
For fiberglass, a carbide-grit or diamond-grit hole saw is your best bet. These specialized saws are designed to cut through abrasive materials like fiberglass, providing clean, smooth holes without chipping or excessive heat. Avoid standard bi-metal or HSS saws, as they will dull quickly and struggle with this tough material.
Working with fiberglass can be tricky. You want to make a clean hole for a vent, a cable, or a fitting, but you’re worried about the material cracking or splintering. It’s a common concern, especially when you’re new to cutting fiberglass. The wrong tool can lead to frustrating rework and a less-than-perfect finish. But don’t worry! Choosing the right hole saw makes all the difference. This guide will walk you through exactly what you need to know to get those perfect holes, every time.
Understanding Fiberglass and Its Cutting Challenges
Fiberglass, or glass-reinforced plastic (GRP), is a composite material made of glass fibers embedded in a plastic resin. This combination makes it strong, lightweight, and resistant to corrosion, which is why it’s used in everything from boat hulls and car bodies to shower stalls and electrical enclosures. However, these same properties present unique challenges when cutting.
The glass fibers are abrasive, meaning they can quickly wear down the teeth of standard cutting tools. The resin binder can also generate heat when cut, which can melt or soften the material, leading to a messy cut and potentially damaging the fiberglass. Furthermore, fiberglass can delaminate or chip if the cutting force isn’t applied correctly or if the wrong type of cutting edge is used. For these reasons, a standard bi-metal or high-speed steel (HSS) hole saw simply won’t cut it. They are designed for softer materials like wood and metal, and will quickly become dull, overheat, and produce a poor-quality cut on fiberglass.
The Best Hole Saw Types for Cutting Fiberglass
When it comes to cutting fiberglass, you need specialized hole saws that can handle its abrasive and composite nature. The two primary types that excel in this material are carbide-grit and diamond-grit hole saws.
Carbide-Grit Hole Saws
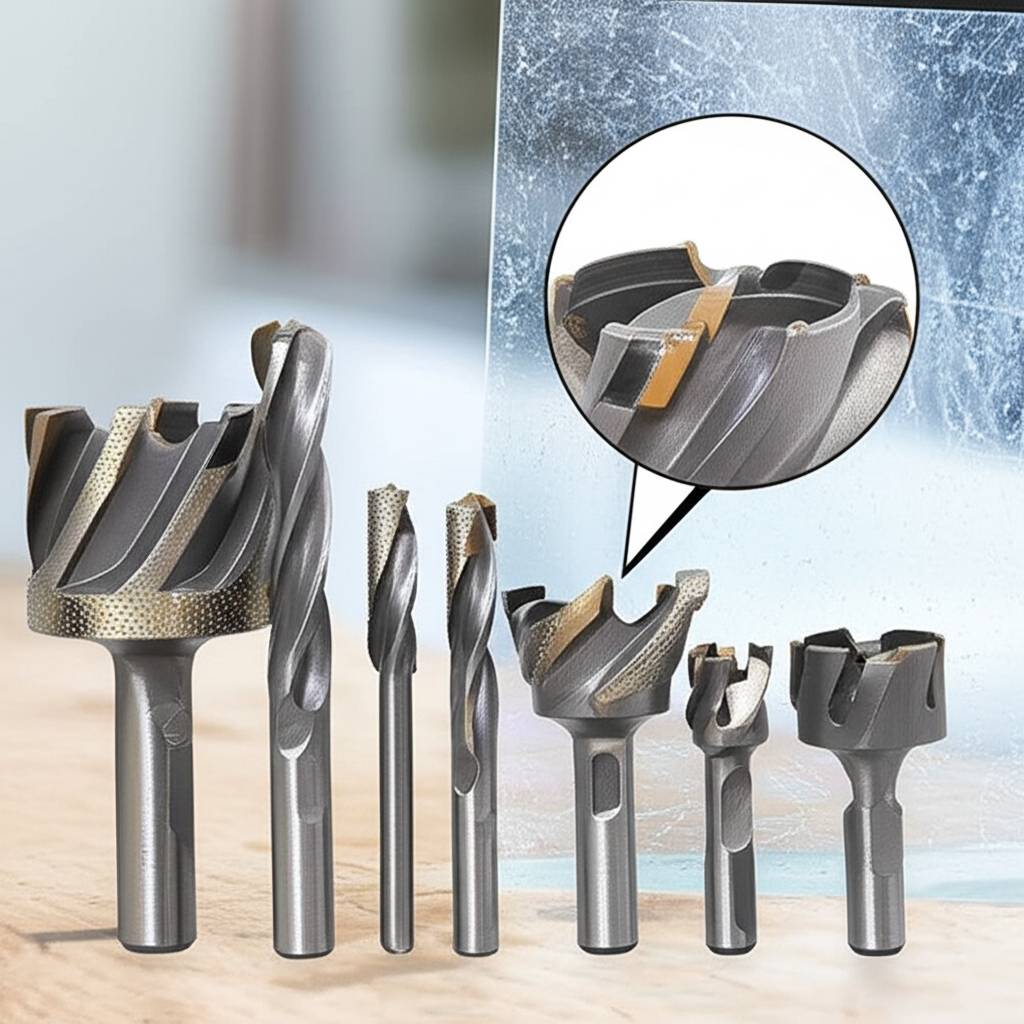
Carbide-grit hole saws are coated with small, extremely hard tungsten carbide particles. These particles act like microscopic chisels, grinding away the fiberglass rather than cutting it with traditional teeth. This grinding action is ideal for abrasive materials.
- Pros:
- Excellent for cutting hard, non-metallic materials like fiberglass, tile, ceramic, and stone.
- Produces a relatively clean cut with minimal chipping when used correctly.
- More affordable than diamond-grit options.
- Good durability for its intended purpose.
- Cons:
- Can generate more heat than diamond-grit saws, requiring cooling.
- The grit coating can wear down over time, especially with heavy use.
- May not be as effective on very thick or dense fiberglass composites.
Carbide-grit hole saws are a fantastic choice for DIYers and professionals who need to cut holes in fiberglass for plumbing, electrical installations, or repairs. They offer a good balance of performance and cost for most fiberglass cutting tasks.
Diamond-Grit Hole Saws
Diamond-grit hole saws have diamond particles electroplated or bonded to the cutting edge. Diamonds are the hardest known natural substance, making them exceptionally effective at grinding through extremely hard and abrasive materials.
- Pros:
- The ultimate choice for cutting the hardest and most abrasive materials, including thick fiberglass, porcelain, glass, and even some concrete.
- Produces very clean, smooth cuts with minimal chipping or material damage.
- Generates less heat compared to carbide-grit saws, reducing the risk of material damage.
- Excellent longevity and durability.
- Cons:
- Generally more expensive than carbide-grit hole saws.
- Can be slower cutting than specialized toothed saws in softer materials.
- Require a constant supply of water or coolant to prevent overheating and extend the life of the diamond coating.
If you’re working with very thick fiberglass, or if you need the absolute cleanest cut with minimal risk of damage, diamond-grit hole saws are the superior option. The need for water cooling is a key consideration, often requiring a continuous flow or periodic wetting of the cutting area.
Hole Saw Construction and Tooth Design
While carbide-grit and diamond-grit saws don’t have traditional “teeth” in the same way as bi-metal saws, understanding their cutting edge is crucial. For fiberglass, the key is the abrasive nature of the cutting surface.
Grit vs. Teeth
Standard hole saws, like those made from bi-metal, feature sharp, hardened teeth that shear through materials. This works well for wood and metal. However, fiberglass is not a material that can be effectively “sheared.” It’s more like cutting through a very tough, abrasive sandpaper.
- Carbide-Grit: The cutting surface is a continuous rim or band coated with tiny, hard carbide particles. These particles grind and wear away the fiberglass.
- Diamond-Grit: Similar to carbide-grit, but the abrasive particles are diamonds. This provides an even harder and more durable grinding surface.
For fiberglass, the abrasive action of grit is what you need. The density and coarseness of the grit can vary, with finer grits generally producing smoother finishes and coarser grits cutting faster but potentially leaving a rougher edge.
Choosing the Right Size and Arbor
Selecting the correct size and ensuring compatibility with your drill are fundamental steps for any hole saw project.
Hole Saw Diameter
The diameter you need depends entirely on the size of the hole you want to create. Common applications for fiberglass include:
- Ventilation: Installing air vents or exhaust fans might require diameters from 3 inches up to 6 inches or more.
- Plumbing/Electrical: Running pipes or conduit often calls for smaller holes, perhaps 1 inch to 2 inches.
- Access Panels: Larger openings might be needed for access panels or hatches.
Always measure the component you intend to fit through the hole to ensure you select the correct diameter. It’s often better to start slightly smaller and enlarge the hole if necessary, rather than making it too big.
Arbor Compatibility
The arbor is the shank that attaches the hole saw to your drill. Most hole saws use a standard threaded arbor, often with a pilot drill bit in the center to guide the cut.
- Shank Type: Most common are round shanks or hex shanks. Hex shanks offer better grip in the drill chuck and prevent slippage, which is crucial when cutting tough materials like fiberglass.
- Pilot Drill Bit: The pilot bit helps center the hole saw and prevents it from wandering when you start the cut. For fiberglass, ensure the pilot bit is sharp and suitable for the material you’re drilling into if it’s not just the fiberglass itself.
- Interchangeability: Many hole saw kits come with a universal arbor that can accept various hole saw sizes. Check that the arbor threads match the hole saw you purchase.
A common issue for beginners is using an arbor that doesn’t fit their drill chuck securely. Always ensure the arbor’s shank is properly gripped by your drill’s chuck.
Essential Tools and Safety Gear
Before you even think about cutting, gather the necessary tools and safety equipment. This ensures a smooth process and protects you from potential hazards.
Tools You’ll Need:
- Cordless or Corded Drill: A powerful drill with adjustable speed and a clutch is recommended. Variable speed control is key for managing heat and cut speed. For fiberglass, a drill with at least 500 RPM is generally suitable, but lower speeds are often better for control.
- Hole Saw(s): Your chosen carbide-grit or diamond-grit hole saw in the correct diameter.
- Arbor: With a suitable pilot drill bit, compatible with your hole saw and drill.
- Water Source/Coolant: For diamond-grit saws, a spray bottle filled with water, a hose with a gentle flow, or a dedicated coolant can is essential. For carbide-grit, water can still help manage heat.
- Measuring Tape and Marker: For accurately marking your cut line.
- Clamps: To secure the fiberglass piece if it’s not already fixed.
- Shop Vacuum: To clean up dust and debris.
Safety Gear:
Working with fiberglass creates fine dust particles that can be harmful if inhaled or irritating to the skin and eyes.
- Safety Glasses or Goggles: Absolutely essential to protect your eyes from flying debris.
- Dust Mask or Respirator: A high-quality N95 or P100 respirator is highly recommended to prevent inhalation of fiberglass dust.
- Gloves: Wear sturdy work gloves to protect your hands from sharp edges and fiberglass splinters.
- Long Sleeves and Pants: To minimize skin exposure to irritating fiberglass dust.
Never skip safety gear. It’s the most important part of any DIY project.
Step-by-Step Guide to Cutting Fiberglass with a Hole Saw
Now that you have your tools and safety gear ready, let’s get cutting. Follow these steps for a clean and efficient cut.
Step 1: Prepare Your Workspace and Fiberglass
- Mark Your Hole: Using a measuring tape and marker, accurately mark the center point of the desired hole on the fiberglass surface.
- Secure the Material: If the fiberglass piece is not firmly attached, clamp it securely to a workbench or stable surface. This prevents movement during cutting, which is crucial for safety and accuracy.
- Coolant Ready (if applicable): If using a diamond-grit hole saw, have your water source or coolant ready. For carbide-grit, have water nearby to cool the saw if it starts to overheat.
Step 2: Set Up Your Drill and Hole Saw
- Attach Hole Saw to Arbor: Screw the hole saw onto the arbor. Ensure it’s tightened securely.
- Insert Arbor into Drill: Place the arbor’s shank into your drill’s chuck. Tighten the chuck firmly to prevent slippage. Ensure the pilot drill bit is properly seated.
- Set Drill Settings:
- Speed: Set your drill to a low to medium speed. High speeds generate excessive heat and can damage the fiberglass and the hole saw.
- Clutch: Engage the drill’s clutch if available. Set it to a lower torque setting to prevent the drill from binding and to protect the fiberglass from excessive force.
- Drilling Mode: Ensure the drill is set to the “drill” mode, not “hammer” or “impact” mode.
Step 3: Begin the Cut
- Position the Hole Saw: Place the pilot drill bit precisely on the marked center point.
- Start Drilling Slowly: Begin drilling at a very slow speed. Apply steady, light pressure. Let the hole saw do the work.
- Apply Coolant (if using diamond-grit): As soon as you start cutting, begin applying water or coolant to the cutting area. Keep the area wet throughout the process. For carbide-grit, a light mist can help manage heat.
- Maintain Steady Pressure: Continue to apply consistent, light to moderate pressure. Avoid forcing the drill. If you encounter significant resistance, back off slightly, let the saw cut, and then reapply pressure.
Step 4: Completing the Cut
- Listen to Your Drill: If the drill starts to bog down or overheat, stop immediately. Let the saw cool down, and reapply coolant if necessary.
- Clear Debris: Periodically, you may need to pull the drill back slightly to clear dust and debris from the cut kerf. This helps prevent binding and overheating.
- Push Through: As you near the end of the cut, reduce pressure slightly to prevent the center plug from breaking off forcefully and potentially damaging the surrounding fiberglass.
- Finish the Hole: Once the pilot bit has fully passed through the material, continue to run the drill for a moment to ensure the cut is clean.
Step 5: Clean Up and Inspect
- Remove the Hole Saw: Carefully withdraw the drill and hole saw from the opening.
- Remove the Plug: The fiberglass plug should be in the hole saw. Eject it carefully.
- Clean the Area: Use a shop vacuum and a brush to clean up all dust and debris from the work area and the cut hole.
- Inspect the Cut: Examine the edges of the hole for any roughness or chipping. Minor imperfections can often be smoothed with fine-grit sandpaper or a deburring tool.
Troubleshooting Common Fiberglass Cutting Issues
Even with the right tools, you might encounter a few snags. Here’s how to deal with them:
1. Excessive Heat or Melting
- Cause: Drilling too fast, applying too much pressure, or not using enough coolant (especially with diamond-grit).
- Solution: Slow down your drill speed. Reduce the pressure. Ensure you are using adequate coolant for diamond-grit saws and consider a light mist of water for carbide-grit saws.
2. Chipping or Delamination
- Cause: Forcing the cut, dull cutting edges, or drilling too fast. The pilot bit can also cause chipping if it’s dull or if the drill is set to hammer mode.
- Solution: Use a steady, lighter pressure. Ensure your hole saw has a good abrasive surface. Slow down the drill speed. Make sure the pilot bit is sharp and the drill is not in hammer mode.
3. Hole Saw Binding or Stalling
- Cause: The kerf (the width of the cut) is packed with debris, or the material is unusually dense.
- Solution: Periodically pull the hole saw back slightly during the cut to clear debris. Reduce pressure and ensure the drill’s clutch is set appropriately.
4. Inaccurate Hole Placement
Cause: The pilot bit slipped, or the material moved during the cut.
Solution: Ensure the fiberglass is securely clamped. Start the cut at a very slow speed to allow the pilot bit to bite properly. For very smooth surfaces, you can lightly score the marked spot with a utility knife to give the pilot bit a starting point.
Maintaining Your Hole Saws for Longevity
Proper care will extend the life of your specialized hole saws and ensure consistent performance.
- Cleaning: After each use, clean the hole saw and arbor thoroughly. Remove any fiberglass dust or debris. A stiff brush and compressed air are useful for this.
- Cooling: For diamond-grit saws, always use water. For carbide-grit, using water to cool the saw can significantly extend its life, even if not strictly required.
- Inspection: Regularly inspect the abrasive coating. If it appears worn down or if cuts become significantly slower and rougher, it might be time to replace the hole saw.
- Storage: Store your hole saws in a dry place, ideally in their original case or a dedicated tool organizer, to prevent damage and corrosion.
While carbide-grit and diamond-grit hole saws are more durable than standard ones, they are still consumables. Treat them with care, and they’ll serve you well.
Fiberglass Hole Saw Comparison Table
Here’s a quick reference to help you decide between the two best options for fiberglass:
| Feature | Carbide-Grit Hole Saw | Diamond-Grit Hole Saw |
|---|---|---|
| Abrasive Material | Tungsten Carbide Particles | Diamond Particles |
| Best For | General fiberglass cutting, tile, ceramic, stone | Very hard/abrasive fiberglass, porcelain, glass, tile, concrete |
| Cut Quality | Good to Very Good | Excellent (smoothest) |
| Heat Generation | Moderate | Low | Recommended (water mist) | Essential (water flow) |
| Durability/Longevity | Good | Excellent |
| Cost | Moderate | Higher |
For most common DIY fiberglass projects, a carbide-grit hole saw will be sufficient and offer great value. If you’re tackling a critical job where absolute precision and minimal risk of damage are paramount, or if you’re working with very thick or dense fiberglass, the investment in a diamond-grit saw is well worth it.
Frequently Asked Questions (FAQ)
Q1: Can I use a regular bi-metal hole saw on fiberglass?
A1: It’s strongly discouraged. Bi-metal hole saws have sharp teeth designed for wood and metal. They will dull very quickly on fiberglass, overheat, and produce a rough, chipped cut. You’ll likely damage both the hole saw and the fiberglass.
Q2: Do I need a special drill for cutting fiberglass?
A2: Not necessarily a “special” drill, but you need a drill with variable speed control and a clutch. A powerful cordless drill or a corded drill with good torque is ideal. Avoid using a hammer drill function, as this can chip the material.
Q3: How do I keep the dust down when cutting fiberglass?
A3: Always wear a respirator. Using a shop vacuum with a brush attachment held near the cutting point can help capture a lot of the dust as it’s generated. For diamond-grit saws, the water coolant also suppresses dust.
Q4: How long will a carbide-grit hole saw last on fiberglass?
A4: The lifespan varies greatly depending on the thickness and type of fiberglass, how often you use it, and whether you use coolant. For occasional DIY use, a good carbide-grit saw can last for many projects. For professional use, expect to replace them periodically.
Q5: What’s the best way to clean up fiberglass dust after cutting?
A5: The best method is to use a HEPA-filter equipped shop vacuum. Wipe down surfaces with a damp cloth afterwards to catch any remaining fine particles. Avoid dry sweeping, as this can re-suspend the dust in the air.
Q6: Can I use a jigsaw with a specialized blade for fiberglass?
A6: Yes, jigsaws with carbide-grit or diamond-grit blades are also effective for cutting fiberglass, especially for curves or non-circular shapes. For clean, round holes, a hole saw is generally more precise and easier to control.
Conclusion
Cutting fiberglass doesn’t have to be a daunting task. By understanding the material’s properties and choosing the right tool, you can achieve professional-looking results. For fiberglass, your go-to options are carbide-grit or diamond-grit hole saws. Remember to prioritize safety by wearing appropriate personal protective equipment and to use a drill with variable speed and a clutch. With steady pressure, proper cooling (especially for diamond-grit), and a little patience, you’ll be cutting clean, precise holes in fiberglass like a seasoned pro. Happy cutting!