
For tile, you need a specialized hole saw designed for hard, brittle materials. Diamond-grit or carbide-tipped hole saws are your best bet. Avoid standard bi-metal saws, as they will dull and chip the tile. Using the correct saw ensures clean cuts and prevents frustration.
Cutting holes in tile can seem daunting, especially for your first time. You might have a beautiful ceramic or porcelain tile, and you need to make a neat opening for a pipe, faucet, or electrical box. The thought of cracking or chipping that perfect surface can be enough to make anyone hesitate. But don’t worry! Choosing the right tool makes all the difference. With a little guidance, you can achieve professional-looking results, even if you’ve never used a hole saw before. This guide will walk you through everything you need to know to select and use the best hole saw for your tile project.
Why Tile Requires Special Hole Saws
Tile is a tough material. Unlike wood or softer metals, ceramic and porcelain tiles are fired at high temperatures, making them very hard and brittle. Standard hole saws, often made from bi-metal or high-speed steel (HSS), are designed for softer materials. Their teeth can quickly become dull, overheat, and chip away at the tile’s surface, leading to jagged edges and a ruined piece of tile. This is why specific types of hole saws are essential for working with tile.
Think of it like trying to cut glass with a butter knife – it just won’t work effectively. You need a tool with the right cutting edge and a method that grinds away the material rather than simply slicing through it. This is where specialized tile hole saws come in.
Types of Hole Saws for Tile
When you’re shopping for hole saws for tile, you’ll primarily encounter two main types that are suitable for the job. Each has its own strengths and best-use scenarios.
1. Diamond-Grit Hole Saws
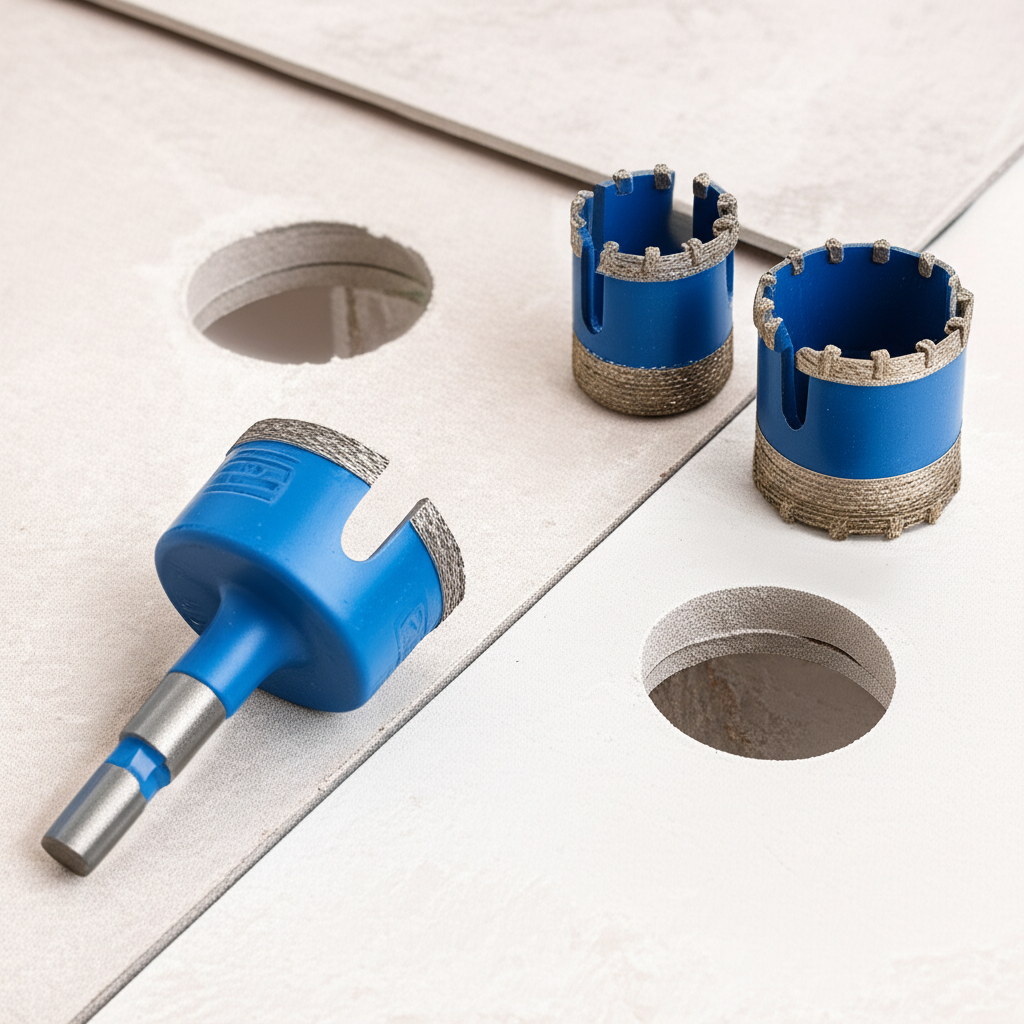
Diamond-grit hole saws are the undisputed champions for cutting hard materials like tile, glass, and stone. They don’t have traditional teeth. Instead, the edge of the saw is coated with industrial-grade diamond particles. These particles act like tiny, incredibly hard grinders, slowly but surely wearing away the tile material.
How They Work:
- Grinding Action: The diamond grit grinds through the tile, rather than cutting in a traditional sense.
- Cooling is Key: Because they grind, they generate heat. Water is crucial to keep the saw and the tile cool, preventing damage and extending the life of the diamond coating.
- Slow and Steady: They work best at slower drill speeds and require a steady, consistent pressure.
Pros:
- Excellent for very hard materials like porcelain, granite, and tempered glass.
- Produce very clean, smooth cuts with minimal chipping.
- Longer lifespan when used correctly with water.
Cons:
- Can be slower than other types of hole saws.
- Require a constant supply of water for cooling, which can be messy.
- May require a pilot bit for starting accuracy.
Best For:
- Porcelain tile
- Ceramic tile
- Natural stone
- Glass
- Encountering stubborn or very dense tiles.
2. Carbide-Tipped Hole Saws
Carbide-tipped hole saws feature cutting edges that are tipped with tungsten carbide. Tungsten carbide is an extremely hard composite material, second only to diamond in hardness. These saws have teeth, similar to bi-metal saws, but the carbide tips allow them to tackle much harder materials.
How They Work:
- Hardened Teeth: The carbide tips provide a very durable cutting edge.
- Cutting Action: They cut by shearing through the material.
- Cooling Recommended: While not as critical as with diamond saws, using water or a cutting fluid can still help prolong the life of the carbide tips and reduce heat buildup.
Pros:
- Good for ceramic tile and softer natural stones.
- Faster cutting than diamond-grit saws in many applications.
- Less messy than diamond saws as water is often optional.
- Generally more affordable than diamond-grit saws.
Cons:
- May not be suitable for the hardest porcelain or tempered glass.
- Can produce more chipping than diamond saws, especially on very brittle materials.
- The carbide tips can chip or break if subjected to excessive force or impact.
Best For:
- Ceramic tile
- Some softer natural stones
- Occasional tile cutting where speed is a factor.
What to Avoid: Bi-Metal and HSS Hole Saws
It’s important to understand why standard bi-metal or High-Speed Steel (HSS) hole saws are generally not recommended for tile:
- Bi-Metal Hole Saws: These are excellent for wood, plastic, and mild metals. Their teeth are designed to cut through these materials efficiently. However, when used on tile, the teeth will quickly become dull, overheat, and likely cause significant chipping or cracking.
- HSS Hole Saws: Similar to bi-metal, HSS saws are designed for softer metals and wood. They lack the hardness and the grinding action needed to cut through tile without damage.
While some very soft, unglazed ceramic tiles might be cut with a high-quality carbide-tipped saw if you go extremely slowly and use water, it’s a risky approach. For consistent, clean results, stick to diamond-grit or appropriate carbide-tipped saws.
Choosing the Right Size
The size of the hole saw you need depends entirely on the project. Measure the diameter of the pipe, conduit, or fixture you need to accommodate. Hole saws are typically measured by their cutting diameter. Common sizes range from 1/2 inch up to 4 inches or more.
Tip: When in doubt, it’s often better to choose a hole saw that is slightly larger than the exact measurement. A snug fit can be achieved with grout or caulk, but a hole that’s too small means you’ll have to start all over.
Essential Tools and Preparation
Before you start cutting, ensure you have everything you need. This will make the process smoother and safer.
Tools You’ll Need:
- The Correct Hole Saw: Diamond-grit or carbide-tipped, in the size you need.
- Power Drill: A variable-speed drill is highly recommended. Cordless drills are convenient, but ensure they have enough power and torque. A drill with a cord often provides more consistent power.
- Arbor/Mandrel: This is the shank that attaches the hole saw to your drill. Ensure it’s compatible with your hole saw size. Many larger hole saws come with their own arbors, or you might need an adapter.
- Water Source: For diamond-grit saws, a spray bottle filled with water, a sponge, or a steady trickle of water from a hose (if working outdoors) is essential for cooling.
- Safety Glasses: Non-negotiable. Tile dust and fragments can be hazardous to your eyes.
- Work Gloves: To protect your hands.
- Dust Mask: Especially important when drilling dry, as tile dust can be harmful to inhale.
- Painter’s Tape or Masking Tape: To help prevent the drill bit from wandering at the start of the cut.
- Optional: Pilot Drill Bit: Some arbors include a pilot bit to guide the hole saw. If yours doesn’t, a small masonry bit can help start the cut accurately.
- Optional: Wet Saw or Tile Saw: For very large or complex cuts, a dedicated wet saw might be a better option, but for single holes, a hole saw is usually more practical.
Preparing the Tile and Workspace:
- Secure the Tile: If the tile is already installed, ensure it’s stable. If you’re cutting a loose tile, place it on a sturdy, flat surface. A piece of scrap wood underneath can provide support and prevent damage to your workbench.
- Mark Your Spot: Use a pencil or marker to clearly indicate the center of the hole you need to cut.
- Apply Tape: For a cleaner start and to prevent the drill from “walking” across the surface, apply a few layers of painter’s tape or masking tape over the marked spot.
Step-by-Step Guide to Cutting Tile with a Hole Saw
Follow these steps carefully for the best results. Patience is key!
Step 1: Attach the Hole Saw to the Arbor
Ensure the hole saw is securely fastened to the arbor. Most arbors have a threaded end that screws into the back of the hole saw. Tighten it firmly.
Step 2: Set Up Your Drill
Insert the arbor into your drill chuck and tighten it securely. Set your drill to a low speed and low torque setting. If your drill has a hammer function, make sure it is turned off. For diamond-grit saws, you’ll want to have your water source ready.
Step 3: Start the Cut (The Crucial Part!)
This is where many beginners run into trouble. The goal is to start the cut without the saw slipping or the tile cracking.
- For Diamond-Grit Saws:
- Begin by holding the drill at a slight angle (around 45 degrees) against the tile.
- Let the diamond grit catch the surface and start grinding a small groove.
- Once a shallow groove is established, slowly begin to bring the drill upright until it’s perpendicular to the tile surface.
- Introduce your water source. Keep the area wet throughout the cutting process. A spray bottle is good for initial wetting, but a steady trickle or sponge application is better for continuous cooling.
- For Carbide-Tipped Saws:
- Start with the drill at a slight angle, similar to the diamond saw, to create an initial groove.
- Gently bring the drill to a perpendicular position.
- Apply steady, even pressure.
- Consider using a bit of water or cutting fluid, especially if you notice excessive heat or dust.
Step 4: Cut Through the Tile
Maintain a consistent, moderate pressure. Let the hole saw do the work. Don’t force it. If you’re using a diamond-grit saw, ensure the water supply remains consistent to keep the cutting area cool. You’ll see a slurry of water and tile dust forming.
Listen to your drill. If it sounds like it’s struggling or overheating, back off the pressure slightly. For diamond saws, you might need to periodically lift the saw slightly to allow water to flush out debris and cool the cutting edge.
Continue cutting until the hole saw breaks through the other side of the tile.
Step 5: Finish the Hole
Once the pilot bit or the cutting edge of the hole saw has passed through the tile, you can often ease up on the pressure. Carefully guide the saw until the hole is fully formed. If you’re cutting a loose tile, try to support the piece that’s about to break free to prevent it from snapping off prematurely and damaging the edge.
Step 6: Clean Up
Turn off your drill and carefully remove it from the hole. Clean the hole saw, arbor, and the surrounding area. If you used water, rinse the tile thoroughly to remove any remaining slurry.
Tips for Success and Troubleshooting
Even with the right tools, a few extra tips can make your tile cutting experience much more successful.
Key Tips:
- Patience is a Virtue: Rushing the process is the quickest way to chip or crack your tile.
- Low Speed, High Torque: This provides control and power without overheating.
- Keep it Cool: Water is your best friend for diamond-grit saws. It lubricates, cools, and flushes debris.
- Steady Pressure: Avoid jerky movements or excessive force.
- Pilot Bit Accuracy: Use a pilot bit or a carefully started groove to ensure the hole is precisely where you want it.
- Work with the Tile: If cutting a loose tile, support the material around the hole as you break through.
Common Problems and Solutions:
- Drill Bit Wandering: Apply painter’s tape over the marked spot before starting. Start at an angle.
- Chipping or Cracking:
- Ensure you’re using the correct type of hole saw (diamond-grit or carbide-tipped).
- Slow down your drill speed.
- Apply less pressure.
- For diamond saws, ensure adequate water cooling.
- Check if the tile is properly supported.
- Overheating Drill or Saw:
- Slow down your drill speed.
- Reduce pressure.
- Ensure sufficient water for diamond saws.
- Take breaks to let the tools cool down.
- Dull Hole Saw: If cutting is becoming very slow and difficult, the hole saw may be dull. For diamond saws, sometimes a brief “sharpening” by drilling into a piece of abrasive material like a brick can help reactivate the grit. For carbide, it might be time for a replacement.
Hole Saw Maintenance for Longevity
Taking care of your hole saws will ensure they perform well for many projects to come.
- Clean After Each Use: Remove any dust, debris, or slurry. For diamond saws, rinse thoroughly with water.
- Dry Properly: After cleaning, dry the hole saws completely to prevent rust, especially on the arbor.
- Inspect for Damage: Check diamond coatings for excessive wear or missing grit. Inspect carbide tips for chips or cracks.
- Store Safely: Keep hole saws in a dry place, ideally in their original packaging or a dedicated tool case, to protect the cutting edges.
- Lubricate Arbor Threads: A light coating of oil on the arbor threads can prevent seizing and make attachments easier.
Proper maintenance ensures your investment lasts and continues to deliver clean, precise cuts.
When to Consider a Different Tool
While hole saws are fantastic for many tile cutting tasks, they aren’t always the best solution for every situation.
- Large Diameter Holes: For very large holes (e.g., over 4 inches), a large circular hole saw can be unwieldy and difficult to control, increasing the risk of error. A tile saw with a circle cutter attachment might be more suitable.
- Very Thick or Hard Porcelain: Some extremely dense porcelain tiles can be challenging even for diamond hole saws. A dedicated wet tile saw with a diamond blade might offer a cleaner, faster solution.
- Edge or Corner Cuts: Hole saws are for round holes. For straight cuts, notches, or angled cuts, you’ll need a tile cutter, wet saw, or angle grinder with a diamond blade.
- Multiple Cuts: If you have many holes to drill, especially in a professional setting, investing in a drill press with a hole saw attachment or a specialized tile cutting machine can significantly improve efficiency and accuracy.
For most DIY projects involving standard plumbing or electrical pass-throughs in ceramic or porcelain tile, the right hole saw is an excellent choice.
Frequently Asked Questions (FAQ)
Q1: Can I use a regular drill for tile with a hole saw?
A1: Yes, but it’s highly recommended to use a variable-speed drill. A drill with good torque and the ability to run at low speeds is crucial for controlling the cut and preventing damage to the tile and the hole saw. Avoid using the hammer function.
Q2: How do I prevent my diamond hole saw from overheating?
A2: The key is water. Ensure the cutting area is constantly lubricated and cooled with water. Periodically lift the drill slightly to allow water to flush out the debris and cool the diamond grit. Don’t force the saw; let its grinding action work.
Q3: My carbide-tipped hole saw is chipping the tile. What should I do?
A3: First, ensure you are using a low drill speed and steady, light pressure. If you’re still experiencing chipping, consider switching to a diamond-grit hole saw, which is generally better for preventing chipping on brittle materials. Make sure the tile is well-supported.
Q4: How long does a diamond-grit hole saw last?
A4: The lifespan of a diamond-grit hole saw depends heavily on the material being cut, the user’s technique, and proper maintenance. For cutting ceramic or porcelain tile, you can expect to get anywhere from a dozen to several dozen holes, depending on the quality of the saw and the tile hardness. Always keep them cool and clean.
Q5: Do I need a special arbor for tile hole saws?
A5: You need an arbor that is compatible with the size of your hole saw. Most arbors are universal for a range of hole saw sizes. Some larger hole saws may come with their own specific arbors. Ensure the pilot bit on the arbor is sharp and centered if you’re using one.
Q6: Can I cut tempered glass with a hole saw?
A6: Cutting tempered glass with a hole saw is extremely difficult and generally not recommended. Tempered glass is designed to shatter into small, blunt pieces when broken, making it very unpredictable when drilled. Specialized diamond-tipped bits and extreme caution are needed, and it’s often best left to professionals or avoided altogether.
Conclusion
Tackling tile projects that require cutting holes doesn’t have to be a source of anxiety. By understanding the unique properties of tile and choosing the right tool – primarily a diamond-grit or carbide-tipped hole saw – you’re already halfway to success. Remember to prioritize safety, prepare your workspace, and work at a steady, controlled pace. Keeping your cutting area cool, especially with diamond saws, and letting the tool do the work are critical steps. With the right approach and a bit of practice, you’ll be confidently creating clean, precise holes in your tile, transforming your DIY projects from daunting tasks into satisfying accomplishments.