
Turn on your air compressor safely and correctly with these simple, proven steps. This guide ensures you power up your unit efficiently, protecting your equipment and getting you ready for your next project in no time.
So, you’ve got a shiny new air compressor, or maybe you’re just getting reacquainted with an older one. That’s fantastic! Air compressors are incredibly useful tools for everything from inflating tires to powering nail guns and even painting. But when it’s time to get it running, you might pause and think, “Okay, how exactly do I turn this thing on?” It’s a common question, and honestly, it can feel a little daunting if you’ve never done it before. Don’t worry, though! It’s much simpler than you might think, and I’m here to walk you through it, step by step. We’ll make sure you do it the right way, the safe way, and the way that keeps your compressor happy for years to come.
Understanding Your Air Compressor: The Basics
Before we dive into the “how-to,” let’s quickly touch on what makes an air compressor tick. At its core, an air compressor is a device that takes ambient air and compresses it into a smaller volume. This compressed air is then stored in a tank and can be released to power pneumatic tools or perform various tasks. Most home and DIY compressors are electrically powered, though some larger industrial units run on gasoline or diesel. For this guide, we’ll focus on the common electric models.
Understanding the main components will make the startup process clearer:
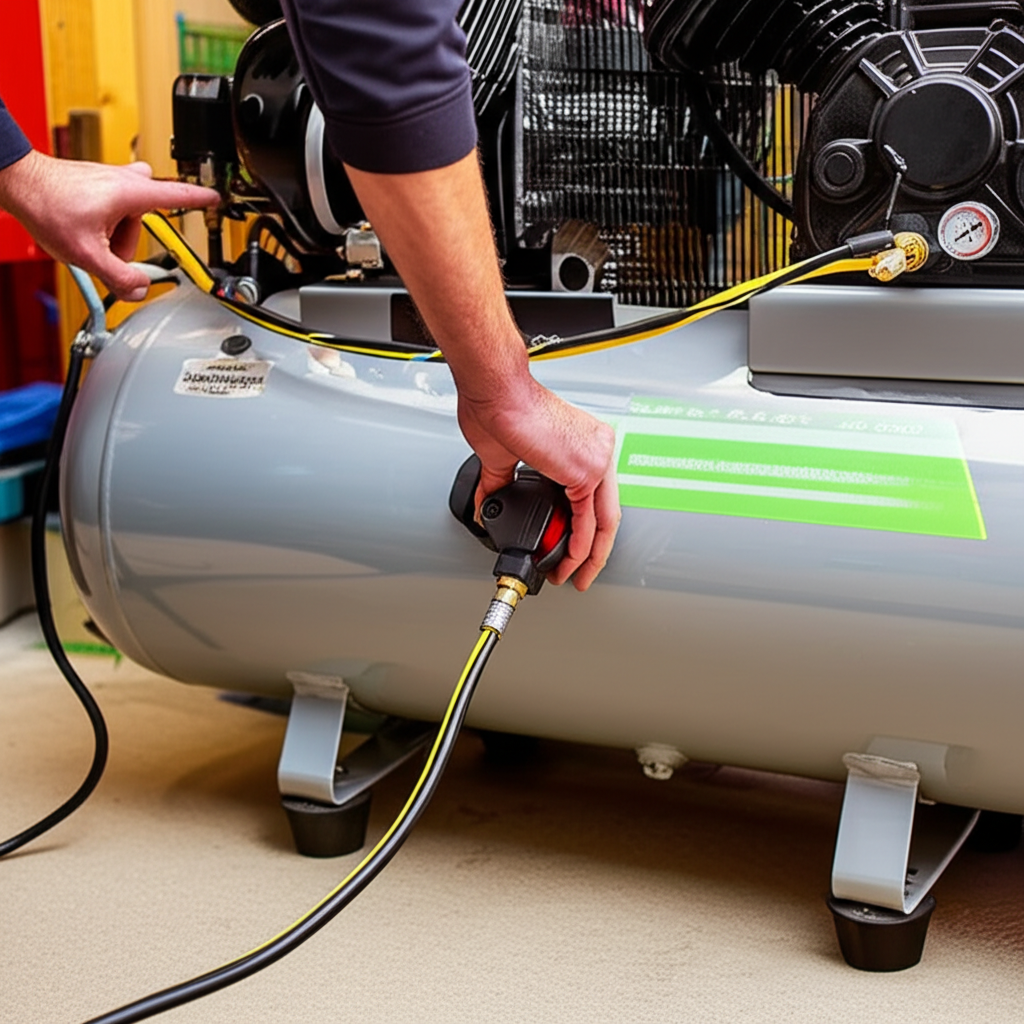
Motor: This is the powerhouse that drives the compressor.
Compressor Pump: The part that actually squeezes the air.
Air Tank: Where the compressed air is stored.
Pressure Switch: This automatically turns the motor on and off to maintain the desired air pressure in the tank.
Pressure Gauge: Shows you how much air pressure is in the tank.
Safety Relief Valve: A crucial safety device that releases excess pressure if something goes wrong.
Drain Valve: Used to release moisture that condenses in the tank.
Essential Safety First!
Safety is paramount when working with any machinery, and air compressors are no exception. Compressed air can be powerful, and there are a few things to keep in mind before you even think about flipping a switch.
Read the Manual: Seriously, this is the best first step. Every compressor is slightly different, and your manufacturer’s manual will have specific instructions and warnings for your model.
Ventilation: Ensure the compressor is in a well-ventilated area. It generates heat, and you don’t want it to overheat.
Power Source: Make sure the electrical outlet and extension cord (if used) are rated for the compressor’s power requirements. Using an underrated cord can lead to motor damage and a fire hazard.
Clearance: Keep the area around the compressor clear of debris, flammable materials, and obstructions.
Eye Protection: Always wear safety glasses. Even when just starting up, there’s a small chance of debris being expelled.
Check the Tank: Ensure the drain valve is closed and the tank is empty of water before starting.
The Proven Way to Turn On Your Air Compressor: Step-by-Step
Now that we’ve covered the safety basics, let’s get to the main event – turning on your air compressor. It’s a straightforward process, and by following these steps, you’ll be using your compressed air in no time.
Step 1: Pre-Startup Checks
Before plugging anything in, take a moment to do a quick visual inspection.
Is the power switch off? Most compressors have a main power switch or button. Ensure it’s in the “off” position.
Is the drain valve closed? Locate the drain valve, usually at the bottom of the tank. It should be turned to the closed position. If it’s open, air will escape, and the compressor won’t build pressure.
Is the air outlet valve open? If your compressor has an outlet valve or regulator, ensure it’s set to a low or open position. This makes it easier for the motor to start.
Check the power cord: Ensure the power cord is in good condition, with no frayed wires or damage.
Step 2: Connect to Power
This is where you’ll connect your compressor to its energy source.
For electric compressors:
Direct Plug-in: If your compressor has a standard plug, plug it directly into a grounded electrical outlet.
Using an Extension Cord: If you need an extension cord, use one that is heavy-duty and rated for the amperage and voltage requirements of your compressor. A common mistake is using an undersized extension cord, which can overheat and damage the motor. The Occupational Safety and Health Administration (OSHA) recommends using appropriate electrical equipment to prevent hazards. Ensure the cord is as short as possible to minimize voltage drop.
Step 3: Engage the Motor
This is the moment of truth!
Locate the ON/OFF Switch: Most compressors have a prominent ON/OFF switch. It might be a toggle switch, a push button, or a dial.
Turn the Switch to ON: Flip the switch to the “ON” position.
Listen and Observe: You should hear the motor start up. The compressor pump will begin to run, and you’ll see the pressure gauge start to climb.
Step 4: Monitor Pressure Build-Up
As the compressor runs, it will start filling the tank with compressed air.
Watch the Pressure Gauge: Keep an eye on the pressure gauge. You’ll see the needle move upwards as the tank fills.
Listen for the Cut-Off: The pressure switch is designed to automatically shut off the motor when the air in the tank reaches a pre-set maximum pressure (often called the “cut-off pressure”). You’ll hear a distinct “click” or a change in the motor’s sound when it stops. This is normal and indicates the compressor has reached its maximum tank pressure.
Step 5: Initial Air Release (Optional but Recommended)
Some people like to release a little bit of air initially to ensure everything is functioning correctly and to slightly reduce the pressure for the first use.
Open the Air Outlet Valve: Slowly open the valve where you would connect your air hose. You should hear air escaping.
Close the Valve: After a few seconds, close the valve again.
Your air compressor is now turned on, has built pressure, and is ready to be used!
What Happens After It Reaches Pressure?
Once the compressor reaches its cut-off pressure, the motor will stop automatically. The compressed air is now stored in the tank, ready for you to use. When you use an air tool, the pressure in the tank will drop. When it falls to a certain point (the “cut-in pressure”), the pressure switch will automatically turn the motor back on to replenish the air. This cycle repeats, maintaining the air pressure in the tank.
Troubleshooting Common Startup Issues
Even with the best intentions, you might encounter a hiccup. Here are a few common problems and how to address them:
Compressor won’t start:
Check Power: Is it plugged in? Is the outlet working? Try plugging in another device to test the outlet.
Check the Switch: Ensure the ON/OFF switch is firmly in the ON position.
Thermal Overload: Many motors have a thermal overload protector that trips if the motor gets too hot. Wait about 15-30 minutes for it to cool down, then try again.
Low Voltage: If using an extension cord, ensure it’s heavy-duty enough. Low voltage can prevent the motor from starting.
Pressure Switch Stuck: In rare cases, the pressure switch might be faulty or stuck.
Compressor runs but doesn’t build pressure:
Drain Valve Open: Double-check that the drain valve is completely closed.
Air Leaks: Listen for hissing sounds around fittings, hoses, or the tank itself.
Faulty Check Valve: There’s a check valve that prevents air from flowing back from the tank to the pump. If this fails, you won’t build pressure. This usually requires professional attention.
Compressor short-cycles (starts and stops frequently):
Air Leak: This is the most common cause. Check all connections, hoses, and fittings for leaks.
Regulator Set Too Low: If your regulator is set very low, the compressor might be topping off the tank and shutting off too quickly.
Understanding Pressure Settings and Regulators
Most air compressors come with a regulator. This handy knob allows you to control the air pressure delivered to your tools. Different tools require different pressures. For example, a tire inflator might need 30-40 PSI, while a framing nailer might need 90-100 PSI.
Setting the Regulator:
1. Ensure the compressor tank has sufficient pressure.
2. Connect your air hose and tool.
3. Slowly turn the regulator knob. Turning it clockwise increases pressure; counter-clockwise decreases it.
4. Use the regulator’s gauge to set the desired PSI for your tool. Always refer to your tool’s manual for the correct operating pressure. A good resource for understanding air tool requirements is Family Handyman’s guide to air compressor PSI.
Air Compressor Types and Startup Differences
While the basic principle of turning on an electric air compressor is similar, there can be slight variations depending on the type:
1. Pancake/Single-Stage Compressors
These are typically small, portable units often used for inflation, brad nailing, and light DIY tasks. Their startup is usually as described above: plug in, switch on. They often have a simpler design with fewer controls.
2. Twin-Stack/Portable Two-Stage Compressors
These are a bit more robust, often found in garages and workshops. They might have slightly larger motors and tanks. The startup process is identical to single-stage units.
3. Stationary/Workshop Compressors
These are larger, more powerful units permanently installed in workshops. They often have higher horsepower motors and larger tanks. They might have more complex electrical hookups (sometimes requiring professional installation) and may include features like automatic drain valves or belt guards. However, the fundamental process of engaging the motor and letting it build pressure remains the same.
4. Oil-Lubricated vs. Oil-Free Compressors
Oil-Lubricated: These require periodic oil checks and changes. They tend to be quieter and last longer. Startup is the same.
Oil-Free: These are generally lighter and require less maintenance (no oil changes). They can sometimes be louder and might have a shorter lifespan than well-maintained oil-lubricated units. Startup is the same.
Maintaining Your Compressor for Smooth Starts
Regular maintenance ensures your compressor starts reliably every time.
Drain the Tank Regularly: Moisture is the enemy! After each use, or at least weekly, open the drain valve to release condensed water. This prevents rust and corrosion inside the tank.
Check and Change Air Filters: A clogged air filter restricts airflow, making the compressor work harder and potentially overheat. Refer to your manual for filter type and replacement intervals.
Inspect Hoses and Fittings: Look for cracks, wear, or leaks in hoses and connections.
* Check Oil Level (for oil-lubricated models): Ensure the oil level is between the minimum and maximum marks on the sight glass. Change the oil according to the manufacturer’s recommendations.
Frequently Asked Questions About Turning On Air Compressors
Q1: Do I need to let my air compressor warm up?
No, most electric air compressors do not require a warm-up period. They are ready to run as soon as they are powered on and have built sufficient pressure in the tank.
Q2: What if my compressor doesn’t shut off automatically?
If your compressor continues to run past its maximum pressure, the pressure switch may be faulty or out of calibration. This is a safety concern. Turn off the compressor immediately and have it inspected by a qualified technician.
Q3: Can I leave my air compressor plugged in all the time?
Yes, you can generally leave your air compressor plugged in, as the pressure switch will automatically shut off the motor when the tank is full. However, it’s good practice to turn off the main power switch if you won’t be using it for an extended period, especially in areas with unstable power.
Q4: Why does my compressor make a loud noise when it starts?
Some noise is normal as the motor and pump engage. However, excessively loud or unusual noises like grinding or banging could indicate a problem with the motor, pump, or a loose component. Check for any loose parts or refer to your manual for troubleshooting.
Q5: What PSI should I set my regulator to?
The PSI you set your regulator to depends entirely on the tool you are using. Always consult the manual for your specific air tool to find its recommended operating pressure. A common range for many DIY tools is 70-100 PSI.
Q6: Is it okay to use a long extension cord?
It’s best to avoid long extension cords if possible, as they can cause voltage drop, leading to motor strain and potential damage. If you must use one, ensure it’s a heavy-duty, outdoor-rated cord with a thick gauge (lower AWG number) that matches or exceeds your compressor’s power requirements.
Conclusion
Turning on an air compressor is a fundamental skill for any DIYer, homeowner, or automotive enthusiast. By following these straightforward steps – from the crucial pre-startup checks to monitoring the pressure build-up – you can confidently power up your unit. Remember, safety is always the first priority. Always read your manual, ensure proper ventilation, and use appropriate electrical connections. With a little care and attention, your air compressor will be a reliable workhorse for countless projects to come. Happy compressing!