
An air compressor regulator controls and stabilizes air pressure from the compressor to your tools. It ensures consistent, safe pressure for optimal tool performance and longevity, preventing damage from over-pressurization. Understanding its function is key to getting the most out of your air tools.
Ever hooked up a new air tool, only to have it sputter, hesitate, or worse, break down after just a few uses? It’s frustrating, right? You spent good money on that tool, and now it’s not performing like it should. Often, the culprit isn’t the tool itself, but the air pressure being delivered to it. Too much pressure can damage delicate internal parts, while too little means your tool won’t have the power it needs to get the job done. This is where a little-known hero comes in: the air compressor regulator. It’s a simple device, but its job is absolutely crucial for anyone using air-powered tools, from inflating tires to running a nail gun. We’ll break down exactly how this genius essential works, so you can stop guessing and start getting the best performance from your equipment.
What is an Air Compressor Regulator and Why Do You Need One?
Think of your air compressor as a powerful engine pumping out air. However, the pressure it generates can fluctuate. It might be high when the tank is full and drop as you use the air, or it might be set too high by default. Most air tools have a specific operating pressure range they perform best in. Exceeding this range can cause premature wear, damage, or even immediate failure. Undershooting it means your tool won’t have enough oomph to work effectively. This is precisely why an air compressor regulator is an indispensable part of your air system. It acts like a gatekeeper, taking the raw, potentially inconsistent air pressure from your compressor tank and delivering a steady, controlled, and safe pressure to your air hose and tools.
Without a regulator, you’re essentially playing a guessing game with your tools. You might get lucky for a while, but eventually, you’ll likely encounter problems. A regulator gives you precise control, ensuring your tools receive the exact air pressure they need to function optimally and last longer. This saves you money on tool repairs and replacements, and it ensures you can complete your projects efficiently and safely.
The Core Components of an Air Compressor Regulator
While they might look simple, air compressor regulators are cleverly designed pieces of equipment. They typically consist of a few key components that work together to manage air pressure:
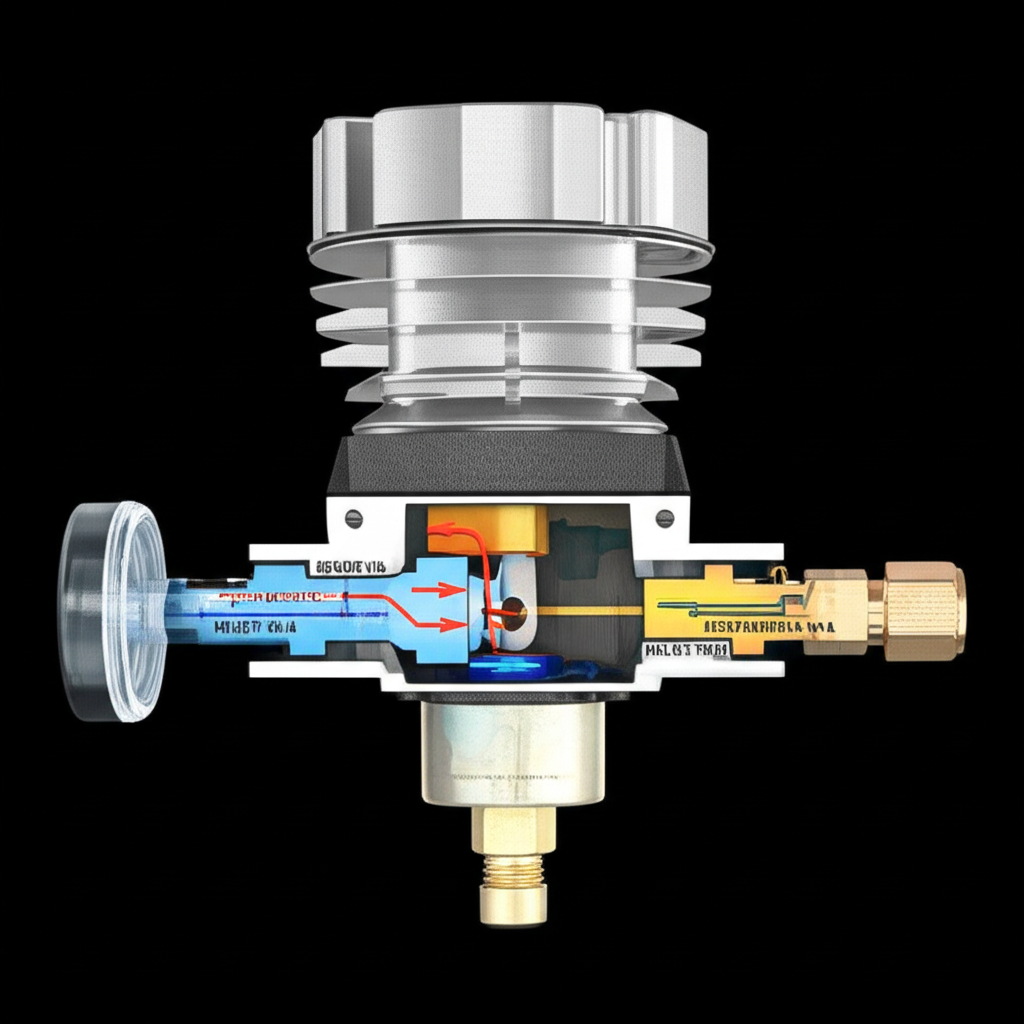
- Inlet Port: This is where the high-pressure air from the compressor tank enters the regulator.
- Outlet Port: This is where the regulated, lower-pressure air exits the regulator to go to your air hose and tools.
- Diaphragm: A flexible, rubberized membrane that is sensitive to pressure changes. It’s the heart of the regulator’s operation.
- Spring: A coiled spring that exerts a downward force on the diaphragm. The tension of this spring is what you adjust to set the desired output pressure.
- Valve Seat and Poppet: A small valve that opens and closes to control the flow of air. The diaphragm pushes on the poppet to open or close this seat.
- Adjustment Knob/Screw: The part you turn to change the spring tension and, therefore, the output pressure.
- Pressure Gauge(s): Most regulators have at least one gauge to show the incoming (tank) pressure and another to show the outgoing (regulated) pressure. This is vital for setting and monitoring.
How an Air Compressor Regulator Works: A Step-by-Step Breakdown
Understanding the mechanics behind the regulator can demystify its function. It’s a clever interplay of forces that results in stable air pressure. Here’s how it all comes together:
- High-Pressure Air Enters: Compressed air from your compressor tank, which can be quite high (e.g., 100-175 PSI or even more), flows into the inlet port of the regulator.
- Spring Pushes Down: Inside the regulator, a spring is pushing down on the diaphragm. The tension of this spring is determined by how much you’ve turned the adjustment knob. A tighter spring means more downward force.
- Diaphragm Responds: The diaphragm sits above the valve seat and poppet. When the spring pushes down, it forces the diaphragm to push the poppet, which opens the valve seat.
- Air Flows to Outlet: With the valve seat open, the high-pressure air from the inlet port is allowed to flow through the valve seat and out the outlet port. This is the air that goes to your tools.
- Pressure Builds at Outlet: As air flows out to your tool, the pressure in the chamber on the outlet side of the regulator begins to build.
- Diaphragm Lifts Up: This outlet pressure acts on the top side of the diaphragm. When the outlet pressure becomes strong enough to overcome the downward force of the spring, it pushes the diaphragm upwards.
- Valve Closes: As the diaphragm lifts, it pulls the poppet away from the valve seat, closing the valve. This stops the flow of high-pressure air from entering the regulator.
- Pressure Stabilizes: The regulator now maintains a steady output pressure. If your tool uses air and the outlet pressure drops, the spring’s force will again push the diaphragm down, opening the valve slightly to let more air in. If the pressure starts to rise too high, the diaphragm will lift again, closing the valve to prevent over-pressurization.
This continuous, subtle balancing act between the spring force and the outlet air pressure is what keeps your tool’s air supply consistent. It’s a feedback loop that’s incredibly effective at maintaining a set pressure.
Setting Your Air Compressor Regulator: A Practical Guide
Knowing how it works is one thing; setting it correctly is another. This is where you translate theory into practice. Getting the pressure right is crucial for both your tools and your safety.
Tools You’ll Need:
- Your air compressor
- Your air tool
- An air hose
- The air compressor regulator (usually attached to the compressor or inline)
- Safety glasses (always!)
Steps to Set Your Regulator:
- Consult Your Tool’s Manual: This is the most important first step. Your air tool’s manufacturer will specify the ideal operating pressure range. For example, a brad nailer might need 70-90 PSI, while a spray gun might need 30-50 PSI.
- Connect Everything: Ensure your air compressor is running and has built up pressure in the tank. Connect the air hose to the compressor’s outlet (or to the regulator if it’s mounted separately) and then connect your air tool to the other end of the hose.
- Locate the Regulator: Most compressors have a regulator with gauges and an adjustment knob attached directly to the compressor’s outlet manifold. Some systems use inline regulators.
- Observe the Gauges: You’ll typically see two gauges: one showing the tank pressure (high) and another showing the regulated output pressure (lower).
- Adjust the Output Pressure:
- To Increase Pressure: Turn the adjustment knob clockwise. This tightens the spring, requiring more outlet pressure to push the diaphragm up and close the valve.
- To Decrease Pressure: Turn the adjustment knob counter-clockwise. This loosens the spring, allowing lower outlet pressure to close the valve.
- Test and Fine-Tune:
- Start with a pressure slightly lower than the recommended minimum.
- Briefly operate your air tool.
- If it’s not performing adequately, slowly increase the pressure using the adjustment knob while the tool is running.
- Watch the output gauge closely.
- Continue increasing until the tool operates smoothly and effectively, but do not exceed the manufacturer’s maximum recommended pressure.
- Secure the Setting: Once you’ve found the sweet spot, some regulators have a locking ring or a mechanism to prevent the knob from accidentally being turned.
Important Note: Always make adjustments with the tool running or with air flowing through the regulator. Adjusting pressure on a static system won’t accurately reflect how it will perform under load.
Understanding Pressure: PSI, SCFM, and CFM
When working with air compressors and tools, you’ll encounter several important measurements. Understanding these will help you select the right tools and set your regulator correctly.
Pressure (PSI)
Pounds per Square Inch (PSI): This is the most common unit of measurement for air pressure. It tells you how much force the air is exerting. As we’ve discussed, your air tools have specific PSI requirements.
Airflow (SCFM and CFM)
While PSI is about pressure, the amount of air delivered is measured in CFM (Cubic Feet per Minute) or SCFM (Standard Cubic Feet per Minute). This is critical because even with the correct PSI, if the compressor can’t deliver enough volume of air, your tool won’t work properly.
- CFM (Cubic Feet per Minute): Measures the volume of air delivered at the compressor’s operating pressure.
- SCFM (Standard Cubic Feet per Minute): Measures the volume of air delivered under specific standard conditions (usually 68°F and 36% relative humidity at sea level). This is a more consistent way to compare air delivery rates between compressors and tools.
How they relate: Your air tool will have a CFM or SCFM requirement. Your air compressor needs to be able to supply at least that much air at the PSI your tool needs. The regulator ensures the PSI is correct, but the compressor’s tank size and pump capacity determine if you have enough CFM/SCFM to keep the tool running continuously.
For example, a framing nailer might require 2-4 CFM at 90 PSI. If your compressor can only deliver 1 CFM at 90 PSI, the nailer will work for a few shots, but then the air pressure will drop, and it will stop firing effectively. A regulator can’t magically create more airflow than the compressor can provide.
Types of Air Compressor Regulators
Regulators come in a few common configurations, each suited for different needs:
1. General Purpose/Fixed Regulators
These are often found directly on the compressor’s outlet. They are designed to reduce the tank pressure to a usable range for most common tools. They usually have one adjustable knob and one gauge for output pressure. Some may also have an inlet gauge.
2. Filter Regulators (FRLs)
These are a fantastic all-in-one solution. An FRL combines a regulator with an air filter and often a water separator. The filter removes dust and debris, while the separator catches moisture. This is ideal for protecting sensitive tools like paint sprayers or air brushes.
Pros:
- Improves air quality, protecting tools.
- Reduces the number of connections in your air line.
- Convenient all-in-one unit.
Cons:
- Can be slightly more expensive than a standalone regulator.
- May add a bit more restriction to the airflow.
3. High-Flow Regulators
Designed for applications that require a larger volume of air, these regulators have larger ports and internal passages to minimize pressure drop, even at high CFM demands. They are essential for running multiple tools or high-demand tools like impact wrenches or sanders.
4. Inline Regulators
These are fitted directly into the air hose, usually near the tool. They are useful if your compressor doesn’t have a built-in regulator or if you need to set different pressures for different tools without readjusting the main compressor regulator. They are often smaller and more portable.
Maintenance and Troubleshooting Tips
Like any piece of equipment, your air compressor regulator can benefit from a little care and attention. Proper maintenance can prevent common issues.
Regular Maintenance:
- Check Gauges: Ensure your pressure gauges are functioning correctly and are easy to read. If a gauge is damaged or inaccurate, it should be replaced.
- Inspect for Leaks: Periodically check all connections for air leaks. Even small leaks can waste air and reduce efficiency. A little soapy water sprayed on connections can reveal leaks by causing bubbles.
- Drain Water Separators: If your regulator has an integrated water separator (often found on FRLs), drain it regularly. Accumulated water can corrode components or freeze in cold weather.
- Clean Filters: If you have a filter regulator, check and clean or replace the filter element as recommended by the manufacturer. A clogged filter restricts airflow.
- Keep it Clean: Wipe down the regulator periodically to remove dust and grime, which can interfere with the adjustment knob or gauges.
Common Troubleshooting Issues:
| Problem | Possible Cause | Solution |
|---|---|---|
| Output pressure won’t reach set point | Internal valve not opening fully. | Check for obstructions or debris in the valve seat. Ensure the adjustment knob is turned fully clockwise. The compressor might not be supplying enough inlet pressure. |
| Output pressure is too high/unstable | Diaphragm damaged or torn. | Inspect the diaphragm for damage. If damaged, the regulator likely needs replacement. Ensure the spring is not damaged or corroded. |
| Regulator leaks air | Loose fittings or seals. | Tighten all connections. Check O-rings or seals for wear or damage and replace if necessary. |
| Gauge is not working | Damaged gauge. | Replace the faulty gauge. |
| Adjustment knob is stiff or won’t turn | Dirt or corrosion in the adjustment mechanism. | Clean the adjustment knob and stem. A light application of a lubricant suitable for pneumatic systems might help, but avoid over-lubrication. |
If you suspect a regulator is faulty, especially if it’s not holding pressure or is leaking significantly, it’s often best to replace it. Regulators are relatively inexpensive compared to the cost of damaged tools or potential safety hazards.
Safety First: Why Proper Pressure Matters
Beyond just tool performance, using your air compressor regulator correctly is a matter of safety. Over-pressurizing air tools can lead to several dangerous situations:
- Tool Malfunction: A tool operating at a pressure far above its design limit can break apart unexpectedly, sending pieces flying.
- Hose Rupture: Air hoses are rated for specific pressures. If the regulator fails or is set too high, a hose could burst, which is a serious hazard.
- Accidental Discharge: For tools like nail guns or staplers, excessive pressure can cause them to discharge nails or staples with much greater force than intended, potentially leading to injury.
- Eye Injuries: Even small leaks or bursts of air can cause debris to be propelled at high speeds, posing a risk to your eyes. Always wear safety glasses!
A properly functioning regulator, set to the correct pressure, is your first line of defense against these risks. It ensures that the compressed air is delivered in a controlled manner, making your DIY projects and professional tasks safer for everyone involved.
FAQs About Air Compressor Regulators
Q1: What is the most common PSI for air tools?
A1: While it varies greatly by tool, many common air tools like nail guns, impact wrenches, and sanders operate effectively in the 70-100 PSI range. However, always check your specific tool’s manual for the exact recommended pressure.
Q2: Can I use my air compressor without a regulator?
A2: You can, but it’s strongly discouraged. The unregulated pressure from the compressor tank can be much higher than your tools are designed for, leading to damage, reduced lifespan, and potential safety hazards. A regulator provides essential control.
Q3: How do I know if my regulator is working correctly?
A3: A working regulator will maintain a steady output pressure, as shown on the output gauge, even as the tool uses air. If the output pressure fluctuates wildly, drops significantly when the tool is used, or won’t adjust to the desired level, it may need servicing or replacement.
Q4: What’s the difference between CFM and PSI?
A4: PSI (Pounds per Square Inch) measures the force or pressure of the air. CFM (Cubic Feet per Minute) measures the volume or amount of air delivered per minute. Both are critical for tool operation; you need the right pressure and enough airflow.
Q5: Do I need a regulator if I only use my compressor for inflating tires?
A5: While tire inflators typically have their own built-in pressure regulation, using a regulator