
Yes, you are generally allowed to drill holes in apartment walls for hanging pictures or shelves, but it’s crucial to understand your lease agreement and follow specific guidelines to avoid penalties or damage. Always check with your landlord or property manager first.
Renting an apartment can sometimes feel like a temporary situation, and making it feel like home often involves hanging your favorite photos or installing a shelf for your books. But then the question pops up: “Are you allowed to drill holes in apartment walls?” It’s a common concern, and the thought of potential damage or lease violations can be daunting. Don’t worry, this guide is here to help you navigate this. We’ll break down what you need to know, from understanding your lease to choosing the right tools, so you can personalize your space confidently and without costly surprises.
Understanding Your Apartment Lease: The Golden Rule
The very first step in drilling holes in your apartment walls is to consult your lease agreement. This document is your contract with your landlord, and it holds the key to what modifications you can and cannot make. Many leases have specific clauses regarding alterations to the property, which includes drilling holes.
Common Lease Clauses and What They Mean
“No alterations or modifications without prior written consent.” This is a very common clause. It means you absolutely must get permission from your landlord before you drill any holes. This permission should ideally be in writing (an email or a signed note) to protect yourself.
“Tenant is responsible for any damage caused to the property.” This is a broad statement that implies you’ll have to pay for repairs if you drill holes and they cause damage, like cracking plaster or hitting a pipe.
“Minor cosmetic changes are permitted.” Some leases are more flexible. If your lease allows “minor cosmetic changes,” a few small nail holes for hanging pictures might be considered acceptable. However, it’s still best to clarify what “minor” means to your landlord.
“All holes must be repaired and the walls repainted to original condition upon move-out.” This is a very landlord-friendly clause. It means you can drill, but you’ll be responsible for patching and painting the holes before you leave.
Why Landlords Have These Rules
Landlords implement these rules for several reasons:
Property Value: Uncontrolled drilling can lead to significant damage, affecting the property’s value and making it harder to rent to future tenants.
Structural Integrity: Drilling in the wrong place could compromise electrical wiring, plumbing, or even the building’s structure.
Aesthetics: Excessive or poorly executed holes can make an apartment look unsightly.
Insurance: Major damage from drilling could potentially affect the landlord’s insurance.
When in Doubt, Always Ask Your Landlord or Property Manager
This cannot be stressed enough. Even if your lease seems vague, or if you think a small nail hole is harmless, always reach out to your landlord or property manager. A quick phone call or email can save you a lot of trouble.
When you contact them, be specific about what you want to do:
“I’d like to hang a few small pictures using nails.”
“I’m interested in installing a small shelf in the living room.”
Be prepared to discuss:
The number and size of holes you plan to make.
The approximate location of the holes.
Your plan for repairing them upon move-out.
Many landlords are reasonable, especially if you show respect for their property and communicate clearly. Some might even have a policy for minor damage or a preferred method for hanging items.
Navigating Different Wall Types in Apartments
Apartment walls aren’t all the same. The material of your wall will dictate how you should drill and what precautions to take.
Drywall
Drywall is the most common wall material in modern apartments. It’s essentially gypsum plaster pressed between two thick sheets of paper.
Pros: Easy to drill into, relatively soft.
Cons: Can be crumbly if over-drilled, susceptible to water damage, and requires specific anchors for heavier items.
Best for: Hanging pictures, mirrors, lightweight shelves.
Plaster and Lath
Older apartments might have plaster and lath walls. These are made of gypsum plaster applied over thin strips of wood (lath).
Pros: Can be more durable than drywall if intact.
Cons: Can be harder to drill into, prone to cracking and crumbling, and can be uneven.
Best for: Similar uses to drywall, but requires more care and potentially different drill bits.
Concrete or Brick
Some apartments, especially in older buildings or basements, might have concrete or brick walls.
Pros: Very strong and durable.
Cons: Extremely difficult to drill into without the right tools, can chip or spall if not drilled correctly.
Best for: Mounting heavy items, but requires specialized drill bits and techniques.
Essential Tools for Drilling in Your Apartment
Having the right tools makes the job easier, safer, and less likely to cause damage.
The Drill
For most apartment drilling tasks, a cordless drill/driver is your best friend.
Cordless Drill/Driver: These are versatile, portable, and easy to control. Look for one with variable speed settings and a torque clutch.
Variable Speed: Allows you to start slow and increase speed as needed, giving you more control.
Torque Clutch: This is crucial! It prevents over-tightening screws and, importantly, can help you avoid stripping screws or damaging the wall material by limiting the drill’s power.
Hammer Drill (for Concrete/Brick): If you encounter concrete or brick walls, a standard drill won’t cut it. You’ll need a hammer drill, which has a hammering action to break through hard materials.
Drill Bits
The type of drill bit you use depends on the wall material and the screw or anchor you’re using.
Twist Drill Bits (HSS – High-Speed Steel): These are standard bits for wood, metal, and plastic. They work well for drywall and plaster if used carefully.
Masonry Drill Bits: These have a carbide tip and are specifically designed for drilling into concrete, brick, and stone. They are essential for harder surfaces.
Screw Driving Bits: If you’re just screwing something in, you’ll need the appropriate screwdriver bit that matches your screws (e.g., Phillips, flathead).
Other Helpful Tools
Level: To ensure your shelves or pictures are straight.
Measuring Tape: For precise placement.
Pencil: To mark drilling spots.
Stud Finder: Essential for drywall. Drilling into a stud provides a much stronger anchor point than drywall alone. You can find electronic stud finders or simpler magnetic ones.
Wall Anchors: These are vital for hanging anything heavier than a picture frame directly into drywall. They distribute the weight and prevent the screw from pulling out. Common types include:
Plastic Expansion Anchors: Good for light to medium loads.
Self-Drilling Anchors (E-Z Ancor): Screw directly into drywall and can hold more weight.
Toggle Bolts: For heavier items, these have wings that open up behind the wall.
Safety Glasses: Always wear them to protect your eyes from dust and debris.
Dust Mask: Especially important when drilling into drywall or plaster to avoid inhaling fine particles.
Drop Cloth or Old Sheet: To catch dust and debris.
Step-by-Step Guide: Drilling Holes Safely and Effectively
Here’s how to drill holes without causing unnecessary damage.
Step 1: Check Your Lease and Get Permission
We’ve covered this, but it’s worth repeating. Your lease is your primary guide. If it’s unclear, ask. Documenting permission is wise.
Step 2: Locate Utilities (Crucial for Safety!)
Before you drill any hole, especially if you’re unsure of the wall’s construction or the location, it’s vital to check for hidden utilities.
Electrical Wires: Electrical wiring is typically run vertically or horizontally from outlets and switches. Avoid drilling directly above, below, or to the sides of these fixtures. An electronic stud finder often has a “deep scan” mode that can detect live electrical wires. The U.S. Consumer Product Safety Commission (CPSC) offers guidelines on avoiding electrical hazards, which can be helpful.
Plumbing Pipes: Water pipes are usually located near bathrooms and kitchens. Drilling into a water pipe can cause severe water damage and costly repairs.
HVAC Ducts: Air conditioning and heating ducts are also hidden within walls.
Pro Tip: If you are drilling into an exterior wall or a wall shared with a bathroom or kitchen, exercise extreme caution. Always err on the side of caution and assume there might be something behind the wall.
Step 3: Mark Your Drilling Spot
Use a pencil to mark precisely where you want to drill. If you’re hanging something that requires multiple holes, use a level to ensure your marks are aligned.
Step 4: Use a Stud Finder (for Drywall)
For drywall, locate studs whenever possible. Drilling into a stud provides a secure anchor for shelves or heavy items.
1. Turn on your stud finder and calibrate it according to the manufacturer’s instructions.
2. Slowly slide it across the wall horizontally.
3. When it detects a stud, it will usually beep or light up. Mark the edges of the stud.
4. You can then mark the center of the stud for your pilot hole.
Table: When to Use a Stud vs. a Wall Anchor
| Item to Hang | Wall Type | Recommended Method |
| :———————– | :———— | :——————————————————- |
| Small Picture Frame | Drywall | Small nail directly into drywall, or use a small anchor. |
| Medium Mirror | Drywall | Locate a stud, or use a medium-duty wall anchor. |
| Heavy Shelf (with items) | Drywall | Locate a stud and use appropriate screws, or toggle bolts. |
| Light Decoration | Plaster/Lath | Small nail or appropriate anchor, be gentle. |
| Heavy Item (Concrete) | Concrete/Brick | Masonry bit, appropriate concrete anchors, and screws. |
Step 5: Select the Right Drill Bit and Set Your Drill
For Drywall/Plaster: Use a twist drill bit that matches the diameter of your screw or wall anchor. If using a wall anchor, the anchor packaging will specify the correct drill bit size.
For Concrete/Brick: Use a masonry bit. The size will depend on the anchor you’re using.
Set your drill’s torque clutch to a low setting initially. For drilling into drywall or plaster, you’ll want to use the drill/driver function (not the hammer function). For concrete, you’ll switch to hammer drill mode.
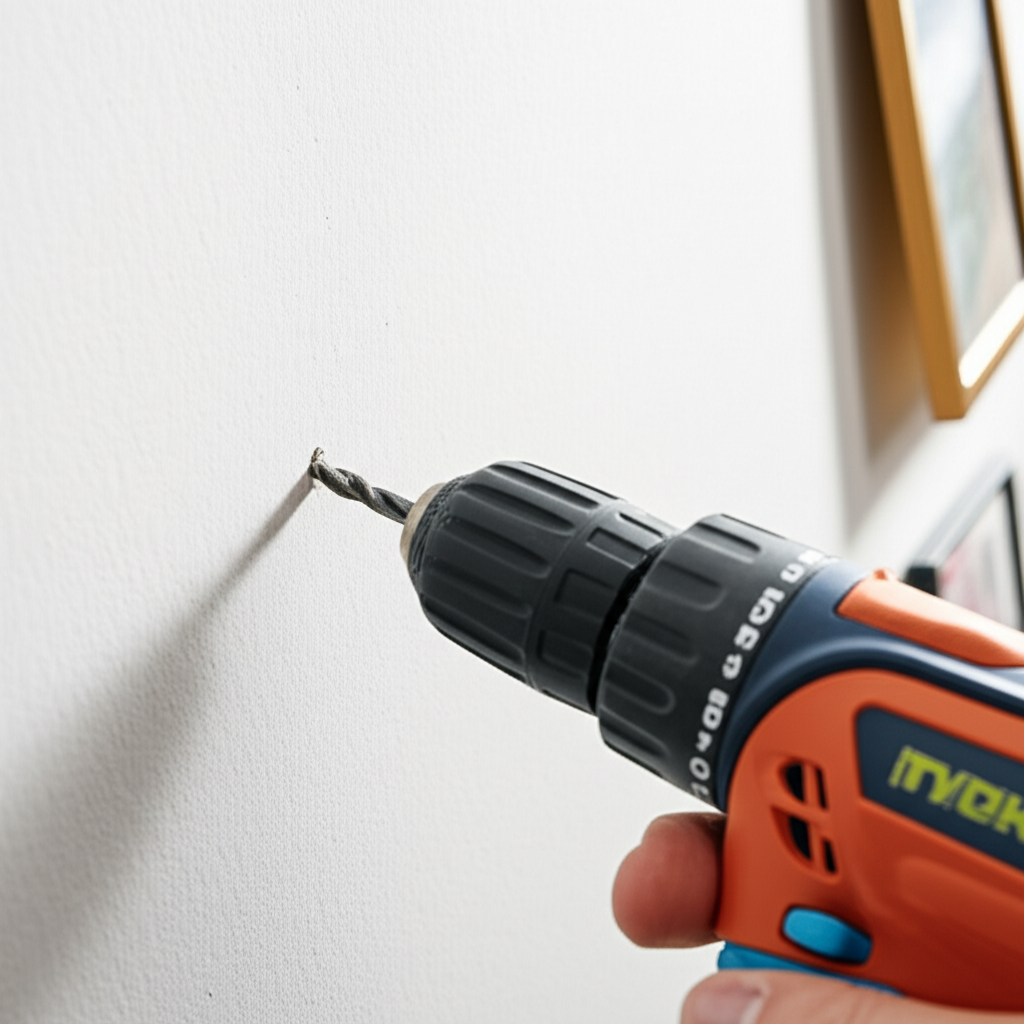
Step 6: Drill the Hole
1. Pilot Hole (Optional but Recommended): For larger screws or harder materials, drilling a small pilot hole first can make it easier to drive the screw and prevent the material from splitting. Use a drill bit slightly smaller than the screw’s shank.
2. Steady Pressure: Place the tip of the drill bit on your marked spot. Apply firm, steady pressure.
3. Keep it Straight: Try to keep the drill perpendicular to the wall to ensure a clean hole.
4. Control Speed: Start at a lower speed to create an initial bite, then increase speed as needed. For drywall, don’t push too hard, as it can crumble. For plaster, you might need to apply slightly more pressure but be mindful of cracking.
5. Clean Out Debris: Periodically pull the drill bit out slightly while drilling to clear dust and debris from the hole. This helps prevent the bit from overheating and makes drilling easier.
Step 7: Insert the Anchor or Screw
For Anchors: Gently tap the anchor into the hole with a hammer until it’s flush with the wall. Then, drive the screw into the anchor.
* For Screws (Directly into Stud or Drywall): If you’re drilling directly into a stud or using a self-drilling anchor, drive the screw until it’s snug. Be careful not to overtighten, which can strip the screw head or damage the wall.
Step 8: Clean Up
Use a dustpan and brush or a vacuum cleaner to clean up any dust and debris. If you’ve used a drop cloth, carefully fold it up to contain the mess.
When Not to Drill: Alternatives for Apartment Dwellers
Sometimes, drilling just isn’t an