
The perfect hacksaw blade tension is crucial for clean cuts and blade longevity. Aim for a blade that’s tight enough to produce a clear, high-pitched “ping” when flicked with your finger, but not so tight that it risks snapping. This guide will show you exactly how to achieve that ideal tension every time.
Hey there, fellow DIYer! Ever grabbed a hacksaw for a quick cut, only to have the blade bend, snag, or even snap? It’s a common frustration, especially when you’re just starting out. The good news is, it’s usually not the blade’s fault – it’s all about the tension. Getting that sweet spot right makes a world of difference. You’ll get cleaner cuts, your blades will last longer, and you’ll avoid those annoying mishaps. Ready to master your hacksaw? Let’s dive in and get that blade perfectly taut, so you can tackle your projects with confidence.
Why Blade Tension Matters for Your Hacksaw
Think of your hacksaw blade like a guitar string. If it’s too loose, it’s floppy and won’t cut well. If it’s too tight, it’ll break easily. The right tension is key for several reasons:
- Clean Cuts: A properly tensioned blade cuts straighter and smoother. A loose blade can wander, leading to jagged edges and wasted material.
- Blade Longevity: Overtightening puts excessive stress on the blade, making it prone to snapping. Undertightening causes the blade to flex and break teeth, shortening its life.
- Cutting Efficiency: When the blade is at the right tension, it engages with the material more effectively, allowing you to cut faster and with less effort.
- Safety: A blade that’s about to snap can break unexpectedly, sending sharp metal fragments flying. Correct tension minimizes this risk.
Understanding Your Hacksaw
Before we get to tightening, let’s quickly look at the parts of your hacksaw that help with tension:
- Frame: This is the U-shaped metal part that holds the blade.
- Tensioning Wing Nut: This is the key component! It’s usually a large, knurled nut at the end of the frame that you turn to tighten the blade.
- Blade Notches: The blade has small holes or slots at each end that fit onto the frame’s pins.
- Pins: These are small pins on the frame that the blade’s notches slide onto.
Most modern hacksaws have adjustable frames, meaning the front part of the frame can extend or retract to accommodate different blade lengths and apply tension. Older or simpler hacksaws might have a fixed frame, and you’ll need to choose the correct blade length for the saw.
How to Properly Tighten a Hacksaw Blade: Step-by-Step
Getting the tension just right is a skill you’ll develop with practice. Here’s how to do it:
Step 1: Select the Right Blade
Before you even think about tension, make sure you have the correct blade for the job. Hacksaw blades come in different lengths (usually 10 or 12 inches) and with varying numbers of teeth per inch (TPI). For general metal cutting, a blade with 18-24 TPI is common. For thinner metals or plastics, you’ll want a higher TPI (24-32 TPI). For softer metals or thicker plastics, a lower TPI (14-18 TPI) might be better.
A good rule of thumb for TPI is to have at least two to three teeth in contact with the material you’re cutting at all times. You can find more detailed information on blade selection from resources like Popular Mechanics, which offers great advice on hacksaw usage.
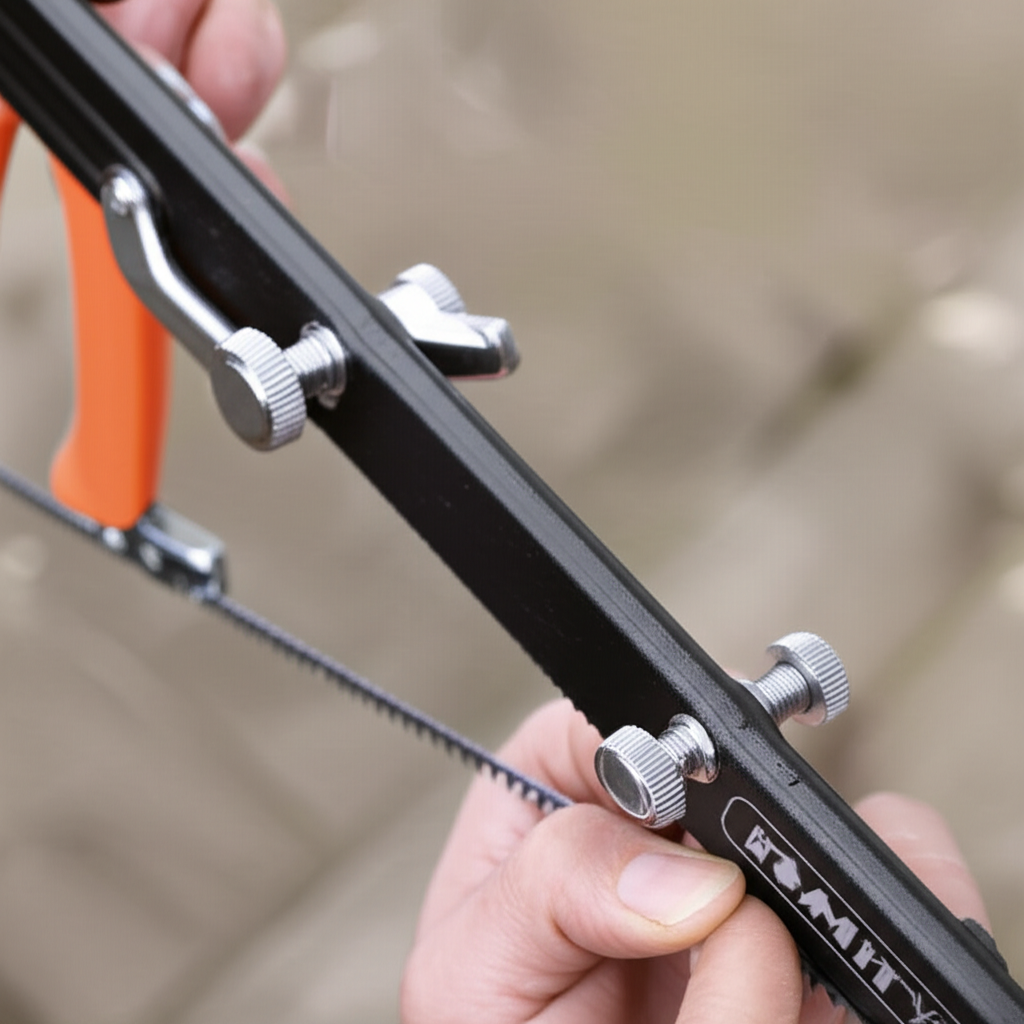
Step 2: Mount the Blade Correctly
This is super important! Hacksaw blades have a specific way they need to be installed:
- Teeth Facing Forward: The teeth on the blade should always point away from the hacksaw handle. When you push the saw forward to cut, the teeth should be the part doing the cutting.
- Align Notches with Pins: Look at the two ends of the blade. You’ll see small holes or notches. On the hacksaw frame, you’ll see pins that stick out. Line up the notches on the blade with the pins on the frame.
- Insert Blade: Gently slide one end of the blade onto its pin, then bring the other end of the frame towards the second pin and slide the blade’s notch onto it. You might need to flex the frame slightly to get the second end on.
Don’t worry if it feels a little wobbly at this stage; that’s what the tensioning is for.
Step 3: Begin Tightening the Wing Nut
Now, find that wing nut on the end of the hacksaw frame. Start turning it. You’ll feel the frame getting tighter and the blade becoming more rigid.
- Turn the wing nut clockwise to tighten.
- Turn it counter-clockwise to loosen.
As you tighten, you’ll notice the frame extending or retracting, depending on your saw’s design, and the blade becoming taut.
Step 4: Test the Tension (The “Ping” Test)
This is the classic, and most reliable, method for beginners. Once the blade feels somewhat tight, give it a quick flick with your finger:
- The Sound: You’re listening for a clear, high-pitched “ping” or “ring.” Think of lightly striking a tuning fork.
- The Feel: The blade should feel firm and resist bending significantly when you press it lightly with your thumb.
What to listen for:
| Blade Tension | Sound | Feel | Result |
|---|---|---|---|
| Too Loose | Thud, dull thwack | Wobbly, easily bends | Poor cuts, blade can snag or break teeth |
| Just Right | Clear, high-pitched “ping” | Firm, resists slight bending | Clean cuts, efficient, less risk of breakage |
| Too Tight | Strained, tight hum, or no sound | Very rigid, feels like it could snap | Blade is under too much stress and likely to break |
If you get a dull thud or feel it’s still very loose, keep tightening. If it sounds strained or you feel it’s about to snap, loosen it slightly.
Step 5: Check for Straightness
As you tighten, glance down the length of the blade. It should look straight. If you see it bowing significantly, you’ve likely overtightened it.
Step 6: Make a Test Cut
The best way to confirm is to make a short test cut on a scrap piece of your material. Does it cut smoothly? Does the blade feel stable? If so, you’ve nailed it!
Tips for Achieving Perfect Tension
Here are some extra pointers to help you master hacksaw blade tension:
- Consistency is Key: Once you find the sweet spot, try to remember the number of turns or the feel. This will help you replicate it.
- Blade Material Matters: Softer blades (like carbon steel) might require slightly less tension than harder blades (like high-speed steel or bi-metal). However, the “ping” test is generally a good indicator for most.
- Frame Quality: Higher quality hacksaws often have more precise tensioning mechanisms, making it easier to get the tension right.
- Environmental Factors: Extreme temperatures can slightly affect metal. While usually not a major issue for casual DIY, be aware that very cold temperatures can make metal more brittle.
- Listen to Your Saw: Over time, you’ll develop an ear for the right sound and a feel for the right tension. Trust your senses!
How Much Tension is “Enough”?
The goal is to make the blade rigid enough to cut efficiently without flexing excessively. When you flick it, it should ring. A common recommendation from tool manufacturers is to tension the blade until it’s under approximately 30,000 PSI (pounds per square inch). While you can’t measure that easily at home, the “ping” test is the practical equivalent for most users.
A good rule of thumb is to tighten the wing nut until you feel significant resistance, then give it a few more firm turns. Then, perform the ping test. If it’s not right, adjust. It’s better to err slightly on the side of being a little too loose than too tight, as snapping a blade is more common with overtightening.
Common Mistakes to Avoid
Even with the best intentions, beginners can make a few common mistakes:
- Overtightening: This is the most frequent error. It leads to broken blades and can even damage the hacksaw frame. Remember that “ping,” not a strained hum.
- Undertightening: The blade feels floppy, cuts poorly, and the teeth can get damaged quickly.
- Ignoring the Teeth Direction: Always ensure teeth face away from the handle. Cutting with the teeth facing the handle will damage the blade and make cutting impossible.
- Using Old or Damaged Blades: If a blade is already bent or has damaged teeth, no amount of correct tension will make it perform well. Replace it!
- Not Using Enough Force: Hacksaws are designed to be used with a good amount of force on the push stroke. Proper tension allows you to do this without the blade flexing too much.
When to Replace Your Hacksaw Blade
Even with perfect tension, blades don’t last forever. Here’s when it’s time for a new one:
- Dull Teeth: If you have to push much harder than usual, or the saw is skipping over the material, the teeth are likely dull.
- Broken Teeth: If you see missing teeth along the blade, it will cut unevenly and is prone to breaking further.
- Bent Blade: If the blade is permanently warped, it won’t cut straight.
- The “Ping” is Gone: Sometimes, even if it looks okay, a blade might have lost its ability to “ping” properly, indicating it’s fatigued.
Replacing a hacksaw blade is straightforward. Just loosen the wing nut completely, remove the old blade, and install a new one following the steps above. For more on blade maintenance and selection, resources like WikiHow offer practical visual guides.
Frequently Asked Questions (FAQ)
Q1: How do I know if my hacksaw blade is too loose?
A1: If the blade feels floppy, bends easily when you press it, or makes a dull thudding sound when flicked, it’s too loose. It will also likely snag or wander during cutting.
Q2: Can I overtighten a hacksaw blade?
A2: Yes, absolutely. Overtightening puts too much stress on the blade, making it very likely to snap, often during use, which can be dangerous.
Q3: What kind of hacksaw blade should I use for cutting PVC pipe?
A3: For PVC pipe, which is a plastic, you’ll want a blade with more teeth per inch (TPI). A blade with 24 TPI or higher is generally recommended for clean cuts on plastic.
Q4: My hacksaw blade keeps breaking. What am I doing wrong?
A4: The most common reasons are overtightening the blade, using a blade with too few teeth for the material, or applying too much pressure and bending the blade during the cut. Ensure your blade is tensioned correctly, choose the right TPI, and focus on a smooth, consistent stroke.
Q5: How many teeth should be on the material when cutting?
A5: A good rule of thumb is to have at least two to three teeth of the blade in contact with the material you are cutting at any given time. This ensures a good grip and prevents the teeth from stripping or snagging.
Q6: Can I use a 12-inch blade on a hacksaw designed for 10-inch blades?
A6: Generally, no. Hacksaws are designed for specific blade lengths. Using a blade that is too long will prevent you from achieving proper tension and can damage the saw or the blade.
Q7: Does the frame material affect blade tension?
A7: While the frame material (like steel or aluminum) affects the overall strength and weight of the saw, the tensioning mechanism (the wing nut and screw) is what directly controls the blade tension. However, a sturdier frame might allow for higher, more consistent tension without deforming.
Conclusion
Mastering hacksaw blade tension is a fundamental skill for anyone working with hand tools. By understanding the “ping” test, ensuring your blade is mounted correctly with teeth facing forward, and avoiding common pitfalls like overtightening, you’ll be well on your way to achieving clean, efficient cuts every time. Remember, practice makes perfect, and with a little attention to detail, your hacksaw will become a reliable tool for all your DIY projects. So, go ahead, get that blade singing, and happy cutting!