
Yes, you can generally drill holes in rental walls, but it’s crucial to understand your lease agreement and the landlord’s policies. Many leases allow minor alterations like hanging pictures, but significant damage might require permission and repair upon moving out. This guide will help you navigate drilling in your rental safely and responsibly.
Moving into a new rental can be exciting, but the thought of personalizing your space often comes with a common question: “Can you drill holes in rental walls?” It’s a frustration many renters face – wanting to hang a shelf or mount a TV, but fearing a hefty charge for damaging the property. Don’t worry, this guide is here to demystify the process. We’ll walk through what your lease likely says, how to do it right, and what to do before you even pick up a drill. Let’s make your rental feel like home, the smart way.
Understanding Your Rental Agreement: The First Step
Before you even think about grabbing a drill, the most important step is to consult your lease agreement. This document is your contract with your landlord and outlines exactly what you can and cannot do within the rental property. Most leases will have a clause regarding alterations or modifications to the property.
What to Look For in Your Lease
Alterations Clause: This section usually details what constitutes an alteration. Hanging a picture with a small nail or screw is typically considered minor and often permissible. However, anything that significantly changes the structure or appearance of the walls, like installing large fixtures or removing built-in elements, might be prohibited without explicit written consent.
Damage and Repair: Leases also specify what happens if you cause damage. They will likely state that you are responsible for the cost of repairing any damage beyond normal wear and tear. This is where unauthorized or poorly executed drilling can become costly.
Moving Out Responsibilities: Pay close attention to what the lease says about the condition of the property when you move out. Some landlords require all holes to be filled and painted to match the original wall color.
When in Doubt, Ask!
If your lease is unclear, or if you’re planning a project that feels a bit more substantial than hanging a photo frame, the best course of action is always to communicate with your landlord or property manager. A quick email or phone call can save you a lot of trouble later. Explain what you’d like to do, and ask for their permission in writing. Many landlords are reasonable, especially if you assure them you’ll repair any damage before moving out.
Types of Rental Walls and How to Drill Them
Rental walls aren’t all the same, and knowing what you’re drilling into is key to a successful and damage-free project. The most common types you’ll encounter are drywall, plaster, and sometimes concrete or brick in older buildings or basements.
Drywall
Drywall (also known as plasterboard or gypsum board) is the most common wall material in modern homes. It’s relatively soft and easy to drill into, but it also offers little structural support on its own.
How it works: Drywall is typically made of a gypsum plaster core pressed between two thick sheets of paper.
Drilling considerations:
For light items (pictures, small shelves), a simple screw into the drywall itself might suffice, especially if using wall anchors.
For heavier items, you’ll need to locate a wall stud (the wooden or metal support behind the drywall) or use appropriate drywall anchors.
Plaster Walls
Older homes often feature plaster walls, which are made of gypsum plaster applied over lath (thin strips of wood or metal). Plaster walls are harder and more brittle than drywall.
How it works: Plaster is a cement-like material applied in layers.
Drilling considerations:
Plaster can chip or crack easily if you’re not careful.
Use a drill bit designed for masonry or general purpose if you encounter plaster.
Start with a small pilot hole and gradually increase the drill bit size if needed.
Locating studs is also important for heavier items.
Concrete and Brick
Some rental units, particularly basements, garages, or older buildings, might have concrete or brick walls. These are much harder materials.
How it works: Concrete and brick are dense, hard building materials.
Drilling considerations:
You will need a hammer drill and a masonry drill bit for these materials.
These drills use a hammering action along with rotation to break through hard surfaces.
Always wear safety glasses and hearing protection when drilling into concrete or brick.
Choosing the Right Drill and Drill Bits
Selecting the correct tools makes all the difference. Using the wrong drill or bit can lead to frustration, damaged walls, or even injury.
Types of Drills
Cordless Drill/Driver: This is the most versatile and common type for DIYers. It’s battery-powered, offering freedom of movement. Most can switch between drilling and driving screws. For most rental wall projects, a standard cordless drill is perfectly adequate.
Hammer Drill: As mentioned, this is essential for drilling into concrete, brick, or stone. It has a mode that adds a hammering action to the rotation. If your rental has concrete walls, you’ll need one of these.
Impact Driver: Primarily designed for driving screws, it delivers quick rotational blows. While it can drill, it’s not ideal for precision drilling into walls.
Essential Drill Bits
Twist Drill Bits (HSS – High-Speed Steel): These are your go-to for wood, metal, and plastic. They are standard for most drilling tasks.
Masonry Drill Bits: These have a hardened carbide tip designed to cut through concrete, brick, and stone. They often have a chisel-like point.
Spade Bits (Paddle Bits): Used for drilling larger holes in wood, but generally not needed for wall mounting.
Forstner Bits: Also for wood, creating clean, flat-bottomed holes. Not typically used for wall mounting.
Table: Drill Bit Selection Guide
| Material | Recommended Drill Bit Type | Drill Type Needed | Notes |
| :———— | :————————— | :————————- | :————————————————- |
| Drywall | HSS Twist Bit (small) | Cordless Drill/Driver | Use anchors for anything heavier than a picture. |
| Plaster | HSS Twist Bit or Masonry Bit | Cordless Drill/Driver | Start slow, be gentle to avoid chipping. |
| Wood Studs | HSS Twist Bit | Cordless Drill/Driver | Use for secure mounting of heavier items. |
| Concrete/Brick| Masonry Bit | Hammer Drill (recommended) | Use safety glasses and hearing protection. |
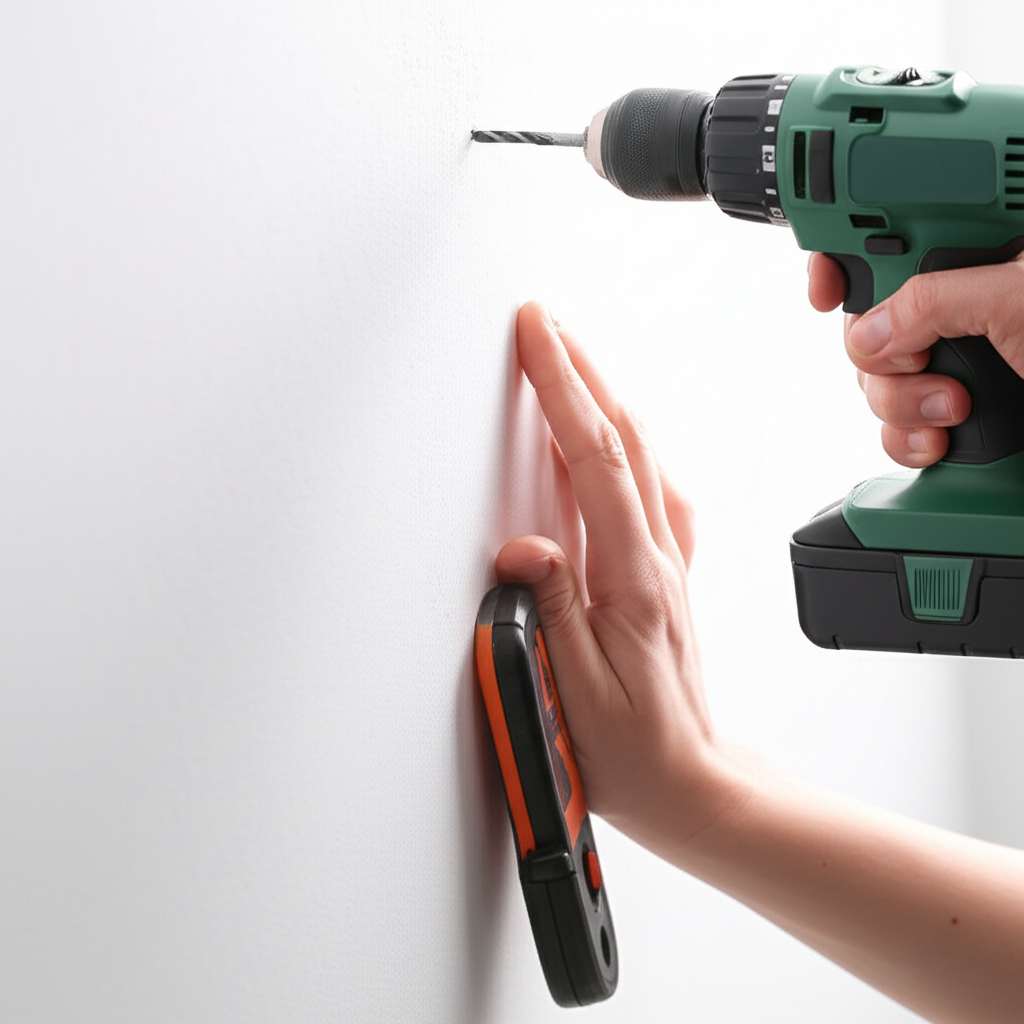
The Step-by-Step Guide to Drilling Holes in Rental Walls
Now that you’ve got your lease sorted and your tools ready, let’s get drilling! Follow these steps for a clean, safe, and responsible job.
Step 1: Gather Your Tools and Materials
Before you start, make sure you have everything you need:
Drill: Cordless drill/driver is usually sufficient.
Drill Bits: Appropriate size and type for your wall material and screw.
Screws: The right size and type for what you’re hanging.
Wall Anchors (if needed): Plastic or metal anchors designed for drywall or plaster.
Stud Finder: Essential for locating wall studs.
Measuring Tape: For precise placement.
Pencil: For marking.
Level: To ensure your item is straight.
Safety Glasses: Always protect your eyes.
Dust Mask: Recommended, especially for plaster or drywall dust.
Vacuum Cleaner: To clean up dust as you go.
Spackle/Putty and Paint: For repairs when you move out.
Step 2: Locate Studs (If Hanging Heavier Items)
For anything heavier than a small picture frame, drilling into a wall stud provides the most secure mounting.
How to use a stud finder:
1. Turn on the stud finder and calibrate it according to the manufacturer’s instructions.
2. Slide it horizontally across the wall where you want to hang your item.
3. It will usually beep or light up when it detects a stud.
4. Mark the edges of the stud with your pencil. Most studs are 1.5 inches wide.
Why studs matter: Drywall alone can’t support much weight. Mounting directly into a stud gives you a solid anchor point.
Step 3: Mark Your Drilling Spot
Once you know where you’re drilling (either into a stud or a specific spot on the wall), use your pencil to make a clear mark.
Use a level: If you’re hanging something that needs to be straight (like a shelf or a series of pictures), hold the item or a level against the wall and mark the spot where the screw or anchor will go.
Step 4: Prepare the Drill Bit
Select the right bit: Choose a drill bit that is the same diameter as your screw or slightly smaller if you’re screwing directly into a stud. If using a wall anchor, the anchor packaging will specify the correct drill bit size.
Insert the bit: Ensure the drill bit is securely fastened in the drill’s chuck.
Step 5: Drill the Hole
This is where technique matters to avoid damage.
Start slow: Begin drilling at a slow speed to create a clean entry point.
Maintain a steady pressure: Apply firm, consistent pressure. Don’t force the drill.
Keep it straight: Hold the drill perpendicular to the wall to ensure a straight hole.
Drill to depth: Drill to the required depth for your screw or anchor. For anchors, follow the manufacturer’s instructions.
Clean as you go: Periodically pull the drill bit out of the hole while it’s still spinning slowly to clear out dust and debris. This also helps prevent overheating.
Step 6: Insert Wall Anchors (If Necessary)
If you’re not drilling into a stud, you’ll likely need wall anchors for anything with weight.
Types of anchors:
Plastic Expansion Anchors: Good for light to medium loads. Tap them gently into the pre-drilled hole until flush with the wall.
Self-Drilling Anchors (Threaded Anchors): These screw directly into drywall without needing a pre-drilled hole (though a small pilot hole can help).
Toggle Bolts: For heavier items, these have “wings” that open up behind the wall for strong support. They require a larger hole.
Installation: Follow the specific instructions for the type of anchor you are using.
Step 7: Insert the Screw and Hang Your Item
Screw it in: Drive the screw into the anchor or the stud. If using a drill/driver, switch to the screw-driving setting and use a low torque setting to avoid stripping the screw head or over-tightening.
Hang your item: Carefully place your item onto the screw or hook. Use a level again to ensure it’s straight.
Tips for Minimizing Damage and Making Repairs
Even with the best intentions, small imperfections can happen. Here are tips to keep your rental looking its best and to make repairs easy when it’s time to move out.
Use the Smallest Necessary Hole Size
Always choose a drill bit that is just large enough for the screw or anchor. Smaller holes are easier to patch and conceal.
Consider Alternatives to Drilling
For lighter items, explore damage-free hanging solutions:
Command Strips: These adhesive strips come in various weight ratings and can hold pictures, decorations, and even shelves without any drilling. They remove cleanly.
Adhesive Hooks: Similar to Command Strips, these offer a quick way to hang items.
Leaning Furniture: Use bookcases or decorative ladders to display items without attaching them to the wall.
Proper Repair Techniques
When you move out, you’ll likely need to patch any holes.
For small nail holes:
1. Gently tap the edges of the hole inward with the handle of your screwdriver or a putty knife.
2. Apply a small amount of spackle or joint compound with a putty knife, smoothing it flush with the wall.
3. Let it dry completely.
4. Lightly sand the area smooth.
5. Apply a coat of matching paint.
For larger screw holes:
1. If a plastic anchor is still in the wall, you can often leave it and spackle over it.
2. If the hole is significantly larger, you might need to use a drywall patch kit, which often involves a mesh patch and joint compound.
3. Follow the kit’s instructions carefully.
4. Sand, prime, and paint to match the wall.
Table: Common Rental Wall Repair Materials
| Repair Need | Recommended Material(s) | Tools Needed |
| :————————– | :——————————————————- | :———————————————– |
| Small nail/screw holes | Spackle or Joint Compound, Sandpaper, Paint | Putty Knife, Small Brush/Roller |
| Larger holes (anchor removed)| Drywall Patch Kit (mesh patch + joint compound), Sandpaper, Primer, Paint | Putty Knife, Sanding Block, Brush/Roller |
| Minor scuffs/marks | Magic Eraser, Mild Cleaner, Touch-up Paint | Soft Cloth |
Painting Considerations
Match the paint: If you have leftover paint from your landlord, use that. If not, you might need to take a small chip of paint to a hardware store to have it color-matched.
Primer: Always use a primer over spackle or joint compound before painting to ensure an even finish and prevent the patch from showing through.
Coverage: Apply at least two coats of paint for good coverage.
Frequently Asked Questions (FAQs)
Q1: Do I need permission to hang a picture in my rental?
Generally, hanging a picture with a small nail or screw is considered minor wear and tear and doesn’t require explicit permission, as long as you plan to patch the hole before moving out. However, always check your lease for specific clauses.
Q2: What’s the best way to hang heavy items like a TV or bookshelf?
For heavy items, it’s crucial to locate wall studs using a stud finder and drill directly into them. If studs aren’t conveniently located, use heavy-duty drywall anchors designed for the item’s weight.
Q3: My lease says no alterations. Does that mean I can’t drill at all?
Some leases are very strict. If your lease states “no alterations,” it’s best to err on the side of caution. Consider damage-free hanging solutions like Command Strips. If you absolutely must drill, have a conversation with your landlord and get written permission.
Q4: What if I drill into a pipe or electrical wire?
This is a serious safety hazard. Always use a stud finder that can also detect live electrical wires. Be aware of common locations for pipes (e.g., near sinks and toilets). If you’re unsure, it’s best to avoid drilling in that area or consult a professional.
Q5: How do I repair a hole in drywall?
For small holes, use spackle or joint compound, apply with a putty knife, let dry, sand smooth, and paint. For larger holes, consider a drywall patch kit. The key is to make the repair flush with the wall and match the paint color perfectly.
Q6: Can I use a hammer drill on regular drywall?
A hammer drill is overkill for drywall and can create more damage than necessary. A standard cordless drill/driver is sufficient for drywall and plaster. A hammer drill is only needed for concrete or brick.
Q7: What are wall anchors and why do I need them?
Wall anchors are devices inserted into a wall to provide a secure point for screws, especially in materials like drywall that don’t offer much inherent strength. They distribute the weight of the item being hung over a larger area, preventing the screw from pulling out and damaging the wall.
Conclusion
Navigating the rules of drilling in a rental doesn’t have to be a daunting task. By understanding your lease, choosing the right tools, and employing careful techniques, you can personalize your living space without jeopardizing your security deposit. Remember, a little preparation and communication go a long way. Whether you’re hanging a beloved piece of art or a much-needed shelf, the goal is to make your rental feel like home while respecting the property. So, go ahead and drill with confidence, knowing you’re doing it the right way. Happy decorating!