
Yes, you absolutely can drill into a fiberglass boat! With the right tools, techniques, and a little patience, it’s a straightforward DIY task. This guide will walk you through proven methods to ensure a clean, secure hole without damaging your boat’s hull or deck.
There’s a moment of hesitation when you need to attach something to your fiberglass boat. Will drilling a hole weaken it? Will it crack? These are common worries for any boat owner, especially those new to DIY projects. But the truth is, drilling into fiberglass is a necessary and manageable part of boat maintenance and customization. Whether you’re mounting a new cleat, installing a transducer, or simply hanging a tool, knowing the right way to do it makes all the difference. We’ll cover everything you need, from choosing the right drill bit to making the perfect hole, so you can tackle your next project with confidence.
Why Drilling into Fiberglass Matters
Fiberglass, or glass-reinforced plastic (GRP), is a composite material made of a polymer matrix reinforced with glass fibers. It’s incredibly strong, lightweight, and resistant to corrosion, which is why it’s so popular in boat building. However, it’s also a material that requires specific handling when drilling. Unlike wood or metal, fiberglass can splinter, delaminate, or create dust that can be harmful if inhaled. Understanding these characteristics helps us choose the right approach.
Gathering Your Essential Tools
Before you even think about drilling, let’s make sure you have everything you need. Having the right tools on hand not only makes the job easier but also ensures a safer and more professional result.
- Cordless Drill: A good quality cordless drill with variable speed and a clutch is ideal. This allows for precise control over the drilling speed and torque, preventing you from overheating the bit or damaging the fiberglass.
- Drill Bits: This is crucial! For fiberglass, you’ll want sharp bits designed for cutting through plastics or composites.
- Masking Tape: Painter’s tape or masking tape is essential for preventing the drill bit from wandering on the surface and for marking your drilling spot.
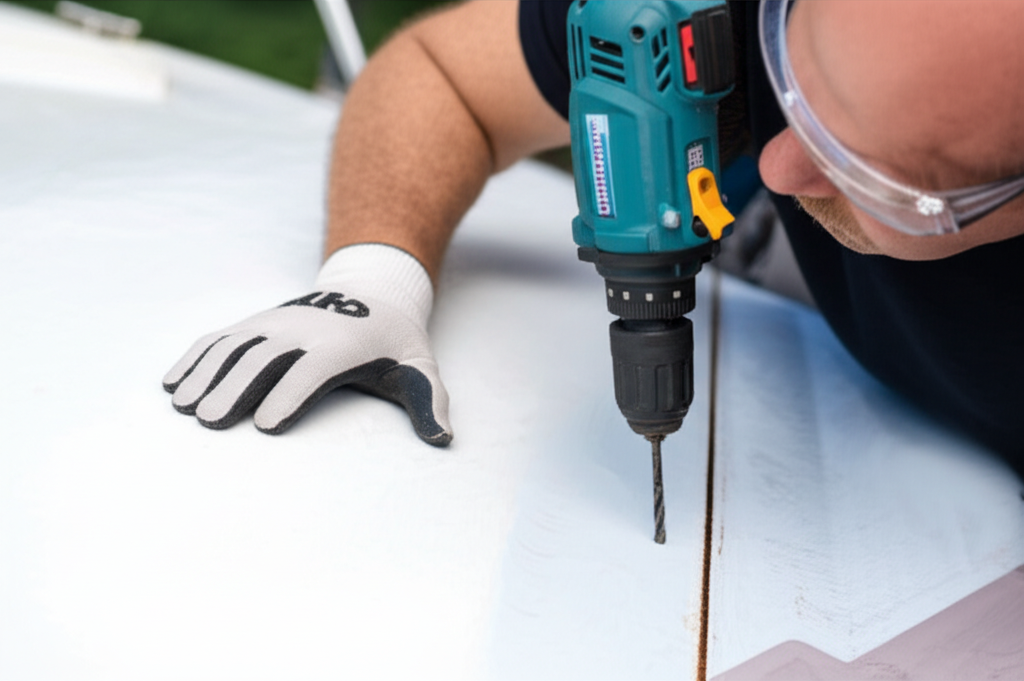
- Safety Glasses: Always protect your eyes from flying debris.
- Dust Mask: Fiberglass dust can be irritating and harmful. A good quality dust mask is a must.
- Measuring Tape or Ruler: For accurate placement of your hole.
- Marker: To mark your drilling spot.
- Optional: Pilot Hole Bit: A smaller bit to create a guide hole for larger bits.
- Optional: Countersink Bit: To create a bevel at the top of the hole if needed for screw heads.
- Optional: Shop Vacuum: To clean up dust as you go.
Choosing the Right Drill Bits for Fiberglass
The type of drill bit you use is perhaps the most critical factor in drilling fiberglass successfully. Using the wrong bit can lead to chipping, cracking, or a rough hole that’s difficult to seal properly.
Recommended Drill Bits:
- Brad-Point Drill Bits: These bits have a sharp point that helps center the bit and prevent it from “walking” across the surface. They are excellent for starting holes accurately.
- Spade Bits (or Paddle Bits): For larger holes, spade bits can work, but you need to use them carefully at a slow speed. Look for spade bits with a sharp spur in the center to help guide the cut.
- Hole Saws: These are best for very large, clean holes. Ensure the teeth are sharp and designed for plastics or wood.
- Specialty Fiberglass Bits: Some manufacturers offer bits specifically designed for drilling fiberglass. These often have a sharper cutting angle and specialized fluting to clear debris effectively.
Bits to Avoid (or Use with Extreme Caution):
- Standard Twist Drill Bits (especially dull ones): While they can work, they tend to “grab” and can cause splintering or delamination if not used with extreme care and at slow speeds. If you must use them, ensure they are very sharp and consider a brad-point style.
- Masonry Bits: These are designed for hard materials like concrete and brick and will likely shatter or create a very rough hole in fiberglass.
Understanding Fiberglass Dust Safety
This is a point we can’t stress enough: fiberglass dust is not your friend. When you drill into fiberglass, you create fine particles of glass and resin. Inhaling these particles can cause significant respiratory irritation and long-term health issues.
Always wear:
- Safety Glasses: To protect your eyes from airborne particles.
- A Respirator Mask: A P95 or P100 respirator mask is highly recommended. A simple dust mask might not be sufficient for fine fiberglass particles.
It’s also a good practice to keep the drilling area as clean as possible. If you have a shop vacuum with a fine-particle filter, running it near the drilling point can help capture dust as it’s generated. For larger projects, consider doing the drilling outdoors or in a well-ventilated area.
Step-by-Step Guide: Drilling Into Fiberglass
Now that you’re prepared with the right tools and safety gear, let’s get to the actual drilling. Follow these steps for a clean, successful hole.
Step 1: Mark Your Spot
Determine the exact location where you need to drill.
Use a pencil or marker to make a clear mark.
For added precision and to prevent the drill bit from “walking” or slipping on the smooth surface, apply a piece of painter’s tape or masking tape over the marked spot.
Mark the center of your hole directly on the tape.
Step 2: Prepare Your Drill
Select the appropriate drill bit for the size of the hole you need.
If you’re using a brad-point bit, the center point will help guide it.
If you’re using a larger bit or hole saw, consider drilling a small pilot hole first with a smaller bit (e.g., 1/8″ or 3/32″). This pilot hole acts as a guide for the larger bit.
Set your drill to a low to medium speed. High speeds generate heat, which can melt the resin and cause a messy hole.
If your drill has a clutch, set it to a low torque setting. This helps prevent over-tightening and potential damage.
Step 3: Drill the Hole
Position the tip of your drill bit (or pilot hole bit) precisely on your marked spot.
Hold the drill perpendicular to the surface.
Apply steady, consistent pressure. Don’t force the drill. Let the bit do the work.
As you begin to drill, you’ll encounter some resistance. Keep the speed low and maintain that steady pressure.
If you’re drilling through a thicker section of fiberglass, you might want to back the bit out periodically to clear any accumulated dust or debris from the flutes of the bit. This also helps prevent overheating.
Continue drilling until you’ve passed completely through the fiberglass.
Step 4: Clean Up and Inspect
Once the hole is drilled, gently pull the drill bit out.
Remove the masking tape.
Use a brush or a shop vacuum to clean away any fiberglass dust from the area.
Inspect the hole. It should be relatively clean and free from excessive chipping or splintering.
If you need to create a beveled edge for a screw head to sit flush, use a countersink bit at a very slow speed.
Step 5: Seal the Hole (Crucial!)
This is a vital step that many DIYers overlook. Drilling into fiberglass exposes the core material (if there is one) or the inner layers of fiberglass and resin to moisture. If left unsealed, water can penetrate, leading to delamination, rot, or structural damage over time.
For small holes (e.g., for screws): You can often get away with a good quality marine-grade sealant like 3M 5200 or Sikaflex 291. Apply a generous amount into the hole and around the fastener before installing it.
For larger holes or holes where a fastener isn’t immediately going in: It’s best to seal the raw edge of the fiberglass. You can use a two-part epoxy resin specifically designed for marine applications. Mix the epoxy according to the manufacturer’s instructions and carefully apply it to the inside edge of the hole. This creates a waterproof barrier.
A good resource for understanding marine sealants is West Marine’s guide on boat sealants and adhesives, which offers detailed information on choosing the right product for various applications.
Drilling Different Thicknesses of Fiberglass
The thickness of the fiberglass you’re drilling into will influence your approach, particularly regarding drill bit choice and technique.
Thin Fiberglass (e.g., Hull Sides, Deck Surfaces)
This is the most common scenario.
Use brad-point bits or sharp twist bits at slow speeds.
Masking tape is especially important here to prevent surface damage.
Backing out the bit frequently to clear dust is a good practice.
Thick Fiberglass (e.g., Transom, Bulkheads, Keel)
For thicker sections, you might need a more robust approach.
Start with a pilot hole using a smaller bit.
Progress to larger bits in stages if necessary (e.g., 1/4″, then 3/8″, then the final size). This reduces stress on the drill and the fiberglass.
Hole saws are often the best option for larger diameters in thicker materials.
* Ensure your drill has enough power and battery life for these tasks.
Consider the construction of the fiberglass. Some areas, like the transom, are often reinforced with wood or foam cores. If you’re drilling into these areas, you’ll be drilling through fiberglass, then the core material, and then fiberglass again. Be prepared for this change in resistance.
Common Issues and How to Avoid Them
Even with the best intentions, things can go wrong. Here are some common problems and how to sidestep them.
- Chipping/Splintering: Usually caused by dull bits, excessive speed, or too much pressure. Ensure your bits are sharp, use slow speeds, and apply steady, even pressure.
- Cracking/Delamination: This happens when the fiberglass layers separate. It’s often a result of the drill bit grabbing or the material being stressed too much. Pilot holes and backing out the bit can help.
- Overheating: Excessive speed and friction melt the resin, creating a gummy, messy hole. Always use low speeds and clear debris.
- Drill Bit Wandering: The bit slips on the surface before biting. Masking tape and a brad-point bit are your best defense.
- Rough Hole Edges: Dull bits or incorrect technique. A sharp bit and a slow, steady approach are key. A countersink bit can clean up the entry edge.
The key to avoiding these issues is preparation and patience. Don’t rush the process, and always prioritize using sharp, appropriate tools.
When to Call a Professional
While most drilling tasks on a fiberglass boat are well within the capabilities of a DIYer, there are times when it’s best to seek professional help.
- Structural Components: If you need to drill into critical structural areas like the keel, stringers, or major bulkheads, and you’re unsure about the impact, consult a marine surveyor or experienced boat builder.
- Large or Complex Holes: For very large holes (e.g., for through-hull fittings) or if you need to cut complex shapes, a professional with specialized tools might be better equipped.
- Uncertainty About Hull Integrity: If your boat has visible damage or you suspect underlying structural issues, don’t start drilling without a professional assessment.
- High-Stress Areas: Areas that will bear significant load, like mounting a mast or a heavy winch, might require specialized backing plates or reinforcement that a professional can advise on.
When in doubt, it’s always better to err on the side of caution and get expert advice. This can save you from costly mistakes and ensure the long-term integrity of your vessel.
Frequently Asked Questions (FAQ)
- What is the best drill bit for fiberglass?
- Brad-point drill bits are excellent for starting holes cleanly. For larger holes, sharp hole saws or spade bits designed for plastics are recommended. Always ensure your bits are sharp.
- Can I use a regular twist drill bit on fiberglass?
- You can, but with caution. Ensure the bit is very sharp and use a slow speed with steady pressure to avoid splintering. Brad-point bits are generally preferred.
- What speed should I drill fiberglass at?
- Always use a low to medium speed. High speeds generate heat, which can melt the resin and cause a messy, gummy hole. Let the bit do the cutting without forcing it.
- Do I need to seal fiberglass after drilling?
- Yes, absolutely. Drilling exposes the material to moisture, which can lead to delamination and damage. Use a marine-grade sealant like 3M 5200 or a two-part epoxy to waterproof the hole and its edges.
- How do I prevent fiberglass dust from getting everywhere?
- Wear a good quality respirator mask (P95 or P100) and safety glasses. Using a shop vacuum near the drilling point can help capture dust as it’s created. Drilling outdoors or in a well-ventilated area is also advisable.
- What if I make a mistake and the hole is too big?
- For minor oversizing, you can often use a larger screw or bolt with a backing plate. For significant oversizing, you might need to repair the hole with fiberglass cloth and resin, then re-drill to the correct size.
Conclusion
Drilling into your fiberglass boat doesn’t have to be a daunting task. By understanding the material, choosing the right tools, prioritizing safety, and following a methodical approach, you can achieve clean, secure holes for any project. Remember to use sharp bits, keep your drill speed low, and always, always seal your holes to protect your boat from moisture. With these proven methods, you’re well-equipped to add that new piece of equipment, reinforce a fitting, or simply make your boat work better for you. Happy drilling, and enjoy your enhanced vessel!