Coping saw trim made easy! Learn to use a coping saw for precise, clean cuts on wood trim, creating professional-looking joints and decorative shapes with this beginner-friendly guide.
Ever stared at a piece of molding, a bit of decorative trim, or even a thin piece of wood and wondered how to make those intricate cuts? You know, the kind that make a project look truly finished and professional? That’s where the humble coping saw comes in. It might look a little old-fashioned, but this simple tool is a powerhouse for detail work, especially when it comes to trim. Many DIYers feel a bit intimidated by it at first, but I promise, once you understand the basics, you’ll be cutting with confidence. This guide will walk you through everything you need to know to master the coping saw for your trim projects.
Why a Coping Saw for Trim?
A coping saw is specifically designed for making curved and intricate cuts. Unlike a handsaw that’s built for straight, forceful cuts, a coping saw uses a thin, flexible blade held under tension by a U-shaped frame. This design allows you to maneuver the saw in tight spaces and follow complex patterns with surprising accuracy.
For trim work, this is invaluable. Think about those inside corner joints in crown molding or baseboards. Instead of a simple butt joint that can easily open up with wood movement, a “cope” joint, achieved with a coping saw, creates a snug, interlocking fit that looks much cleaner and holds better over time. Beyond corners, you can also use it to cut decorative shapes, notches, or to remove waste material from a workpiece.
What You’ll Need: Your Coping Saw Toolkit
Before we dive into the how-to, let’s make sure you have the right gear. Having the proper tools makes all the difference in your experience and the final result.
Coping Saw: The star of the show! They come in various frame depths (the distance from the blade to the back of the frame). For trim work, a deeper frame gives you more clearance.
Coping Saw Blades: These are the workhorses. They are thin and come in different tooth counts (TPI – Teeth Per Inch).
Lower TPI (e.g., 10-14 TPI): Good for faster cuts on softer woods or thicker materials.
Higher TPI (e.g., 18-24 TPI): Better for smoother, cleaner cuts on hardwoods or thinner materials, ideal for fine trim work.
Reverse-tooth blades: These have teeth that point backward towards the handle. They are excellent for preventing tear-out on the “show” side of your cut, which is crucial for trim.
Workpiece: Your trim or wood.
Marking Tool: A pencil or marking knife.
Clamps: Essential for holding your workpiece securely. You don’t want your trim moving while you’re cutting!
Safety Glasses: Always protect your eyes.
Optional: A miter box can help guide straight cuts, but for coping, freehand is the goal.
Choosing the Right Blade for Trim
This is a critical step for successful trim work. The blade you choose will directly impact the smoothness and accuracy of your cut.
| Blade Type | TPI Range | Best For | Considerations for Trim |
| :—————– | :——– | :——————————————— | :——————————————————– |
| Standard Blade | 10-24 | General purpose cutting | Higher TPI (18-24) for smoother finish on trim. |
| Reverse-Tooth | 14-20 | Cutting on the push stroke, prevents tear-out | Highly recommended for trim to protect the visible face. |
| Scallop Tooth | 10-14 | Faster cutting, aggressive material removal | Generally too aggressive for fine trim work. |
For most trim applications, especially when you want a clean finish on the visible side of the wood, a reverse-tooth blade is your best friend. It cuts on the push stroke, meaning the teeth are angled away from you as you push the saw forward. This action pulls any splintering or tear-out away from the surface you want to look good.
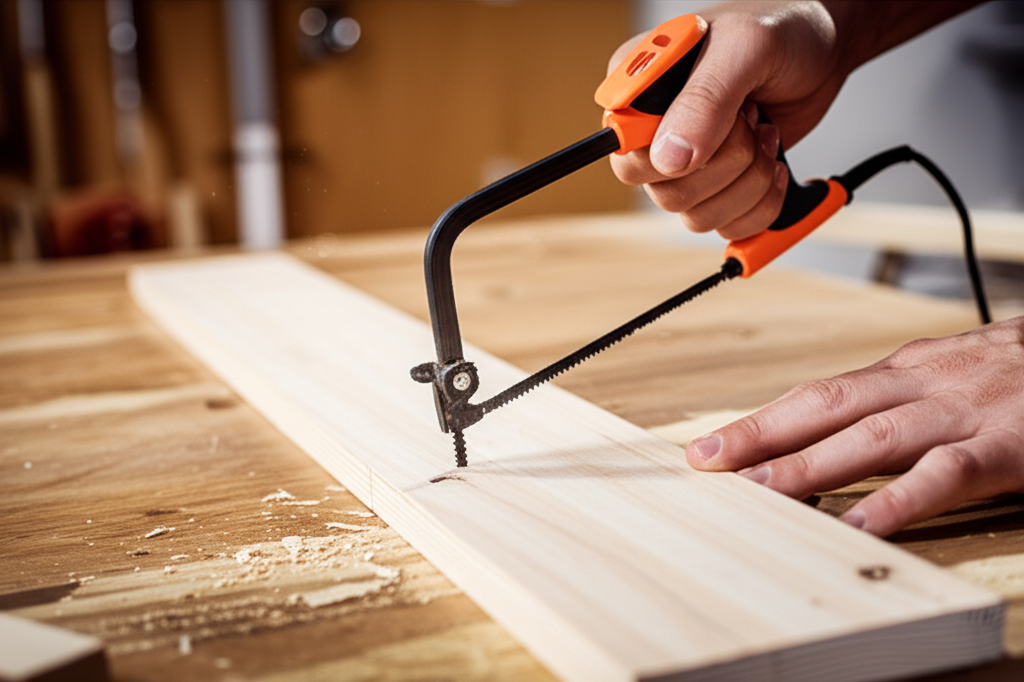
How to Use a Coping Saw for Trim: Step-by-Step
Let’s get down to business. Using a coping saw effectively is all about technique and preparation.
Step 1: Prepare Your Workspace and Saw
1. Secure Your Workpiece: Clamp your trim firmly to a workbench or sawhorse. Ensure the section you’ll be cutting is well-supported and doesn’t wobble. Overhang the edge of your bench slightly so you have room to maneuver the saw.
2. Install the Blade:
Tension: Loosen the knob at the bottom of the saw handle. Insert one end of the blade into the slot at the top of the frame, ensuring the teeth are pointing downward (if using a standard blade) or forward (if using a reverse-tooth blade).
Orientation: This is crucial! For most cuts, you want the teeth of the blade to point in the direction of the cut. For a standard blade, this means pointing down. For a reverse-tooth blade, this means pointing forward (towards the front of the saw frame). This allows the blade to cut on the push stroke, which is generally more controlled.
Tighten: Insert the other end of the blade into the slot at the bottom of the frame. Now, tighten the knob. You want the blade to be taut, like a guitar string. If it’s too loose, it will bend and break easily. If it’s too tight, it can also snap. A good rule of thumb is that it should make a “ping” sound when plucked.
Blade Direction: Always check that the teeth are pointing in the direction you intend to cut. For most inside cuts on trim, you’ll be cutting on the push stroke, so the teeth should be pointing forward towards the front of the saw frame.
Step 2: Mark Your Cut Line
1. Visualize: Understand the shape you need to cut. For a cope joint, you’re typically cutting at a 45-degree angle.
2. Mark Clearly: Use a sharp pencil or a marking knife to draw your cut line directly onto the trim. If you’re doing a cope joint, you’ll usually cut at a 45-degree angle against the face of the molding, not the edge.
Step 3: Making the Cut
1. Start the Cut: Place the blade on your marked line. Hold the saw handle with one hand and gently steady the frame with the other.
2. The First Stroke: Make a few short, gentle strokes to create a small kerf (the groove made by the saw blade). This helps guide the blade.
3. Cutting Motion:
Push Stroke: Apply steady, even pressure as you push the saw forward. This is where the cutting happens.
Pull Stroke: As you pull the saw back, release the pressure. Let the blade glide.
Rhythm: Develop a smooth, consistent rhythm. Don’t force the saw. Let the teeth do the work.
4. Follow the Line: Keep the blade perpendicular to the surface you’re cutting, or at the angle required for your joint. The thin blade allows you to steer it precisely. If you’re cutting a curve, slowly rotate the workpiece or the saw as you cut.
5. Clearing Sawdust: Occasionally, you might need to clear sawdust from the kerf to ensure a clean cut and prevent the blade from binding. You can do this by gently pulling the saw back a bit or using a small brush.
Step 4: Finishing the Cut
1. Approaching the End: As you get close to finishing your cut, slow down and be extra careful.
2. Support the Offcut: To prevent the piece you’re cutting off from breaking off jaggedly, support it with your free hand as you make the final strokes.
3. Clean Up: Once the cut is complete, you might have a few small splinters. You can often clean these up with a sharp chisel, sandpaper, or a sanding block. For a perfect cope joint, a little fine-tuning with sandpaper is often necessary.
Coping Saw Techniques for Common Trim Jobs
Let’s look at how you apply these steps to specific trim tasks.
Cutting Inside Corner Cope Joints
This is perhaps the most common and valuable use of a coping saw for trim.
1. Miter First: Start by cutting your trim at a 45-degree angle using a miter saw or a miter box. This will create a clean, angled face on the end of the molding.
2. Mark the Cope: Place the mitered piece into the corner where it will be installed. Use a pencil to lightly mark the profile of the wall onto the mitered face. This line represents the “high points” of the molding that you need to cut away.
3. The Cut: Position your coping saw so the blade cuts away from the mitered face, following the line you just marked. You’ll be cutting at roughly a 45-degree angle, essentially shaving off the excess material. Use a reverse-tooth blade for this to ensure the front face of the molding remains pristine.
4. Test Fit: Once cut, test fit the coped piece against the adjoining piece. It should fit snugly without any gaps. You may need to make minor adjustments with sandpaper or a sanding block to get a perfect fit.
Cutting Curves and Shapes
The coping saw excels at this.
1. Draw Your Pattern: Draw the desired curve or shape directly onto the wood.
2. Drill a Starting Hole: For tight curves or internal cutouts, drill a small hole inside the waste area of your pattern.
3. Thread the Blade: Loosen the blade tension, thread the blade through the drilled hole, and re-tension it.
4. Cut Slowly: Guide the saw along your line, making slow, deliberate strokes. For sharp curves, you might need to pivot the saw or workpiece slightly.
Maintaining Your Coping Saw
To keep your coping saw performing at its best, a little maintenance goes a long way.
Blade Storage: Keep spare blades in their protective sleeves or a dedicated blade holder to prevent damage and injury.
Blade Tension: Always loosen the blade tension when you’re finished using the saw. Leaving it under tension can weaken the frame over time and potentially cause the blade to snap.
Cleaning: Wipe down the frame and handle after use to remove sawdust and debris.
Blade Replacement: Blades will dull over time. If you find yourself struggling to make a cut or experiencing excessive splintering, it’s time for a new blade.
Coping Saw vs. Other Saws for Trim
It’s helpful to understand where the coping saw fits in your toolkit compared to other saws.
| Saw Type | Best For | Coping Saw Advantage for Trim |
| :——————– | :—————————————————————————————————- | :———————————————————————————————— |
| Miter Saw | Straight cuts, precise angle cuts (like 45-degree miters for corners) | Not a replacement; it’s a complement. Used to prepare the miter for coping. |
| Jigsaw | Curved cuts, thicker materials, faster curves than a coping saw | More control for very fine, intricate curves; less likely to over-cut or wander on delicate work. |
| Backsaw/Tenon Saw | Straight cuts, general woodworking, less intricate detail work. | Designed for curves and internal cuts where a backsaw cannot reach. |
| Oscillating Multi-Tool | Flush cuts, plunge cuts, sanding, scraping. Can cut curves but with less precision than a coping saw. | Offers superior control and precision for delicate decorative cuts and fine cope joints. |
While a jigsaw can cut curves, the thin, tensioned blade of a coping saw offers a level of control and finesse that’s often needed for delicate trim work. The ability to thread the blade through a pre-drilled hole is also a unique advantage for internal cuts.
Troubleshooting Common Coping Saw Issues
Even with the best intentions, you might run into a snag. Here are a few common problems and how to fix them:
Blade Breaking:
Cause: Blade is too loose, too tight, or you’re forcing the cut.
Solution: Adjust blade tension. Ensure the blade is installed correctly with teeth pointing in the direction of cut. Use smooth, steady strokes and let the blade do the work.
Rough Cuts/Splintering:
Cause: Dull blade, wrong blade for the material, or cutting too fast.
Solution: Use a sharp, high-TPI or reverse-tooth blade. Slow down your cutting speed.
Blade Drifting:
Cause: Blade is too loose, or you’re not keeping the blade perpendicular to the work.
Solution: Increase blade tension slightly. Focus on keeping the blade on your line and the frame of the saw at a consistent angle to the workpiece.
Saw Binding:
Cause: Kerf is too narrow, or you’re trying to make too sharp a turn.
* Solution: Ensure the blade is sharp. For very tight curves, you might need to slightly widen the kerf with a few extra strokes or use a blade with a bit less TPI.
Frequently Asked Questions about Coping Saws
What is a coping saw best used for?
A coping saw is ideal for making curved cuts, intricate patterns, and precise internal cuts in wood. It’s especially popular for creating cope joints in molding and for detailed decorative work.
How do I install a coping saw blade correctly?
Loosen the tension knob, insert one end of the blade into the top slot with teeth pointing forward (for reverse-tooth) or down (for standard), then insert the other end into the bottom slot. Tighten the knob until the blade is taut, like a guitar string. Always ensure teeth point in the direction of your cut.
Which type of blade should I use for trim?
For trim work, a reverse-tooth blade is highly recommended. It cuts on the push stroke, which helps prevent splintering and tear-out on the visible face of the molding, giving you a cleaner finish.
How do I make a clean cope joint with a coping saw?
After mitering your molding at 45 degrees, mark the profile of the wall onto the mitered face. Use your coping saw to cut away the excess material along this line, holding the saw at a complementary 45-degree angle. A reverse-tooth blade is key here.
Can I use a coping saw on materials other than wood?
Yes, coping saws can cut through various materials like thin plastics, soft metals (like brass or aluminum), and even some softer composites. However, you’ll need to use the appropriate blade type and TPI for each material.
My coping saw blade keeps breaking. What am I doing wrong?
Blade breakage usually comes down to tension or forcing the cut. Ensure the blade is properly tensioned – not too loose, not too tight. Use smooth, consistent strokes and avoid bending the blade excessively. Also, make sure you’re not trying to turn too sharply for the blade’s width.
How do I get a smooth finish after cutting with a coping saw?
Using a sharp, high-TPI or reverse-tooth blade is the first step. After cutting, you can gently sand the edge with fine-grit sandpaper or a sanding block to remove any minor imperfections or fuzzies. For cope joints, a light sanding ensures a perfect fit.
Conclusion
The coping saw is a fantastic tool that, once mastered, can elevate your woodworking and DIY projects, especially when it comes to trim. It’s the go-to for those intricate inside corner joints that make a room look professionally finished, and it’s surprisingly capable of handling decorative curves. Remember to choose the right blade for the job – a reverse-tooth blade is often your best bet for trim – keep your workpiece securely clamped, and use smooth, controlled strokes. Don’t be discouraged if your first few cuts aren’t perfect; practice is key. With a little patience and this guide, you’ll soon be confidently creating beautiful, precise cuts with your coping saw, adding that extra touch of craftsmanship to your home projects. Happy cutting!