
Quick Summary: Attaching a hole saw to your drill is simple! Ensure your drill chuck is compatible with the hole saw’s arbor. Insert the arbor into the chuck, tighten it securely by hand, and then use the drill’s chuck key to firmly lock it in place. Always double-check the connection before drilling.
Ever stare at a shiny new hole saw and your trusty drill, wondering how they magically connect? You’re not alone! Many DIYers find this a bit puzzling at first. Getting this connection right is key to safe and effective drilling. A loose hole saw can be dangerous and will give you messy, uneven holes. But don’t worry, it’s actually quite straightforward. We’ll walk you through the simple, proven method to get your hole saw attached securely. Let’s dive in and get you drilling with confidence!
Understanding Your Hole Saw and Drill Chuck
Before we get to attaching, it’s important to understand the two main components involved: the hole saw itself and the drill’s chuck. Hole saws are specialized cutting tools designed to create large, clean holes. They typically consist of a cylindrical saw blade with teeth and an arbor, which is the shank that attaches to your drill.
The drill chuck is the part of your drill that grips the tool bit. Most modern drills use a keyless chuck, which you can tighten and loosen by hand. Older or more powerful drills might use a chuck with a key. The type of arbor your hole saw has will determine how it connects to your specific drill chuck.
Types of Hole Saw Arbors
Hole saws come with different types of arbors, designed for compatibility with various drill chucks and hole saw sizes. Understanding these will help you make the right connection:
- Standard Arbors: These are the most common and feature a threaded shaft that screws into the base of the hole saw. The other end of the arbor has a pilot drill bit and a shank that fits into your drill chuck.
- Quick-Change Arbors: Designed for faster bit changes, these often use a spring-loaded collar system. You simply push the collar back, insert the arbor, and release the collar to lock it in place.
- Mandrel Arbors: Typically found on smaller hole saws or those made for specific materials like glass or tile, these might have a different threading or a more integrated design.
The pilot drill bit in the center of the arbor is crucial. It guides the hole saw, preventing it from wandering as you start drilling, ensuring a precise hole placement. For larger hole saws, the arbor often has multiple mounting points to securely attach the saw blade.
Tools You’ll Need
For most hole saw attachments, you won’t need many specialized tools, but having the right ones makes the job easier and safer.
- Your Drill: Ensure it’s powerful enough for the hole saw size and material you’re cutting. A variable speed drill is ideal.
- Hole Saw: Make sure it’s the correct type for your material (wood, metal, tile, etc.).
- Arbor: This usually comes with the hole saw, but sometimes they are sold separately. Ensure it’s compatible with your hole saw and drill.
- Chuck Key (if applicable): For drills with keyed chucks.
- Safety Glasses: Absolutely essential for protecting your eyes from flying debris.
- Work Gloves: To protect your hands from sharp edges and improve grip.
Always check that your drill’s chuck can open wide enough to accommodate the shank of the arbor. Most standard drills can handle common hole saw arbors.
The Proven Method: Step-by-Step Attachment
Attaching a hole saw to your drill is a straightforward process. Follow these steps carefully for a secure and safe connection.
Step 1: Prepare Your Drill and Hole Saw
First, ensure your drill is unplugged or the battery is removed. This is a critical safety step to prevent accidental startup. Inspect both the drill chuck and the arbor for any debris or damage. Clean them if necessary.
If your hole saw uses a threaded arbor, screw the arbor into the base of the hole saw. Ensure it’s snug. Some arbors have a set screw to further secure them; if yours does, tighten it gently.
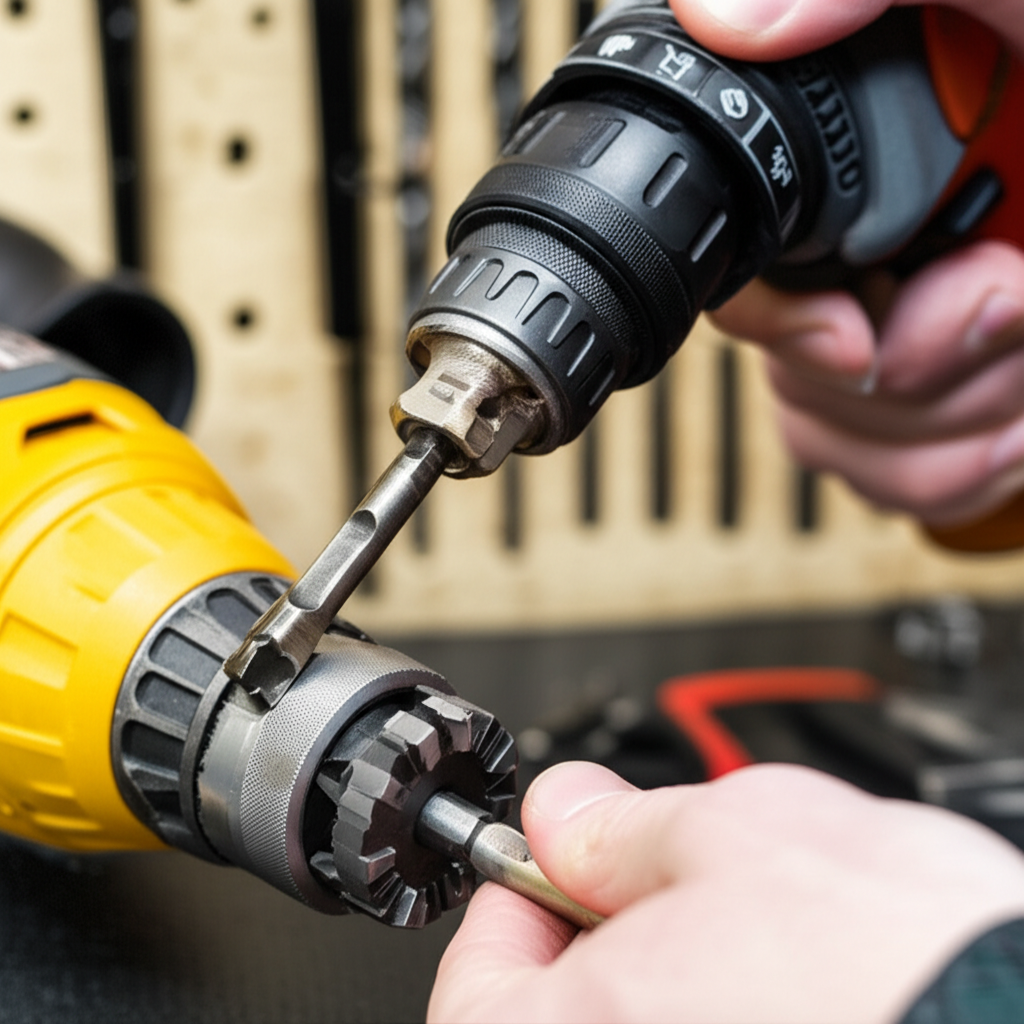
Step 2: Open the Drill Chuck
For a keyless chuck, grip the rear part of the chuck firmly and twist the front part counter-clockwise to open it. You’ll see the chuck jaws retract. Open it wide enough to easily insert the arbor’s shank.
If you have a keyed chuck, insert the chuck key into one of the holes on the chuck and turn it counter-clockwise to open the jaws. Again, open it sufficiently to accommodate the arbor.
Step 3: Insert the Arbor into the Chuck
Carefully slide the shank of the hole saw arbor into the open drill chuck. Make sure the pilot drill bit is centered within the hole saw’s opening.
Step 4: Secure the Chuck
For a keyless chuck, grip the front part of the chuck and twist it clockwise as tightly as you can by hand. You want it to be very snug. For a keyed chuck, insert the chuck key and turn it clockwise, tightening each of the three holes in sequence until the chuck is firmly gripping the arbor.
Step 5: Double-Check the Connection
This is a vital step. Gently try to wiggle the hole saw and arbor. It should feel completely solid and secure. Tug on it slightly to ensure there’s no play. A secure connection is paramount for safety and effective cutting. If it feels loose at all, repeat steps 2-4, ensuring you tighten the chuck as much as possible.
Now, re-insert the battery or plug in your drill. You’re ready to go!
Choosing the Right Hole Saw for Your Material
The way you attach the hole saw remains largely the same, but selecting the correct type of hole saw for your material is crucial for success and safety. Different materials require different tooth designs and construction.
| Hole Saw Type | Materials Best For | Key Features | Best For Beginners? |
|---|---|---|---|
| Bi-Metal Hole Saws | Wood, plastic, drywall, non-ferrous metals (aluminum, brass), mild steel | Flexible, durable teeth; good for general-purpose use. | Yes, very versatile. |
| Carbide-Tipped Hole Saws | Masonry (brick, concrete block), tile, ceramic, fiberglass, harder woods | Hard, sharp carbide teeth; can handle abrasive materials. | Yes, for masonry/tile specific jobs. |
| Diamond Grit Hole Saws | Hard tile, porcelain, glass, stone, marble, granite | Electroplated diamond grit edge; requires water for cooling. | No, requires specific technique and cooling. |
| High-Speed Steel (HSS) Hole Saws | Thinner metals, wood, plastic | Stronger than carbon steel, good for metal cutting. | Yes, for metal. |
For instance, when cutting through ceramic tile or hard surfaces, you’ll need a carbide-tipped or diamond grit hole saw. Trying to use a bi-metal saw on these materials will likely result in dull teeth and a ruined hole saw. Conversely, a diamond grit saw isn’t suitable for wood. Always match your hole saw to the material you’re drilling into. Resources like OSHA’s guidelines on power tool safety emphasize using the right tool for the job, which includes the right cutting accessory.
Tips for Safe and Effective Hole Saw Use
Once your hole saw is securely attached, there are several best practices to follow for optimal results and safety:
- Wear Safety Gear: Always wear safety glasses and gloves. Consider hearing protection for prolonged use.
- Start Slow: Begin drilling at a slower speed to allow the pilot bit to establish the hole and prevent the saw from jumping.
- Maintain Steady Pressure: Apply firm, consistent pressure. Don’t force the drill. Let the hole saw do the work.
- Keep it Cool: For metal or tile, use a lubricant or water to keep the hole saw cool. This extends its life and improves cutting.
- Clear Debris: Periodically withdraw the hole saw from the cut to clear sawdust or metal shavings. This prevents binding and overheating.
- Drill Straight: Keep the drill perpendicular to the surface.
- Support Your Workpiece: Ensure the material you are drilling is securely clamped to prevent it from moving during the cut.
For thicker materials, you might need to drill halfway through and then finish the cut from the other side to get a cleaner edge and prevent blow-out. This is especially true for wood.
Troubleshooting Common Issues
Even with the right attachment, you might encounter problems. Here are a few common ones and how to fix them:
- Hole Saw Not Cutting:
- Cause: Dull teeth, wrong hole saw type for the material, or insufficient drill speed/power.
- Solution: Ensure you have the correct hole saw. Try a faster drill speed (if appropriate for the material) and apply steady pressure. If it’s still not cutting, the hole saw may be dull and need replacement.
- Drill Overheating:
- Cause: Forcing the drill, dull teeth, lack of lubrication (for metal/tile), or using too small a drill for a large hole saw.
- Solution: Ease up on the pressure, use lubrication, ensure the hole saw is sharp, and check if your drill has adequate power.
- Hole Saw Wandering on Start:
- Cause: Pilot bit not engaging properly, or starting drill too fast.
- Solution: Ensure the pilot bit is sharp and centered. Start the drill at a very slow speed until the pilot bit bites into the material. You can also create a small pilot dimple with a nail and hammer where you want to start.
- Hole Saw Binding or Getting Stuck:
- Cause: Debris build-up in the cut, material warping, or drilling too fast.
- Solution: Periodically back the hole saw out of the cut to clear debris. If cutting wood, try to finish the cut from the opposite side if possible.
Proper maintenance of your hole saws, like cleaning them after each use and storing them correctly, can prevent many of these issues. A quick check of the arbor’s threads for damage is also a good idea.
Maintaining Your Hole Saws for Longevity
To get the most out of your hole saws and ensure they perform well for future projects, proper maintenance is key. Think of it as treating your tools right so they treat you right!
- Clean After Use: Always remove sawdust, metal shavings, or other debris from the hole saw and arbor immediately after you finish cutting. A brush or compressed air works well.
- Lubricate (for Metal): If you cut metal, a light coat of oil on the teeth can help prevent rust and keep them in good condition.
- Store Properly: Keep hole saws in their original packaging or a dedicated case to protect the teeth from damage. Avoid tossing them loosely into a toolbox where they can get chipped or bent.
- Check for Damage: Before each use, inspect the teeth for any signs of wear, chipping, or bending. Also, check the arbor for straightness and thread damage.
- Sharpening (Limited): While some bi-metal hole saws can be lightly sharpened with a file on the outer edge of the teeth, it’s often more effective and safer to replace them when they become dull. Carbide and diamond grit saws are generally not resharpenable.
A well-maintained tool not only lasts longer but also performs better, giving you cleaner cuts and a more pleasant DIY experience. For more on tool maintenance, resources like This Old House often provide excellent practical advice.
Frequently Asked Questions (FAQ)
Q1: Can I use any hole saw with any drill?
A1: Not necessarily. While most hole saws use a standard arbor that fits common drills, you need to ensure your drill’s chuck can open wide enough for the arbor shank. Also, the drill needs sufficient power for the size of the hole saw and the material you’re cutting.
Q2: How tight should I make the chuck?
A2: You should tighten the chuck as much as you possibly can, both by hand for keyless chucks and with the chuck key for keyed chucks. A secure grip is essential for safety and to prevent the hole saw from slipping.
Q3: What’s the difference between a bi-metal and a carbide hole saw?
A3: Bi-metal hole saws have teeth made of high-speed steel (HSS) welded to a flexible steel body, making them versatile for wood, plastic, and soft metals. Carbide-tipped hole saws have small carbide tips brazed onto the teeth, making them much harder and ideal for masonry, tile, and tougher materials.
Q4: Do I need a special drill for large hole saws?
A4: For larger hole saws (e.g., over 2 inches), you’ll generally need a more powerful drill, often a corded drill or a high-torque cordless drill. The drill needs enough power to maintain consistent speed under load and to cut through the material without bogging down.
Q5: What if the pilot bit breaks?
A5: If the pilot bit breaks, it’s usually because the drill was started too fast, the material is extremely hard, or the bit was dull. You can often replace the pilot bit on the arbor. Check your arbor’s manual or look for replacement pilot bits at hardware stores.
Q6: Do I need to use a lubricant when cutting metal with a hole saw?
A6: Yes, using a cutting fluid or lubricant is highly recommended when cutting metal. It helps to cool the cutting edge, reduce friction, flush away metal chips, and extend the life of your hole saw and drill bit.
Conclusion
You’ve now got the complete picture on how to securely attach a hole saw to your drill. It’s a simple process, but one that requires attention to detail for safety and effective results. By understanding your arbor, opening and tightening your drill chuck properly, and always double-checking the connection, you’re well on your way to making clean, precise holes in a variety of materials.
Remember to choose the right hole saw for your specific project and material, always prioritize safety by wearing your protective gear, and don’t hesitate to use lubrication when cutting metal or tile. With these tips and the proven attachment method, you can confidently tackle your next DIY project, whether it’s hanging shelves, installing plumbing fixtures, or any other task that requires a perfectly round hole.
Happy drilling!