
Changing a bow saw blade may seem challenging. But with the right steps, it becomes simple.
A bow saw is a handy tool for cutting wood. Over time, the blade becomes dull and needs replacing. Knowing how to change the blade ensures your saw works efficiently. This guide will help you through each step, making the process easy and quick.
Whether you are a beginner or have some experience, this tutorial will provide clear instructions. Let’s get started on keeping your bow saw in top shape.

Credit: www.amazon.com
Tools Needed
Changing a bow saw blade can seem like a daunting task, but having the right tools makes it straightforward. Below, you’ll find a detailed list of the necessary and optional tools to ensure you are fully prepared for the task.
Required Tools
To change a bow saw blade, you will need the following tools:
- New Bow Saw Blade: Ensure it matches the size of your saw.
- Screwdriver: A flat-head or Phillips, depending on the saw’s screws.
- Wrench: Use an adjustable wrench for loosening nuts.
- Gloves: Protect your hands from cuts and scrapes.
- Safety Glasses: Prevent debris from getting into your eyes.
Optional Tools
While not essential, these tools can make the process smoother:
- Lubricant: Helps loosen tight screws and nuts.
- File: Useful for smoothing rough edges on the saw frame.
- Cleaning Brush: Removes dirt and debris from the saw.
- Workbench: Provides a stable surface to work on.
- Clamps: Keeps the saw steady while you change the blade.
Having these tools at your disposal ensures a smooth and safe blade replacement process.
Preparing Your Bow Saw
Before changing your bow saw blade, it’s crucial to prepare the saw itself. Proper preparation ensures safety and efficiency. Follow these steps to get your bow saw ready for the blade change.
Inspecting The Saw
Start by examining your bow saw. Check the frame for any damage. Look for cracks, bends, or any signs of wear. Ensure the saw is in good condition. A damaged frame can make blade replacement unsafe.
Next, inspect the tensioning mechanism. Confirm it works smoothly. A faulty tensioner can lead to an improperly secured blade. This can cause accidents during use. Make sure all parts are intact and functional.
Clearing The Work Area
Create a clean, organized workspace. Remove any clutter or obstacles. A clear area reduces the risk of accidents. It also makes the process smoother.
Gather all necessary tools beforehand. You will need gloves, pliers, and a new blade. Having everything within reach saves time. It also ensures you stay focused on the task.
Ensure good lighting in your work area. Proper visibility is essential for safety. It helps you see what you are doing clearly. This prevents mistakes and injuries.
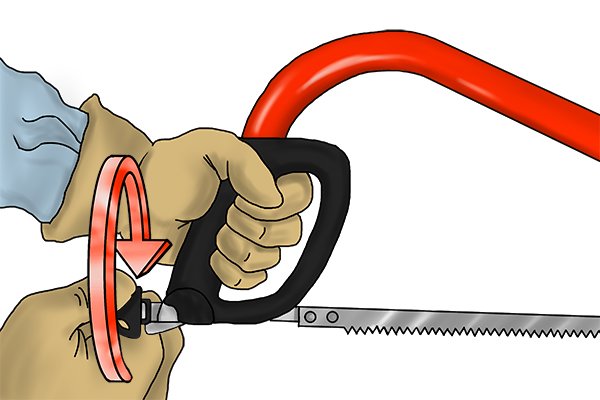
Removing The Old Blade
Changing a bow saw blade can seem challenging. But, with the right steps, it becomes easier. The first step is removing the old blade. This process involves loosening the tension and detaching the blade. Follow these simple steps to get started.
Loosening The Tension
Start by loosening the tension on the bow saw. Locate the tension knob or lever. Turn the knob counterclockwise. This will release the tension on the blade. Ensure the blade is loose enough to remove. If the blade is still tight, turn the knob a bit more.
Detaching The Blade
Next, detach the blade from the saw frame. Hold the saw firmly with one hand. Use your other hand to slide the blade out of the frame. Be careful not to cut yourself. The blade might still be sharp. Dispose of the old blade properly. Check your local guidelines for disposal.
Credit: www.wonkeedonkeetools.co.uk
Choosing A New Blade
Choosing the right blade is crucial for the performance of your bow saw. With various options available, it can be overwhelming to decide which blade suits your needs best. This section will guide you on the types of blades and how to select the right one for your saw.
Blade Types
Bow saw blades come in different types. Each type is designed for specific tasks. Here are some common blade types:
- Green Wood Blades: These blades have larger teeth. They are ideal for cutting fresh, wet wood.
- Dry Wood Blades: These blades have smaller teeth. They are perfect for cutting dry, seasoned wood.
- All-Purpose Blades: These blades are versatile. They can handle both green and dry wood.
Selecting The Right Blade
To select the right blade, consider the material you will cut. If you cut green wood, choose a green wood blade. If you cut dry wood, opt for a dry wood blade. For versatility, an all-purpose blade is a good choice.
Next, check the blade length. Ensure it matches your saw. Most bow saws have standard lengths. Common sizes are 21 inches, 24 inches, and 30 inches. Measure your saw to confirm the correct length.
Also, consider the teeth per inch (TPI). Higher TPI means finer cuts. Lower TPI means faster, rougher cuts. Choose based on your cutting needs. For smooth cuts, go for higher TPI. For fast cuts, opt for lower TPI.
| Blade Type | Best For | Teeth Size |
|---|---|---|
| Green Wood Blades | Fresh, wet wood | Large |
| Dry Wood Blades | Dry, seasoned wood | Small |
| All-Purpose Blades | Both green and dry wood | Medium |
Lastly, consider the blade material. High-carbon steel blades are durable. They stay sharp longer. Stainless steel blades resist rust. They are ideal for damp conditions.
By understanding these factors, you can choose the best blade for your bow saw. This will ensure efficient and effective cutting.
Installing The New Blade
Changing a bow saw blade can be easy if you follow the right steps. After removing the old blade, it’s time to install the new one. This process involves two key steps: attaching the blade and securing the tension.
Attaching The Blade
To start, make sure you have the correct replacement blade for your bow saw. The new blade should match the size and type of the old blade.
- Place the new blade between the bow saw’s frame.
- Align the holes on the blade with the pins on the frame.
- Insert the pins through the holes to hold the blade in place.
Check that the blade is firmly attached. It should not wobble or shift.
Securing The Tension
Once the blade is attached, you need to secure the tension. This is crucial for safe and effective cutting.
- Locate the tensioning mechanism on your bow saw.
- Turn the tensioning knob or lever to tighten the blade.
- Ensure the blade is tight but not overstretched.
A properly tensioned blade should feel firm and have minimal flex. Test the blade by gently pressing it. If it moves too much, tighten the tension further.
Follow these steps to install your new bow saw blade. Proper installation ensures your saw works effectively and safely.
Testing The New Blade
Testing the new blade is crucial to ensure your bow saw works effectively. This step confirms the blade’s installation and its cutting precision. Let’s walk through the process of testing the new blade.
Checking Alignment
Start by checking the alignment of the blade. Ensure the blade is straight and properly tensioned. Misalignment can cause inaccurate cuts and damage the saw.
- Hold the saw at eye level.
- Look along the blade to see if it is straight.
- Adjust the tension if the blade appears loose or crooked.
A properly aligned blade improves cutting performance and safety. Always double-check alignment before proceeding to test cuts.
Test Cuts
Now, it’s time to make some test cuts. Use a scrap piece of wood for this step. Follow these instructions:
- Secure the wood on a stable surface.
- Grip the saw firmly with both hands.
- Start cutting with slow, steady strokes.
Observe the cut closely:
- Is the cut smooth and straight?
- Does the blade move easily through the wood?
If the blade struggles or the cut is rough, recheck the blade alignment. Repeat the test cuts until satisfied with the performance.
Consistent, smooth cuts indicate a properly installed blade. Regularly maintain and test your bow saw to keep it in top condition.
Maintenance Tips
Maintaining your bow saw blade is crucial for its longevity and efficiency. Proper care ensures that your tool stays sharp and ready for use. Below are some essential maintenance tips to keep your bow saw blade in top shape.
Regular Inspections
Perform regular inspections on your bow saw blade. Check for any signs of wear and tear. Look for dullness, rust, or damage. A quick visual check can prevent bigger problems.
- Inspect the blade before and after each use.
- Check for any bends or breaks.
- Ensure the teeth are sharp and clean.
Regular inspections help you catch issues early. This keeps your saw effective and safe to use.
Proper Storage
Proper storage is essential for maintaining your bow saw blade. Store it in a dry place to prevent rust. Avoid leaving it outdoors or in damp areas.
- Hang the saw on a pegboard or wall hook.
- Use a protective cover for the blade.
- Keep it away from moisture and humidity.
Storing your saw correctly extends its life. It also keeps the blade sharp and ready for the next use.

Credit: diy.stackexchange.com
Troubleshooting
Changing a bow saw blade can be tricky. First, loosen the tension screw and remove the old blade. Then, fit the new blade into the slots and tighten the screw.
Changing a bow saw blade can sometimes be tricky. Issues may arise that leave you frustrated. This section will guide you through common problems and quick fixes.Common Issues
The blade might not fit properly. Often, the blade can be too tight or too loose. This affects its cutting efficiency. Another issue is the blade slipping off during use. Incorrect tension is a common cause. The blade may also break if it is old or damaged.Quick Fixes
First, check if the blade fits the saw frame. Ensure it is the correct size. If the blade is too tight, loosen the tension screw. If it is too loose, tighten the screw. For slipping blades, adjust the tension until the blade stays in place. If the blade is broken, replace it with a new one. Always keep spare blades handy. Regularly inspect the blade for damage before use. “`Frequently Asked Questions
How Do You Replace A Bow Saw Blade?
To replace a bow saw blade, first, loosen the tensioning screw. Remove the old blade, then attach the new blade. Finally, tighten the tensioning screw securely.
What Tools Are Needed To Change A Bow Saw Blade?
You need a screwdriver or wrench to loosen and tighten the tensioning screw. No other tools are necessary.
How Often Should You Change A Bow Saw Blade?
Change your bow saw blade when it becomes dull or damaged. Regular inspection ensures optimal performance and safety.
Can I Use Any Blade For My Bow Saw?
No, you must use the correct blade size and type for your specific bow saw model. Check the manufacturer’s recommendations.
Conclusion
Changing a bow saw blade is easy with the right steps. Safety comes first, so wear gloves. Loosen the tension knob to remove the old blade. Insert the new blade and adjust the tension. Check for proper alignment. Now your bow saw is ready for use.
Practice makes perfect, so don’t worry if it’s not perfect the first time. With time, you’ll change blades like a pro. Happy sawing!