
Cutting wood with a drill machine can be surprisingly effective. You can achieve precise cuts with the right technique and tools.
Using a drill machine to cut wood is not as common as using saws. But, it can be a handy method when you need to make specific cuts or only have a drill at hand. With a few simple steps, you can turn your drill into a versatile cutting tool.
In this guide, we will explore how to cut wood with a drill machine. Whether you are a DIY enthusiast or a professional, these tips will help you get the job done efficiently. Ready to learn a new skill? Let’s dive in!

Credit: m.youtube.com
Introduction To Cutting Wood With A Drill Machine
Cutting wood with a drill machine might sound unusual. But, it is an effective method for precise cuts. This technique is useful for both DIY enthusiasts and professionals. Using a drill machine to cut wood can save time and effort. In this blog post, we will discuss the benefits and common applications of cutting wood with a drill machine.
Benefits Of Using A Drill Machine
A drill machine offers several benefits when cutting wood. One major advantage is precision. Drill machines allow for accurate cuts, which is essential in woodworking. Another benefit is versatility. You can use different attachments for various cutting tasks. This flexibility makes the drill machine a valuable tool in your workshop.
Drill machines are also user-friendly. They are easy to handle, even for beginners. This makes them a great choice for DIY projects. Additionally, drill machines are often more compact than other cutting tools. This makes them easier to store and transport.
Common Applications
Drill machines can be used for various woodworking projects. One common application is making holes. This is useful for creating joints or inserting screws. Another application is cutting out shapes. With the right attachment, you can cut intricate designs with ease.
Drill machines are also great for sanding edges. You can attach a sanding bit to smooth rough surfaces. This is especially helpful for finishing touches on your projects. Another use is creating grooves or slots in the wood. This can be done with a special bit attachment, making the drill machine even more versatile.
Essential Tools And Materials
Cutting wood with a drill machine requires specific tools and materials. The right tools ensure safety and precision. Below are the essentials needed to get the job done efficiently.
Required Drill Bits
Using the correct drill bits is crucial for cutting wood:
- Spade Bits: Ideal for creating large holes.
- Forstner Bits: Great for smooth and clean holes.
- Hole Saw Bits: Perfect for cutting larger circular holes.
- Brad Point Bits: Ensure accurate and clean holes with minimal splintering.
Safety Gear
Safety gear is important to protect yourself while working:
- Safety Glasses: Protect your eyes from flying debris.
- Ear Protection: Prevent hearing damage from loud drill noises.
- Dust Mask: Avoid inhaling wood dust.
- Gloves: Protect your hands from splinters and blisters.
Preparing Your Workspace
Before cutting wood with a drill machine, it’s crucial to prepare your workspace. A well-organized and safe area can make your task easier and more efficient. This section will guide you through setting up a safe area and organizing your tools and materials.
Setting Up A Safe Area
First, clear the area of any obstacles. Ensure there’s enough space to move around freely. Remove any unnecessary items that could cause accidents. Safety should be your top priority. Use a sturdy workbench or table. It should be at a comfortable height. This helps avoid strain on your back and arms.
Organizing Tools And Materials
Gather all necessary tools and materials before starting. Place them within easy reach. This includes your drill machine, drill bits, clamps, and wood pieces. Keep a dust mask and safety glasses nearby. These protect you from wood dust and debris. Arrange your tools in an orderly fashion. This helps you work more efficiently.
Label your drill bits and keep them in a box. This saves time when you need to switch bits. Check that your drill machine is in good working condition. Ensure the battery is charged or the cord is long enough to reach your work area. Organizing your workspace can make your wood-cutting task smoother and safer.
Credit: www.wikihow.com
Choosing The Right Drill Bit
Choosing the right drill bit for cutting wood is crucial. It ensures clean cuts and efficient work. Not every drill bit is suitable for wood. Some bits are designed for metal or masonry. Using these can damage the wood or the bit itself. Understanding the types and sizes of drill bits helps in making an informed decision. Let’s dive into the specifics to make your wood-cutting project a success.
Types Of Drill Bits For Wood
Several types of drill bits work well for wood. Here are the most common ones:
Twist Bits: These are the most common type. They are versatile and can be used for various materials, including wood.
Spade Bits: These have a flat, paddle-like shape. They are ideal for making large holes in wood.
Forstner Bits: These bits create clean, flat-bottomed holes. They are perfect for woodworking projects that need precision.
Auger Bits: These have a spiral design and are used for deep, large holes. They are great for drilling into thick wood.
Brad-Point Bits: These have a sharp point and spurs. They provide clean, accurate holes without splintering the wood.
Selecting The Appropriate Size
Choosing the right size of the drill bit is essential. The size of the bit should match the diameter of the hole you need. Using the wrong size can ruin your project. Measure the diameter of your hole first. Then, select a bit that matches this measurement.
If you’re drilling pilot holes for screws, choose a bit slightly smaller than the screw. This ensures the screw fits snugly. For large holes, consider starting with a smaller bit. Gradually increase the size until you reach the desired diameter. This approach prevents the wood from splitting.
Techniques For Cutting Wood
Cutting wood with a drill machine is possible with the right techniques. Whether you are drilling straight holes or cutting curves, knowing the proper methods makes a big difference. Let’s explore the best techniques for cutting wood with a drill machine.
Drilling Straight Holes
Drilling straight holes in wood requires precision and the correct tools. Here are some steps to help you achieve clean and accurate holes:
- Mark the spot: Use a pencil to mark the exact spot where you need to drill.
- Clamp the wood: Secure the wood piece using clamps to prevent movement.
- Choose the right bit: Use a wood drill bit that matches the hole size you need.
- Adjust the speed: Set your drill to a low speed for better control.
- Drill straight: Hold the drill perpendicular to the wood and start drilling slowly.
- Clear debris: Periodically lift the drill to clear wood shavings.
Following these steps ensures your holes are straight and clean.
Cutting Curves And Shapes
Cutting curves and shapes with a drill machine involves a different approach. Here’s how you can do it:
- Draw your design: Sketch the shape or curve on the wood using a pencil.
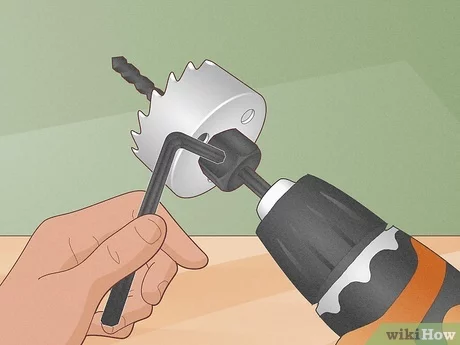
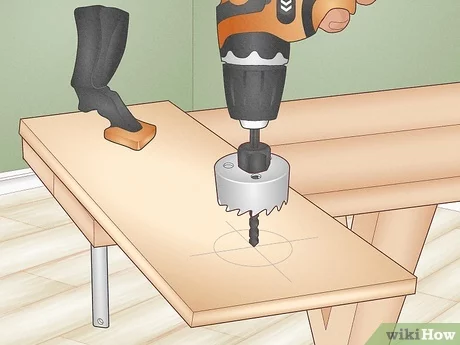
- Use a hole saw: Attach a hole saw to your drill to cut larger circular shapes.
- Drill pilot holes: For intricate shapes, drill several small pilot holes along the outline.
- Connect the dots: Use a jigsaw or coping saw to connect the pilot holes and cut along the outline.
- Smooth edges: Sand the edges to achieve a smooth finish.
These techniques help you create precise curves and shapes in wood.
Safety Measures
Cutting wood with a drill machine can be dangerous if safety measures are not followed. Ensuring you take the right precautions is crucial. Let’s look at the essential safety measures to keep you safe while working with a drill machine.
Protective Equipment
Wearing the right protective equipment is the first step in ensuring safety. Here is what you need:
- Safety glasses to protect your eyes from flying debris.
- Ear protection to guard against loud noises.
- Gloves to keep your hands safe from cuts and splinters.
- Dust mask to avoid inhaling sawdust.
Avoiding Common Hazards
Being aware of common hazards can help you avoid accidents. Here are some tips:
- Make sure the drill bit is secure before starting.
- Keep the work area clean to avoid slips and falls.
- Check the wood for nails or screws to prevent damage to the drill bit.
- Do not wear loose clothing that can get caught in the machine.
- Always unplug the drill when changing bits or making adjustments.
Troubleshooting Common Issues
Cutting wood with a drill machine can sometimes be challenging. Even with the best techniques, problems can arise. This section will help you troubleshoot common issues. Learn how to deal with splintering and fix misaligned cuts effectively.
Dealing With Splintering
Splintering is a common problem when cutting wood. It can ruin the finish of your project. To avoid splintering, follow these steps:
- Use a sharp drill bit to make clean cuts.
- Place a piece of scrap wood under the wood being cut. This supports the wood and reduces splintering.
- Apply masking tape over the cut line. This helps keep the wood fibers together.
- Drill slowly and steadily. This prevents sudden jerks that cause splintering.
If splintering does occur, you can sand the edges. Use fine-grit sandpaper to smooth out the rough areas. This will improve the appearance of your work.
Fixing Misaligned Cuts
Misaligned cuts can happen if the drill is not steady. They can affect the accuracy and look of your project. To fix misaligned cuts, use these tips:
- Ensure the wood is securely clamped before drilling.
- Mark the cut line clearly with a pencil or marker.
- Check the drill bit alignment before starting the cut. Adjust if necessary.
- Hold the drill with both hands for better control.
- Drill at a consistent speed to maintain accuracy.
If a cut is misaligned, you may need to adjust your project design. Use a file to correct minor misalignments. For larger errors, consider re-cutting the piece.
| Problem | Solution |
|---|---|
| Splintering | Use sharp bits, scrap wood, masking tape, drill slowly |
| Misaligned Cuts | Clamp wood, mark lines, check alignment, use both hands |
Credit: www.wikihow.com
Maintenance Tips For Your Drill Machine
Maintaining your drill machine is essential for its longevity and performance. Regular care ensures your tool stays in top condition. Let’s explore some simple maintenance tips.
Cleaning And Lubrication
Keep your drill clean to avoid dust build-up. Wipe it down after each use. Use a soft cloth to remove dirt and debris. For hard-to-reach areas, use compressed air.
Lubricate the moving parts regularly. This reduces wear and tear. Apply a small amount of machine oil to the chuck and other metal parts. Do this every few months or after heavy use.
Storing Your Drill Safely
Store your drill in a cool, dry place. Avoid damp areas to prevent rust. Use a toolbox or storage case for added protection.
Keep your drill and its accessories organized. This makes it easier to find what you need. It also prevents damage from clutter.
Unplug the drill before storing it. This ensures safety and prolongs battery life for cordless models.
Advanced Techniques For Experienced Users
For those who have mastered the basics of using a drill machine to cut wood, advanced techniques offer a new level of precision and creativity. These methods can help you achieve intricate designs and efficient cuts. This section dives into some advanced strategies to elevate your woodworking skills.
Creating Decorative Patterns
To create decorative patterns, start by selecting the right drill bit. A spade or forstner bit works well. Draw your pattern on the wood with a pencil. Secure the wood piece to a workbench. Begin drilling at low speed, following your drawn lines. Ensure steady hands to avoid mistakes. For complex patterns, consider using a template. Templates help maintain consistency and accuracy. Drill slowly and lift the bit occasionally to clear debris. This prevents overheating and ensures a clean cut.
Utilizing Jigs And Guides
Jigs and guides are essential for precise cuts. Create or purchase a jig suitable for your project. Attach the jig to your workbench or wood piece. Guides ensure straight and repeatable cuts. Position the guide where you want to cut. Secure it firmly. Place the drill against the guide. Move the drill along the guide for a straight line. For angled cuts, use an adjustable jig. Set the desired angle and lock it in place. This ensures consistent and accurate cuts every time.
Conclusion And Best Practices
Using a drill machine to cut wood requires safety gear and proper technique. Always secure the wood firmly and choose the right drill bit. Practice on scrap wood to gain confidence.
Cutting wood with a drill machine can be efficient and precise. Following best practices ensures safety and a smooth process. Let’s recap the key points and some final thoughts to keep in mind.Recap Of Key Points
First, choose the right drill bit for your wood type. Secure the wood firmly to prevent movement. Mark your cutting line clearly for accuracy. Start drilling at a low speed to avoid splintering. Gradually increase speed as you progress. Always wear safety gear to protect yourself.Final Thoughts
Practice makes perfect. The more you cut wood with a drill, the better you get. Keep your drill bits sharp and clean. Regular maintenance extends your drill’s lifespan. Always prioritize safety. Follow these best practices to achieve the best results. “`Frequently Asked Questions
Can You Cut Wood With A Drill Machine?
Yes, you can cut wood with a drill machine using the right attachments, like hole saws or rotary cutters.
What Attachments Do I Need?
You need hole saws, rotary cutters, or spade bits. These attachments help in making precise cuts.
Is It Safe To Use A Drill For Cutting Wood?
Yes, it’s safe if you use the correct attachments and follow safety guidelines like wearing protective gear.
What Type Of Wood Can I Cut?
You can cut various types of wood, such as softwood and hardwood. Always ensure the attachment suits the wood type.
Conclusion
Cutting wood with a drill machine can be easy and efficient. With the right tools and techniques, even beginners can achieve great results. Always remember to prioritize safety. Wear protective gear and work in a well-lit area. Practice makes perfect, so keep trying.
Soon, you’ll cut wood like a pro. Enjoy your woodworking projects and happy drilling!