
To successfully hole saw granite, you need a diamond-grit hole saw specifically designed for stone, a powerful drill with a water-cooling system, and a slow, steady approach. Patience and the right technique are key for clean, precise holes without damaging your granite or your tools.
Ever stared at a beautiful slab of granite, needing to drill a perfect hole for a faucet, plumbing, or a unique decorative element, only to feel a wave of dread? You’re not alone. Granite is tough, unforgiving, and can easily chip or crack if you use the wrong tools or techniques. It’s a common DIY challenge, but with the right guidance, you can achieve professional-looking results. This guide will walk you through everything you need to know, from choosing the right gear to executing the cut safely and effectively. Get ready to tackle that granite project with confidence!
Why Granite is a Tough Nut to Crack (and How to Do It)
Granite is an igneous rock, meaning it was formed from molten rock. This process creates an incredibly dense, hard material composed of minerals like quartz, feldspar, and mica. While this makes granite durable for countertops and flooring, it also makes it challenging to cut. Traditional hole saws designed for wood or metal simply won’t cut it – literally. They’ll dull instantly, overheat, and likely shatter.
The key to successfully hole-sawing granite lies in understanding its composition and using tools that are engineered to abrade, rather than cut, through hard stone. This involves specialized abrasives and cooling methods to prevent the intense friction from damaging the material or the tool.
Choosing the Right Hole Saw for Granite
This is the most critical step. Using the wrong type of hole saw is a recipe for disaster. For granite, your only real option is a diamond-grit hole saw.
Diamond-Grit Hole Saws: Your Granite Cutting Companion
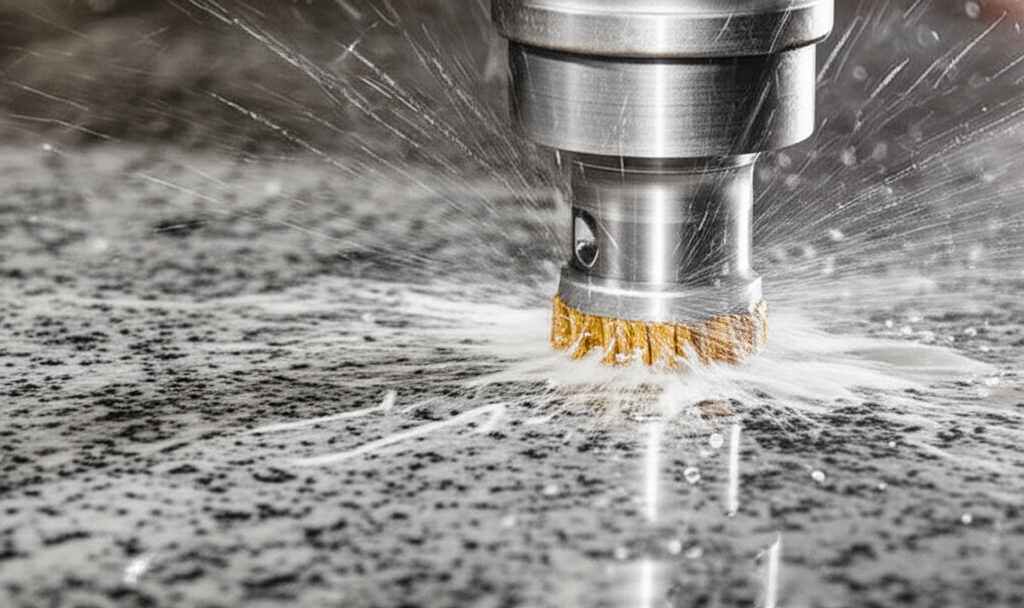
Diamond-grit hole saws feature a cutting edge coated or embedded with industrial diamonds. Diamonds are the hardest known natural substance, which allows them to grind through incredibly hard materials like granite, porcelain, tile, and glass. They work by wearing away the material particle by particle, rather than by the teeth of a metal saw cutting into it.
Types of Diamond Hole Saws
- Electroplated Diamond Hole Saws: These have a layer of diamond particles bonded to the metal core using an electroplating process. They are generally less expensive and good for occasional use or thinner materials. However, the diamond coating can wear down over time.
- Sintered Diamond Hole Saws: These are made by fusing diamond particles with a metal powder at high temperatures and pressure. This creates a very durable, continuous cutting edge that lasts much longer and can handle more demanding tasks. They are typically more expensive but offer superior performance and longevity for hard materials like granite.
- Vacuum Brazed Diamond Hole Saws: These have diamond grit brazed onto the cutting edge using a vacuum brazing process. This creates a strong, heat-resistant bond that ensures the diamonds stay in place, even under high stress. They offer excellent durability and are often preferred for professional use.
What to Look For in a Diamond Hole Saw
- Diamond Grit Quality: Higher quality diamonds and a denser grit will cut faster and last longer.
- Arbor Type: Most diamond hole saws come with a standard arbor (the shaft that fits into your drill). Ensure it’s compatible with your drill chuck. Some larger ones might require a pilot drill bit.
- Depth of Cut: Check the specifications for the maximum depth the hole saw can cut. Most standard ones are suitable for typical granite countertop thicknesses.
- Pilot Drill Bit: Many diamond hole saws include a pilot drill bit in the center. This bit helps to guide the hole saw and keep it from wandering, especially at the start of the cut. Ensure it’s sharp and centered.
For granite, I highly recommend investing in a sintered or vacuum brazed diamond hole saw. While they might cost more upfront, their durability and cutting performance will save you time, frustration, and potentially the cost of replacing damaged granite.
Essential Tools and Safety Gear
Beyond the right hole saw, you’ll need a few other items to ensure a safe and successful granite drilling operation.
Tools You’ll Need:
- Diamond-Grit Hole Saw: As discussed, this is non-negotiable.
- Drill: A powerful drill is essential. A corded hammer drill or a high-torque cordless drill (18V or higher) is recommended. Variable speed is crucial for controlling the cutting process. A hammer drill function is generally not recommended for stone drilling, as it can cause chipping. Stick to the standard rotary drilling mode.
- Water Source/Cooling System: This is absolutely vital. Drilling granite generates immense heat. Water acts as a lubricant and coolant, preventing the diamond grit from overheating and glazing over, and it also helps to wash away debris. You can use a spray bottle, a garden hose with a slow trickle, or a specialized water-feed attachment for drills.
- Arbor/Mandrel: This connects the hole saw to your drill. It usually comes with the hole saw or is sold separately.
- Pilot Drill Bit (if not included): To help guide the cut.
- Safety Glasses or Goggles: To protect your eyes from flying debris.
- Dust Mask: Drilling stone creates fine silica dust, which is harmful if inhaled. A P95 or P100 respirator is highly recommended.
- Work Gloves: For a better grip and protection.
- Masking Tape or Painter’s Tape: To mark your drilling spot and provide a little extra surface protection.
- Bucket or Container: To catch water and debris.
- Sponge or Rags: For managing water and cleanup.
- Center Punch or Nail: To create a small starting divot for the pilot bit.
Safety First!
Working with power tools and hard materials always carries risks. Always prioritize safety:
- Wear safety glasses, a dust mask, and gloves.
- Ensure your drill is in good working condition and the cord is not frayed.
- Secure the workpiece if necessary, especially if you’re drilling a small piece.
- Keep water away from the drill’s motor and electrical components.
- Never force the drill. Let the diamond grit do the work.
- Be aware of your surroundings and keep bystanders at a safe distance.
Step-by-Step Guide: How to Hole Saw Granite
Now that you have your tools and understand the safety precautions, let’s get to the actual drilling. Patience and a methodical approach are your best friends here.
Step 1: Mark Your Drilling Location
Use a pencil or marker to clearly mark the center of the hole you want to drill. For extra precision and to prevent the pilot bit from skittering across the surface, you can place a piece of masking tape over the marked spot. Then, use a center punch or a nail to create a small indentation in the center of the tape. This indentation will act as a guide for your pilot drill bit.
Step 2: Set Up Your Cooling System
This is crucial. Before you start drilling, prepare your water source. If using a spray bottle, have it filled and ready. If using a hose, ensure you can control the flow to a slow, steady trickle. Some professionals use a specialized water-feed attachment that connects directly to the hole saw arbor, creating a more consistent water supply. If you’re drilling a countertop, place a bucket or container underneath to catch the water and slurry. For smaller pieces, you might create a small dam around the drilling area with putty or clay to hold water.
Step 3: Mount the Hole Saw and Pilot Bit
Attach the pilot drill bit to the arbor if it’s separate. Then, securely attach the diamond-grit hole saw to the arbor. Ensure both are tightened properly in your drill chuck. Make sure your drill is set to the correct mode – standard rotary drilling, not hammer mode.
Step 4: Start the Cut (Slow and Steady!)
Place the tip of the pilot drill bit into the indentation you made. Begin drilling at a very slow speed. As the pilot bit starts to cut, slowly introduce water to the drilling area. Once the pilot bit has penetrated a few millimeters into the granite, you can start to angle the drill slightly so the side of the diamond-grit hole saw makes contact with the granite. This helps to create a small groove for the hole saw to follow.
Step 5: Maintain a Consistent Angle and Speed
Once the hole saw is cutting on its edge, slowly bring the drill up to a vertical position. Maintain a slow to moderate speed and steady, consistent pressure. Avoid jerky movements. The key here is to let the diamond grit grind away the stone. Don’t force it. If you feel significant resistance, slow down your drill speed and ensure you have adequate water flow.
Keep the water flowing throughout the entire drilling process. This prevents overheating, lubricates the cut, and flushes away the abrasive slurry. You’ll see a mixture of water and granite dust (slurry) forming. Periodically, you may need to lift the hole saw slightly out of the cut to allow fresh water to enter and to clear out accumulated debris. This is often referred to as “clearing the cut.”
Step 6: Completing the Hole
As you get close to breaking through the other side of the granite, reduce the pressure significantly. Continue to drill slowly and keep the water flowing. This helps prevent chipping or blow-out on the exit side of the hole, which is often the most vulnerable area. Once the hole saw has passed completely through the granite, stop the drill and carefully remove it. Let the water cool the area for a moment before removing the cut-out piece of granite.
Step 7: Clean Up
Carefully remove the cut-out piece of granite. Clean the drilled hole and the surrounding area with water and a sponge. Dispose of the slurry appropriately. Allow the granite and your tools to dry completely before storing.
Troubleshooting Common Granite Drilling Issues
Even with the best preparation, you might encounter a few snags. Here’s how to deal with them:
| Problem | Cause | Solution |
|---|---|---|
| Hole saw not cutting / slow cutting | Dull diamond grit, insufficient water, drilling too fast, wrong type of hole saw. | Ensure you’re using a diamond-grit hole saw. Increase water flow. Slow down drill speed. If the diamonds appear glazed, try a more aggressive angle momentarily or a brief burst of slightly higher speed (with plenty of water) to expose fresh diamond grit. |
| Hole saw overheating / smoking | Insufficient water, drilling too fast, excessive pressure. | Immediately stop drilling. Increase water flow significantly. Let the tool and material cool down. Resume drilling at a slower speed with steady pressure and consistent water. |
| Chipping or blowout on exit | Drilling too fast at the end, too much pressure on exit, no support on the back. | Reduce pressure significantly as you approach the exit side. Ensure continuous water flow. If possible, place a piece of wood or scrap material on the exit side and clamp it securely to support the granite. |
| Pilot bit wandering | No starting indentation, dull pilot bit, drilling too fast initially. | Use a center punch or nail to create a small starting divot. Ensure the pilot bit is sharp. Start at a very slow speed with gentle pressure until the pilot bit establishes a solid groove. |
| Drill overheating | Overworking the drill, insufficient cooling of the hole saw, drilling too long without breaks. | Use a powerful drill (corded or high-voltage cordless). Take breaks to let the drill cool. Ensure the hole saw is adequately cooled by water. Don’t force the drill; let the tool do the work. |
Maintaining Your Diamond Hole Saws
Proper maintenance will extend the life of your diamond-grit hole saws and ensure they perform optimally.
- Clean Thoroughly: After each use, rinse the hole saw and arbor thoroughly with water to remove all granite slurry and debris.
- Dry Completely: Allow the hole saw and arbor to air dry completely before storing them. This prevents rust and corrosion, especially on the arbor.
- Inspect for Damage: Check the diamond coating for any signs of wear, chipping, or detachment. Inspect the arbor for any bending or damage.
- Proper Storage: Store hole saws in a dry place, ideally in their original packaging or a dedicated case, to protect the diamond grit from damage.
- Sharpening (Limited): While you can’t “sharpen” diamond grit in the traditional sense, you can sometimes expose fresh diamond particles by drilling into a softer, abrasive material like a piece of concrete or a grinding stone for a short period. This should be done with water and caution.
For more in-depth information on tool maintenance, resources like the OSHA standard for power tool safety (while not specific to maintenance, it highlights the importance of proper tool condition) or guides from reputable tool manufacturers often provide valuable tips.
Frequently Asked Questions (FAQ)
Q1: Can I use a regular hole saw on granite?
A1: No, absolutely not. Regular hole saws made of bi-metal or high-speed steel are designed for softer materials like wood or metal. They will dull instantly on granite, overheat, and likely break, potentially causing injury or damaging the granite.
Q2: How long does it take to drill a hole in granite?
A2: The time varies greatly depending on the size of the hole, the thickness of the granite, the power of your drill, and the quality of your diamond hole saw. For a 1.5-inch hole in 3cm granite, expect it to take anywhere from 5 to 15 minutes of active drilling, not including setup and cleanup.
Q3: Do I really need water when drilling granite?
A3: Yes, water is essential. It lubricates the cutting surface, cools the diamond grit and the granite to prevent damage and glazing, and flushes away abrasive dust. Without water, you risk ruining your hole saw and cracking the granite.
Q4: What drill speed should I use for granite?
A4: Always use a slow to moderate speed. High speeds generate excessive heat and friction, which is detrimental to both the hole saw and the granite. Look for the lowest speed setting on your drill that still allows the bit to cut effectively.
Q5: What is the best type of diamond hole saw for granite?
A5: Sintered or vacuum brazed diamond hole saws are generally considered the best for granite due to their durability and the strength of their diamond bond. Electroplated saws can work for lighter tasks but will wear out much faster.
Q6: Can I use a cordless drill for drilling granite?
A6: A powerful cordless drill (18V or higher with good torque) can work, especially for smaller holes. However, corded drills often provide more consistent power and torque, which can be beneficial for larger holes or thicker granite. Ensure your cordless drill has a fully charged battery and is capable of sustained, high-torque operation.
Conclusion
Hole-sawing granite might seem daunting, but with the right knowledge and tools, it’s a perfectly achievable DIY task. Remember, the key ingredients are a high-quality diamond-grit hole saw, a powerful drill, a reliable water-cooling system, and a patient, steady hand. By following these steps and prioritizing safety, you can achieve clean, precise holes in your granite projects, transforming your vision into a reality. Don’t let the hardness of granite intimidate you; approach it with the right preparation, and you’ll be amazed at what you can accomplish.