
Putting a bit in a jackhammer is straightforward! This guide shows you how to safely and correctly insert the chisel or point into your jackhammer. We’ll cover preparation, the simple steps, and essential safety tips so you can break concrete with confidence.
Facing a tough concrete job can feel a bit daunting, especially when you’re new to using powerful tools like a jackhammer. You might be staring at this heavy-duty machine, wondering how to get it ready to work. The good news is that putting the business end – the bit – into the jackhammer is one of the simpler parts of the process. It’s a crucial step, and getting it right means you’re one step closer to tackling that project safely and efficiently. Let’s break it down, step-by-step, so you can feel totally prepared.
Why Getting the Jackhammer Bit Right Matters
Think of the bit as the jackhammer’s teeth. It’s what does all the hard work, chipping away at concrete, rock, or masonry. If the bit isn’t seated properly, it won’t hit hard, it might even pop out unexpectedly, or worse, it could damage your jackhammer. For beginners, this can be a real confidence killer. But with a little guidance, you’ll be a pro at it in no time. Getting this step right ensures your jackhammer performs at its best and, most importantly, keeps you safe.
Understanding Your Jackhammer and Bits
Before we dive into the “how-to,” let’s quickly look at what you’re working with. Jackhammers come in different types, mainly electric and pneumatic (air-powered). The process of inserting a bit is very similar for both, but it’s always good to know what kind you have. The bits themselves are also varied. You’ll typically see:
- Point Bits: These are like a sharp pencil and are great for general demolition and breaking up concrete.
- Chisel Bits: These have a flat, angled edge and are perfect for cutting through asphalt, breaking up slabs, or removing tile and mortar.
- Asphalt Cutters: Wider and flatter, designed specifically for slicing through asphalt.
It’s important to use the right bit for your job. For most DIY concrete removal, a point bit or a chisel bit will be your go-to. Always make sure the bit you choose is compatible with your jackhammer model. Check your jackhammer’s manual or the bit packaging for compatibility information.
Essential Tools and Safety Gear
You don’t need a whole toolbox for this, but a few things will make the job much easier and safer:
- Your Jackhammer: Of course!
- The Correct Jackhammer Bit: Make sure it’s the right type and size for your machine.
- Heavy-Duty Gloves: Protect your hands from sharp edges and vibrations.
- Safety Glasses or Goggles: Essential for protecting your eyes from flying debris.
- Hearing Protection: Earplugs or earmuffs are a must – jackhammers are LOUD.
- Steel-Toed Boots: Protect your feet from dropped tools or debris.
- A Soft Cloth or Rag: To wipe down the bit and the chuck area.
- Lubricant (Optional, but Recommended for Pneumatic): Some pneumatic jackhammers require a bit of tool oil. Check your manual.
Safety is paramount when working with any power tool, especially a jackhammer. Always ensure the jackhammer is unplugged (if electric) or the air hose is disconnected (if pneumatic) before attempting to change the bit. This is the most critical safety step.
How to Put a Bit in a Jackhammer: Step-by-Step
Ready to get your jackhammer prepped? It’s a simple process, usually taking less than a minute once you know how. Follow these steps carefully:
Step 1: Ensure the Jackhammer is Safely Deactivated
This is non-negotiable. If you have an electric jackhammer, make sure it is unplugged from the power source. If you have a pneumatic jackhammer, disconnect the air hose from the tool. Double-check that the trigger cannot be accidentally pulled.
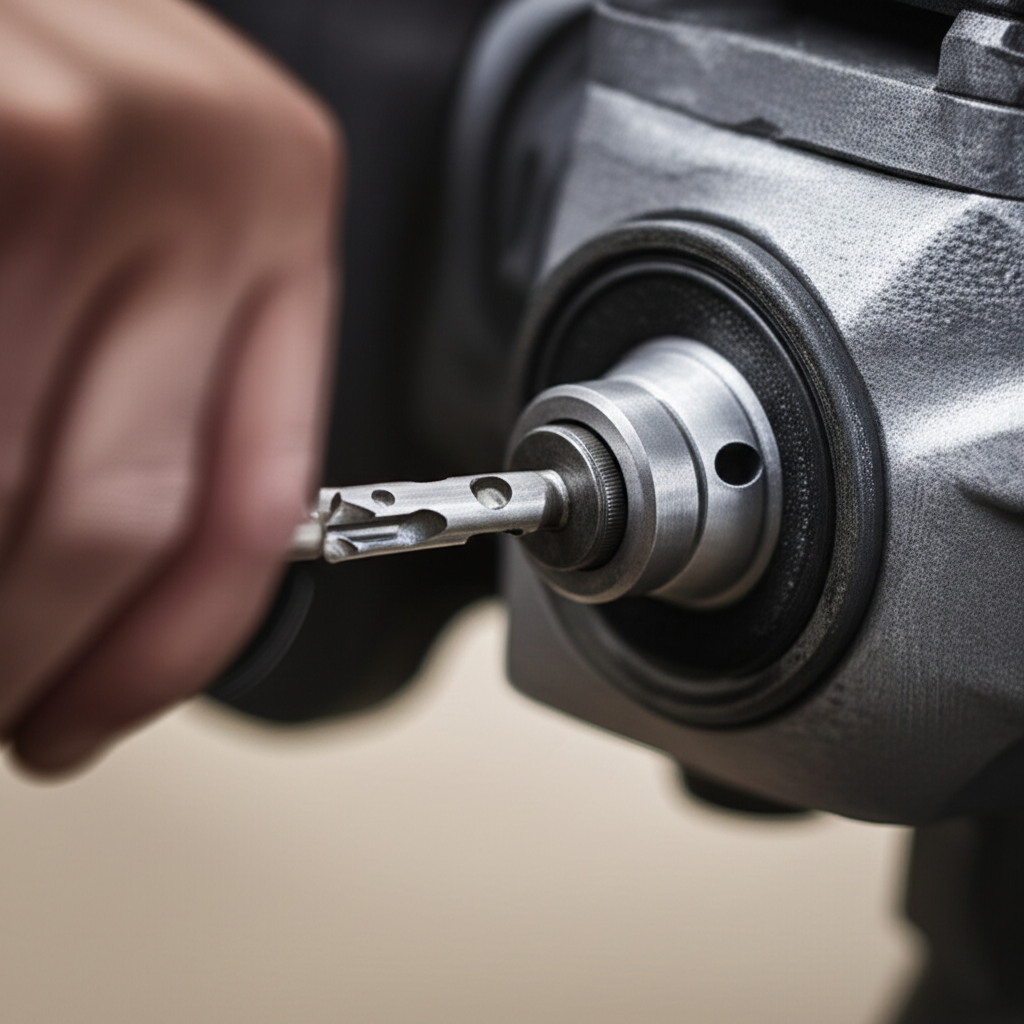
Step 2: Prepare the Chuck Area
The chuck is the part of the jackhammer where the bit goes. It’s usually at the front end. You’ll notice a sleeve or collar that moves. This sleeve is what holds the bit in place. Use your rag to wipe away any dirt, dust, or old grease from the chuck and the end of the bit you’ll be inserting. A clean surface helps the bit seat properly and prevents grit from getting into the mechanism.
Step 3: Lubricate the Bit (If Necessary)
For pneumatic jackhammers, it’s often recommended to put a small amount of specialized jackhammer oil or tool oil on the shank (the part that goes into the chuck) of the bit. This helps it slide in smoothly and protects the internal parts. Electric jackhammers usually don’t require this, but always consult your owner’s manual. A little bit of grease on the bit shank can also help prevent rust and make future changes easier.
Step 4: Insert the Bit
This is the main event! Here’s how it works for most common jackhammers:
For Jackhammers with a Spring-Loaded Sleeve:
- Grasp the bit firmly.
- Pull the chuck sleeve forward (towards the bit). You’ll feel a spring mechanism engage.
- While holding the sleeve back, insert the shank of the bit straight into the chuck opening. Make sure it goes in all the way.
- Once the bit is fully inserted, release the sleeve. You should hear or feel a click as it snaps forward, locking the bit in place.
For Jackhammers with a Collar or Locking Pin:
- Some models might have a collar you need to twist or a pin you need to pull to release the chuck.
- Insert the bit shank into the opening.
- Once the bit is in place, twist the collar back or ensure the pin is securely in its locked position.
Important Note: The bit should slide in relatively easily. If you have to force it, stop and check that you have the correct bit and that the chuck is clear of obstructions. Forcing it can damage both the bit and the jackhammer.
Step 5: Test the Fit
Give the bit a gentle wiggle. It should feel secure and not loose. Try pulling the chuck sleeve forward again – the bit should not come out easily. If it feels loose or wobbly, repeat the insertion process, ensuring the bit is fully seated and the sleeve has locked correctly. A secure fit is vital for efficient operation and safety.
Tips for Choosing the Right Bit
Selecting the correct bit is as important as inserting it properly. Here’s a quick guide:
| Bit Type | Best For | When to Use |
|---|---|---|
| Point Bit | General Demolition, Breaking Concrete | Breaking up slabs, foundations, or large concrete sections. Its pointed tip helps to concentrate force. |
| Chisel Bit | Cutting, Scraping, Removing Tile/Mortar | Breaking concrete into manageable pieces, cutting expansion joints, removing stubborn flooring materials like tile or thin-set mortar. |
| Asphalt Cutter | Asphalt Paving | Breaking up asphalt roads, driveways, or parking lots. Its wide blade is designed for slicing. |
Always check the diameter and length of the bit shank to ensure it matches your jackhammer’s chuck specifications. Manufacturers like Bosch, Makita, and DeWalt offer various bit types compatible with their respective jackhammer models.
Common Mistakes to Avoid
Even with simple steps, beginners can sometimes run into issues. Here are a few common pitfalls to steer clear of:
- Not Deactivating the Tool: The most dangerous mistake. Always disconnect power or air first.
- Using the Wrong Bit: A bit that’s too small or too large won’t seat correctly and can cause damage.
- Forcing the Bit: If it doesn’t go in smoothly, something is wrong. Don’t force it.
- Not Seating the Bit Fully: A partially inserted bit will be inefficient and can come loose.
- Ignoring Maintenance: Keeping the chuck clean and lightly lubricated (where recommended) prevents future problems.
Pneumatic vs. Electric Jackhammers: Bit Insertion Differences
While the core process of inserting a bit is similar, there are slight nuances:
Pneumatic Jackhammers:
- Air Hose: You must disconnect the air hose.
- Lubrication: Often require a few drops of specialized tool oil on the bit shank before insertion. This is crucial for the internal lubrication system of the hammer. Check your manual for the specific oil type and quantity.
- Power Source: Rely on a powerful air compressor.
Electric Jackhammers:
- Power Cord: You must unplug the power cord.
- Lubrication: Generally do not require lubrication on the bit shank, though a light grease can help.
- Power Source: Plug into a standard electrical outlet.
Regardless of the power source, the principle of securing the bit in the chuck remains the same. Always refer to your specific jackhammer’s user manual for detailed instructions and recommendations, as they can vary slightly between manufacturers and models. For example, the Occupational Safety and Health Administration (OSHA) provides general guidelines for power tool safety, which are always a good resource to review before operating any heavy machinery.
Frequently Asked Questions (FAQ)
Q1: How do I know if I have the right bit for my jackhammer?
A1: Check your jackhammer’s manual for the correct chuck size and bit shank diameter. The bit packaging should also list compatible models or specifications. If unsure, take a photo of your jackhammer’s chuck to the tool rental store or hardware store.
Q2: My jackhammer bit feels loose after inserting it. What should I do?
A2: Ensure the bit is fully seated in the chuck and that the locking sleeve has fully engaged. Try pulling the chuck sleeve back and re-inserting the bit, making sure it goes all the way in before releasing the sleeve. If it still feels loose, there might be an issue with the chuck mechanism, and you may need to consult a professional or the manufacturer.
Q3: Do I need to lubricate the bit before inserting it?
A3: For pneumatic jackhammers, it’s often recommended to lubricate the bit shank with specialized tool oil. Electric jackhammers typically do not require this. Always consult your jackhammer’s owner’s manual for specific lubrication instructions.
Q4: What’s the difference between a point bit and a chisel bit?
A4: A point bit has a sharp, pointed end, ideal for breaking up concrete by concentrating force. A chisel bit has a flat, angled edge, better for cutting through asphalt or removing materials like tile.
Q5: Can I use a bit from a different brand of jackhammer?
A5: It depends on the compatibility. While some bits might be interchangeable, it’s always best to use bits specifically designed for your jackhammer model to ensure proper fit, performance, and safety. Check the specifications carefully.
Q6: How often should I check the bit’s fit?
A6: It’s a good practice to check the bit’s security before you start operating the jackhammer and periodically during extended use, especially if you notice any unusual sounds or vibrations.
Conclusion
You’ve got this! Putting a bit into your jackhammer is a fundamental step that’s made much simpler when you know exactly what to do. By ensuring your tool is safely deactivated, keeping the chuck clean, and correctly seating the bit with its locking mechanism, you’re setting yourself up for a successful and safe demolition project. Remember to always wear your personal protective equipment and consult your jackhammer’s manual for any specific model requirements. Now that your jackhammer is prepped and ready, you can approach your concrete-breaking tasks with newfound confidence and control. Happy breaking!