
Quick Summary: Sharpening a chainsaw chain with a file is a straightforward DIY process that restores cutting power and safety. This guide provides a proven, step-by-step method for beginners to achieve a sharp, efficient chain, ensuring cleaner cuts and reduced effort.
Is your chainsaw struggling to cut through wood? Does it feel like you’re forcing it, or worse, are you getting jagged, messy cuts? You’re not alone! A dull chainsaw chain is a common problem for homeowners and DIYers. It’s frustrating, inefficient, and can even be dangerous. But don’t worry, getting that sharp, biting edge back on your chain is totally achievable with just a few simple tools and a little patience. We’re going to walk through the proven method of sharpening your chainsaw chain using a file. By the end of this, you’ll feel confident in restoring your saw’s cutting performance and tackling your projects with ease.
Why Sharpen Your Chainsaw Chain?
Think of your chainsaw chain like the blade on a kitchen knife. When it’s sharp, it glides through food with minimal effort, leaving a clean cut. When it’s dull, it tears and crushes, requiring more force and producing a mess. The same principle applies to your chainsaw. A sharp chain:
- Cuts faster and more efficiently, saving you time and effort.
- Reduces the strain on your chainsaw’s engine and your body.
- Provides cleaner, more precise cuts, which is crucial for woodworking and construction projects.
- Significantly improves safety by reducing the risk of kickback and allowing for better control.
According to the USDA Forest Service, maintaining your equipment, including sharp chains, is a cornerstone of chainsaw safety.
When to Sharpen Your Chainsaw Chain
Several signs indicate it’s time to sharpen your chain:
- Sawdust instead of chips: If your saw is producing fine dust rather than distinct wood chips, the cutters are likely dull.
- Saw drifts: If the saw wanders off the cut line, even when you’re holding it straight, the chain is probably dull and uneven.
- More effort required: You have to push harder to make the saw cut.
- Chain doesn’t cut when the saw is tilted: A sharp chain should cut even when you tilt the saw slightly.
- Smell of burning wood: This can indicate friction from dull cutters.
Regularly inspecting your chain is key. Many professionals recommend sharpening after every few hours of use, or even after each significant job, especially if you’ve hit dirt or rocks.
Tools You’ll Need
Before you start, gather these essential tools:
- Chainsaw File: This is the most crucial tool. You need the correct size file for your specific chainsaw chain.
- File Guide or Holder: This helps maintain the correct angle and depth while filing. Some guides have depth gauges built-in.
- Depth Gauge Tool (Optional but Recommended): This tool helps set the raker height, which controls how deep the cutter bites.
- Gloves: To protect your hands from sharp edges and debris.
- Safety Glasses: Essential for protecting your eyes from flying metal filings.
- Chain Breaker (if removing the chain): Some prefer to remove the chain for sharpening.
- Bench Vise or Clamp: To hold the chainsaw securely.
- Rag: For cleaning the chain.
Choosing the Right File Size
The file size is critical for a proper sharpening. It must match the pitch of your chainsaw chain. The pitch is the distance between the drive links, measured from the center of one rivet to the center of the next, then divided by two. Common pitches are 3/8” low profile, .325”, 3/8”, and .404”.
You can usually find the chain pitch stamped on the drive links of your chain, on the chainsaw’s manual, or on the bar itself. If you’re unsure, check your chainsaw’s manufacturer website or consult a local dealer. Using the wrong file size will result in a poor sharpening job, or even damage to the chain.
Here’s a quick reference table:
| Chain Pitch | Recommended File Diameter |
|---|---|
| 3/8″ Low Profile | 5/32″ (4.0 mm) |
| .325″ | 5/32″ (4.0 mm) or 3/16″ (4.8 mm) |
| 3/8″ | 13/64″ (5.2 mm) or 7/32″ (5.5 mm) |
| .404″ | 7/32″ (5.5 mm) or 1/4″ (6.3 mm) |
Always double-check your chainsaw’s specifications to ensure you have the correct file.
Step-by-Step Guide: How to Sharpen a Chainsaw Chain with a File
Sharpening a chainsaw chain involves two main parts: sharpening the cutters (the teeth) and adjusting the rakers (the small metal pieces in front of the cutters). Let’s break it down.
Step 1: Secure the Chainsaw
First, ensure your chainsaw is stable and safe to work on. Engage the chain brake firmly. If possible, secure the chainsaw in a bench vise or use a clamp to hold the bar. This prevents the chain from moving and allows you to focus on the filing process.
If you don’t have a vise, you can rest the chainsaw on a sturdy surface, ensuring it won’t tip over. Safety first, always!
Step 2: Identify the Starting Point
Look at your chainsaw chain. You’ll notice two types of links: the cutters (the sharp teeth that do the cutting) and the drive links (which sit in the bar groove and have the rakers attached). You need to sharpen every other cutter, starting with a cutter on the side of the bar that faces away from you.
Find the longest cutter. This is your starting point. If all cutters appear to be the same length, it doesn’t matter which one you begin with, as long as you maintain consistency.
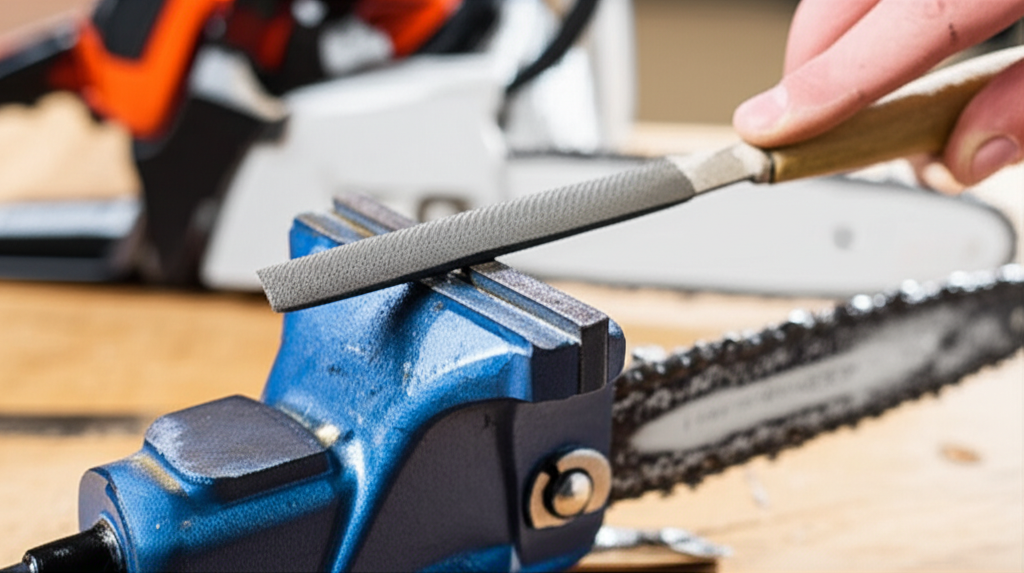
Step 3: Set Up Your File and Guide
Place the correct size file into your file guide. The file guide will have markings to help you achieve the correct sharpening angle. For most chains, the recommended angle is 25 to 35 degrees. The guide will typically have a notch or marking indicating this angle.
Position the file guide against the cutter. The file should be parallel to the ground when you’re filing the top edge of the cutter, and the guide should be set to the correct angle relative to the top plate of the cutter.
Step 4: File the Cutters
Now, let’s get to filing. Place the file on the leading edge of the cutter, ensuring it’s snug against the tooth’s gullet (the curved part at the bottom). The file should be at the correct angle, usually indicated on your file guide.
Using firm, steady strokes, file from the back of the cutter towards the front. Apply pressure on the forward stroke and lift the file slightly on the backward stroke to avoid dulling the cutter. Make 3-5 strokes per cutter. The goal is to remove the dull metal and create a sharp edge.
You’ll know you’re getting a good sharp edge when you start to see a small, shiny sliver of metal forming on the cutting edge. This is called a “burr.”
Step 5: Maintain Consistency and Angle
This is where the file guide really shines. It helps you maintain the correct angle and depth for each stroke. Keep the file perfectly horizontal to the bar (not angled up or down) and at the correct angle to the cutter. Consistency is key to an even, sharp chain.
It’s also important to file each cutter with the same number of strokes. This ensures all cutters are the same length, which is vital for smooth cutting and preventing the chain from pulling to one side.
Step 6: Move to the Other Side
Once you have sharpened all the cutters on one side of the chain (remember, you’re doing every other cutter), move to the other side of the chainsaw. Engage the chain brake again if you disengaged it. Rotate the chainsaw or reposition yourself so you can access the cutters on the opposite side.
Repeat the filing process for every other cutter on this side. Again, maintain the same angle and number of strokes for each cutter. You should be filing from the back of the cutter towards the front, just like you did on the first side.
Step 7: Check and Adjust the Rakers
The rakers, also known as depth gauges, are the small metal pieces located just in front of each cutter. They control how deep the cutter bites into the wood. If the rakers are too high, the cutters won’t bite effectively, and you’ll get sawdust instead of chips. If they’re too low, the saw can become aggressive and prone to kickback.
You’ll need a depth gauge tool for this. Place the tool over the chain so that the raker is positioned in the notch of the tool. The top of the raker should be flush with the top of the tool’s slot. If the raker is sticking up higher than the slot, you need to file it down.
To file the raker, use the round file. Place the file in the notch of the depth gauge tool and file the raker down until it is flush with the tool. Remember to file the rakers on every cutter. Be careful not to file them too low.
Most chains have a recommended raker depth, often indicated by a mark on the depth gauge tool or in your chainsaw manual. It’s typically around 0.025 inches (0.635 mm) for most consumer chains.
Here’s a quick look at the relationship between cutters and rakers:
| Component | Function | Appearance |
|---|---|---|
| Cutter | The sharp tooth that actually cuts the wood. | The angled, sharp metal piece. |
| Raker (Depth Gauge) | Controls the depth of cut by the cutter; prevents the cutter from digging too deep. | The low-profile metal piece just ahead of the cutter. |
It’s important to file the rakers on every cutter on both sides of the chain. This ensures consistent cutting depth across the entire chain.
Step 8: Clean and Inspect
Once you’ve finished filing all the cutters and rakers, use a rag to wipe away any metal filings from the chain and the saw. Inspect your work. All the cutters should look uniform, and the rakers should be at the correct height. You should see a nice, sharp edge on each cutter.
If you removed the chain, reassemble it carefully. If you sharpened it on the bar, you can now release the chain brake and give the chain a gentle tug to ensure it moves freely.
Tips for a Better Sharpening Experience
Here are some extra tips to help you get the best results:
- Work in good light: Being able to see clearly is crucial for proper filing.
- Don’t over-file: Too many strokes can remove too much metal, shortening the life of your chain. Aim for 3-5 good strokes per cutter.
- Keep your file clean: Metal filings can clog the file’s teeth. Brush the file occasionally with a wire brush.
- Practice makes perfect: Your first few attempts might not be perfect, but you’ll get better with practice.
- Consider a sharpening kit: Many manufacturers offer complete sharpening kits that include the correct files, guides, and depth gauge tools for their chains.
- Check chain tension: After sharpening, ensure your chain tension is correct. A chain that’s too loose can derail, and one that’s too tight can cause premature wear. The Occupational Safety and Health Administration (OSHA) provides guidelines on chainsaw safety, which includes proper chain tension.
When to Replace Your Chain
Even with regular sharpening, chainsaw chains have a limited lifespan. You should consider replacing your chain when:
- The cutters are worn down so much that you can no longer achieve a sharp edge, even after filing.
- The chain has been sharpened so many times that the cutters are significantly shorter than the rakers.
- The chain is damaged (e.g., bent, cracked, or has missing parts).
- You notice excessive stretching or uneven wear that cannot be corrected by sharpening.
A good rule of thumb is that if you’ve had to file a chain more than 5-7 times, it might be time for a new one.
Frequently Asked Questions (FAQ)
What is the most important thing to remember when sharpening a chainsaw chain with a file?
The most crucial aspect is maintaining a consistent angle for every cutter and using the correct file size for your chain’s pitch. Consistency ensures the chain cuts evenly and efficiently.
How often should I sharpen my chainsaw chain?
It depends on usage. A good rule of thumb is to sharpen after every few hours of use, or when you notice signs of dullness like sawdust production or the saw drifting off-course. Some professionals sharpen after every significant job.
Can I sharpen my chainsaw chain while it’s still on the bar?
Yes, absolutely! This is the most common method for DIYers and is perfectly effective. Just ensure the chainsaw is securely positioned and the chain brake is engaged for safety.
What happens if I use the wrong size file?
Using a file that is too large or too small will result in an improper sharpening angle and can damage the cutter’s edge, making it less effective or even dulling it further. It can also wear out your chain faster.
How do I know if my rakers are set correctly?
You need a depth gauge tool. Place the tool over the chain so the raker fits into the slot. If the raker is higher than the slot, it needs to be filed down until it’s flush with the top of the slot. Refer to your chainsaw manual for specific raker height recommendations.
My chain still isn’t cutting well after sharpening. What could be wrong?
Several things could be the cause: the chain might be too dull and needs more aggressive filing, the rakers might be too high, the chain tension might be incorrect, or the chain might be worn out and needs replacement. Double-check all the steps and ensure your file angle is correct.
Conclusion
There you have it! Sharpening a chainsaw chain with a file is a skill that’s well within your reach. By following these steps, using the right tools, and paying attention to detail, you can restore your chainsaw’s cutting performance, making your work easier, faster, and safer. Remember, a sharp chain is a happy chain, and a happy chain means a more confident and capable you. Don’t let a dull chain slow you down – grab your file and get to it!