Quick Summary: Removing a coping saw blade is simple! Just loosen the tension by turning the handle counter-clockwise until the blade is slack, then unhook the ends from the frame. It’s a quick step to changing blades or storing your saw safely.
Remove Coping Saw Blade: Your Effortless Guide
Ever found yourself staring at a coping saw, ready to tackle a curve or a tricky cut, only to realize the blade isn’t quite right, or maybe it’s time for a fresh one? Changing the blade on a coping saw might seem a bit fiddly at first, especially if you’re new to this handy tool. But trust me, it’s one of those simple skills that, once you know it, you’ll wonder why you ever thought it was complicated. We’ve all been there, fumbling a bit, but that’s part of the learning curve. This guide is here to make that process smooth and easy, so you can get back to your project with confidence.
A coping saw is fantastic for detailed work. Whether you’re cutting intricate shapes in wood, trimming a piece of molding just so, or even working with certain plastics, its fine blade and adjustable frame give you incredible control. But to keep that control and get the best cuts, you need to know how to properly manage the blade. That includes knowing how to remove it safely and efficiently. We’ll walk through it step-by-step, so you’ll be a pro at blade changes in no time.
Why You Might Need to Remove a Coping Saw Blade
There are a few common reasons why you’ll need to swap out or remove the blade from your coping saw. Understanding these will help you appreciate why this skill is so useful:
- Blade Dullness: Like any cutting tool, a coping saw blade will eventually become dull. A dull blade makes cutting harder, can lead to rougher edges, and increases the risk of the blade snapping.
- Changing Blade Types: Coping saws can use blades with different tooth counts (TPI – teeth per inch). A higher TPI blade is great for fine detail work and smoother finishes on harder materials, while a lower TPI blade is better for faster cuts on softer woods. You’ll want to switch them depending on your material and desired outcome.
- Blade Breakage: It happens! Blades can snap, especially if you apply too much sideways pressure or twist the saw. You’ll definitely need to remove a broken blade before fitting a new one.
- Cleaning and Maintenance: Sometimes, you might want to remove the blade for a thorough cleaning of the saw frame or to lubricate the tensioning mechanism.
- Storage: For safe storage, especially if you’re packing your tools away, removing the blade can prevent accidental cuts and protect the blade itself.
Understanding Your Coping Saw
Before we dive into removing the blade, let’s quickly look at the parts of a coping saw that are important for this task. Knowing these will make the process much clearer.

- Frame: This is the U-shaped metal part that holds the blade under tension. Frames can be solid metal or adjustable (often with a sliding section to accommodate different blade lengths).
- Handle: Usually made of wood or plastic, this is where you grip the saw. It’s also typically where the tensioning mechanism is located.
- Tensioning Knob/Screw: This is the crucial part for blade removal. It’s usually a wingnut or a knob at the end of the handle that you turn to tighten or loosen the blade.
- Blade Pins/Hooks: These are small pins or hooks at the ends of the frame that the coping saw blade’s holes fit onto.
How to Remove a Coping Saw Blade: Step-by-Step
Alright, let’s get down to business. This is a straightforward process that takes just a minute or two once you know the steps. Always make sure your work area is clear and you have good lighting.
Step 1: Loosen the Blade Tension
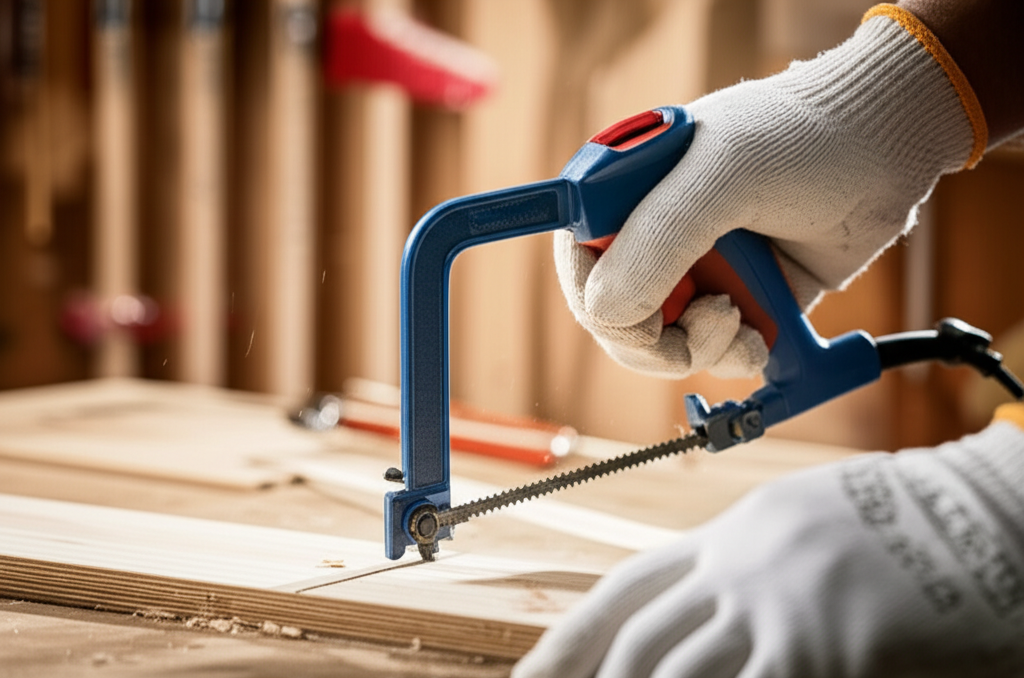
This is the most important step. A coping saw blade is held under significant tension, and you can’t remove it safely or easily if it’s still tight. You need to release that tension.
- Locate the tensioning knob or screw. It’s almost always at the end of the handle, opposite the blade.
- Turn the knob counter-clockwise. You’ll feel the tension on the blade decrease as you turn. Keep turning until the blade is completely slack. It should be floppy and hang loosely.
Pro Tip: If your saw has a very stiff knob, a gentle twist with a pair of pliers might help, but be careful not to strip the threads. Usually, hand power is enough.
Step 2: Unhook the Blade from One End
Once the blade is slack, you can start detaching it from the frame.
- Gently lift the blade’s loop off the hook or pin at either the top or bottom of the frame. It doesn’t matter which end you start with.
- The blade should now hang from the other end.
Step 3: Unhook the Blade from the Second End
Now, detach the blade from the remaining end of the frame.
- Carefully maneuver the blade so its other looped end comes off the hook or pin on the frame.
- The blade is now completely free from the saw.
Step 4: Inspect and Store (or Replace)
With the blade removed, take a moment to:
- Inspect the blade: Check for any damage, dullness, or if it’s broken. If it’s dull or damaged, it’s time for a new one.
- Inspect the saw: Give the frame and handle a quick wipe-down.
- Store the blade safely: If you’re not immediately replacing it, it’s best to store the loose blade in a protective case or wrap it securely to prevent injury and damage.
Preparing to Install a New Blade
If you’re installing a new blade, the process is essentially the reverse, but with a few key points to remember for proper tensioning.
Choosing the Right Blade: This is important! For most general woodworking and trim work, a blade with around 14-18 TPI is a good starting point. For very fine detail, you might go up to 24 TPI. For faster, rougher cuts on softer materials, you might use a lower TPI blade (around 10-12 TPI).
Blade Orientation: Coping saw blades have teeth that are angled forward. When you install the blade, the teeth should point away from the handle, towards the frame. This means when you pull the saw, the teeth cut. If you install it backward, it won’t cut effectively and might even damage the material.
Tensioning the New Blade: This is where you’ll use that tensioning knob again. Install the blade onto the hooks (start with one end, then flex the frame to get the other end on). Then, gradually tighten the knob clockwise. You want the blade to be taut, like a guitar string. Too loose, and it will wander or break easily. Too tight, and you risk snapping it. A good rule of thumb is that it should make a “ping” sound when plucked, but don’t overdo it. Check the manufacturer’s recommendations if available.
For more on choosing and using blades, resources like Wood Magazine’s guide to coping saws offer excellent practical advice.
Tips for Effortless Blade Removal and Replacement
Here are a few extra pointers to make the whole process even smoother:
- Keep it Clean: A little sawdust or grime can make the tensioning knob hard to turn. A quick brush or wipe can save you a lot of hassle.
- Don’t Force It: If the knob is very stiff, check for obstructions or cross-threading. Forcing it can damage your saw.
- Blade Direction Matters: Always ensure the teeth are facing the correct way when installing a new blade. This is crucial for effective cutting.
- Practice Makes Perfect: The more you change the blade, the faster and easier it becomes.
- Safety First: Always wear safety glasses when working with saws, even for simple tasks like blade changes. Blades can snap unexpectedly.
Troubleshooting Common Issues
Sometimes, things don’t go exactly as planned. Here are a few common problems and how to fix them:
| Problem | Possible Cause | Solution |
|---|---|---|
| Tensioning knob is too stiff to turn. | Dirt, rust, or grime in the threads. | Clean the threads with a brush. Apply a drop of lubricant (like WD-40 or 3-in-One oil) to the threads and work the knob back and forth. |
| Blade won’t come off the hook. | Not enough tension released. | Ensure the knob is turned counter-clockwise sufficiently to make the blade completely slack. |
| New blade snaps when tensioning. | Blade is too tight; frame might be warped; blade is defective. | Release tension immediately. Check frame for damage. Try a new blade, and do not overtighten. Aim for taut, not strained. |
| Blade teeth are facing the wrong way. | Incorrect installation. | Remove the blade and reinsert it with the teeth pointing away from the handle. |
Frequently Asked Questions (FAQ)
Q1: How do I know when to replace my coping saw blade?
A1: You’ll know it’s time to replace your blade if it’s making cutting feel like a struggle, if the cuts are rough or splintered even when you’re being careful, or if the blade itself looks damaged, bent, or dull.
Q2: Can I use any saw blade with a coping saw?
A2: No, you need specific coping saw blades. They are designed with holes at each end that fit onto the saw’s pins and are made to be tensioned properly. Standard hacksaw blades or jigsaw blades won’t work.
Q3: What is TPI, and how does it affect my cutting?
A3: TPI stands for “teeth per inch.” A higher TPI (e.g., 24 TPI) means more teeth in an inch, resulting in finer, smoother cuts, ideal for detailed work on hardwoods or plastics. A lower TPI (e.g., 10 TPI) means fewer teeth, which makes for faster, more aggressive cuts, suitable for softer woods.
Q4: How tight should a coping saw blade be?
A4: The blade should be taut, similar to a guitar string. When you pluck it gently, it should make a slight “ping” sound. It shouldn’t be so loose that it wobbles, nor so tight that you feel the frame is straining or about to break. Proper tension is key for clean cuts and blade longevity.
Q5: My coping saw frame is adjustable. How does that affect blade removal?
A5: An adjustable frame usually has a sliding section. The blade removal process is the same: loosen the tension. The adjustability simply allows you to fit blades of slightly different lengths or to achieve different tension levels by adjusting the frame’s overall length.
Q6: Is there a specific way the blade teeth should face?
A6: Yes, always! The teeth should point away from the handle and towards the front of the frame. This ensures that when you pull the saw forward (the cutting stroke for most coping saw operations), the teeth engage the material and cut.
Conclusion
And there you have it! Removing a coping saw blade is a fundamental skill that unlocks the versatility of this wonderful tool. By simply loosening the tension on the handle, unhooking the blade from both ends, and taking a moment to inspect your work, you’re ready to swap for a new blade or put your saw away safely. Remember that correct blade tension and orientation are key to achieving those beautiful, intricate cuts you’re aiming for. Don’t be afraid to practice this a few times; it’s a quick process that will soon become second nature. Happy sawing!