
A coping saw is a versatile hand tool with a thin, narrow blade held under tension by a U-shaped frame. It’s perfect for intricate curves, detailed cuts, and removing waste material in woodworking and other crafts. Learn how to choose, use, and maintain one for precise results.
Ever stared at a piece of wood, a tricky trim joint, or a detailed design and thought, “How am I supposed to cut this cleanly?” You’re not alone! Many DIYers and woodworkers face the challenge of making curved or intricate cuts. It can be frustrating when your standard saw just won’t do the job. But there’s a fantastic tool designed specifically for these tasks: the coping saw. It might look a little unusual, but once you understand what it is and how it works, you’ll wonder how you ever managed without it. This guide will walk you through everything you need to know to confidently use a coping saw for your projects.
What Exactly is a Coping Saw?
At its heart, a coping saw is a type of handsaw characterized by its distinctive U-shaped frame and a very thin, narrow blade. This blade is held taut by the frame, allowing for incredibly precise and controlled cuts, especially on curves and in tight spaces. Think of it as the detail artist of the saw world. Unlike a jigsaw, which is powered and can be a bit more aggressive, a coping saw gives you manual control, making it ideal for delicate work where accuracy is paramount.
The name “coping saw” actually comes from its historical use in creating “cope joints” in woodworking, particularly for fitting decorative moldings in corners. A cope joint involves cutting a piece of molding at an angle so that it fits snugly against another piece that has been shaped to match its profile. The coping saw was the perfect tool for shaping that intricate profile.
Anatomy of a Coping Saw: Understanding the Parts
To truly appreciate what a coping saw does, it helps to know its components. Each part plays a crucial role in its functionality:
- The Frame: This is the U-shaped metal structure that holds the blade. Frames come in different depths (the distance from the blade to the back of the frame), which determines how far into a workpiece you can cut. Deeper frames allow for larger cuts.
- The Blade: This is the cutting edge. Coping saw blades are very thin and narrow, with fine teeth. They are designed to be tensioned by the frame. You can buy blades with different tooth counts and types for various materials and cutting styles.
- The Handle: Usually made of wood or plastic, this is where you grip the saw. Some saws have a pistol-grip handle, while others have a more traditional saw handle.
- The Pins: At each end of the blade are small pins that fit into slots in the frame. These pins help secure the blade and allow it to be rotated.
- The Tensioning Mechanism: Most coping saws have a simple mechanism, often a screw or lever at the end of the frame, that allows you to tighten or loosen the blade. This is crucial for proper cutting and blade longevity.
Why Choose a Coping Saw? Its Strengths
In a world of power tools, why would you reach for a simple handsaw like the coping saw? Because it excels in areas where other saws struggle:
- Intricate Curves: This is its superpower. The narrow blade can turn and flex, allowing you to cut tight, smooth curves that are impossible with most other saws.
- Detail Work: For scrollwork, inlay, marquetry, or cutting out complex shapes, the precision of a coping saw is unmatched.
- Tight Spaces: Its relatively small size and maneuverability make it perfect for working in confined areas where larger saws won’t fit.
- Material Versatility: With the right blade, a coping saw can cut through wood, plastic, thin metal, and even foam board.
- No Power Needed: It’s a great tool for situations where electricity isn’t available, or for quiet work that won’t disturb others.
- Cost-Effective: Coping saws are generally very affordable, making them an accessible tool for any DIYer’s toolkit.
When to Use a Coping Saw vs. Other Saws
It’s helpful to know when a coping saw is the best choice. Here’s a quick comparison:
| Saw Type | Best For | Coping Saw Advantage |
|---|---|---|
| Coping Saw | Tight curves, intricate shapes, detail work, removing waste, fitting moldings. | Extreme maneuverability for curves, precise control, ability to cut inside a workpiece. |
| Jigsaw | Rougher curves, cutting larger panels, general-purpose cutting. | Faster for larger jobs, but less precise for fine details and can wander on curves. |
| Handsaw (Crosscut/Rip) | Straight cuts, longer cuts, rougher material removal. | Cannot make curved cuts, limited to straight lines. |
| Backsaw (Dovetail/Tenon) | Fine, straight cuts, joinery (like dovetails), precise cuts in thicker wood. | More rigid blade for straighter cuts, but cannot handle curves. |
For instance, if you’re cutting out a decorative silhouette from a thin piece of plywood, a coping saw is your go-to. If you need to cut a large circle in a sheet of MDF, a jigsaw might be faster. And for cutting a simple length of lumber to size, a standard handsaw is the most efficient.
Choosing the Right Coping Saw and Blades
Not all coping saws are created equal, and the blade you choose is just as important. Here’s what to consider:
Coping Saw Frames:
- Depth of Frame: Measure the distance from the blade to the back of the frame. A deeper frame allows you to cut further into the material. For most home projects, a frame depth of 4-6 inches is sufficient.
- Handle Comfort: Try to hold the saw. Does the handle feel comfortable and secure in your hand?
- Tensioning Mechanism: Ensure it’s easy to operate and holds the blade securely.
Coping Saw Blades:
Blades are typically sold in packs and vary by:
- Teeth Per Inch (TPI):
- Low TPI (e.g., 10-14 TPI): These blades have fewer, larger teeth. They cut faster but leave a rougher finish. Good for thicker materials or faster waste removal.
- Medium TPI (e.g., 15-20 TPI): A good all-around choice for general woodworking. Offers a balance between speed and finish.
- High TPI (e.g., 21-32 TPI): These blades have many fine teeth. They cut slowly but produce a very smooth finish. Ideal for very thin materials, plastics, or when a pristine edge is required.
- Blade Width: Wider blades are more rigid and better for straighter cuts, while narrower blades flex more, allowing for tighter curves.
- Blade Material: Most are made of high-carbon steel. For cutting metal, look for blades specifically designed for metal cutting, which are often made of bi-metal or have a harder coating.
Tip: It’s a good idea to have a few different TPI blades on hand to tackle various materials and desired finishes.
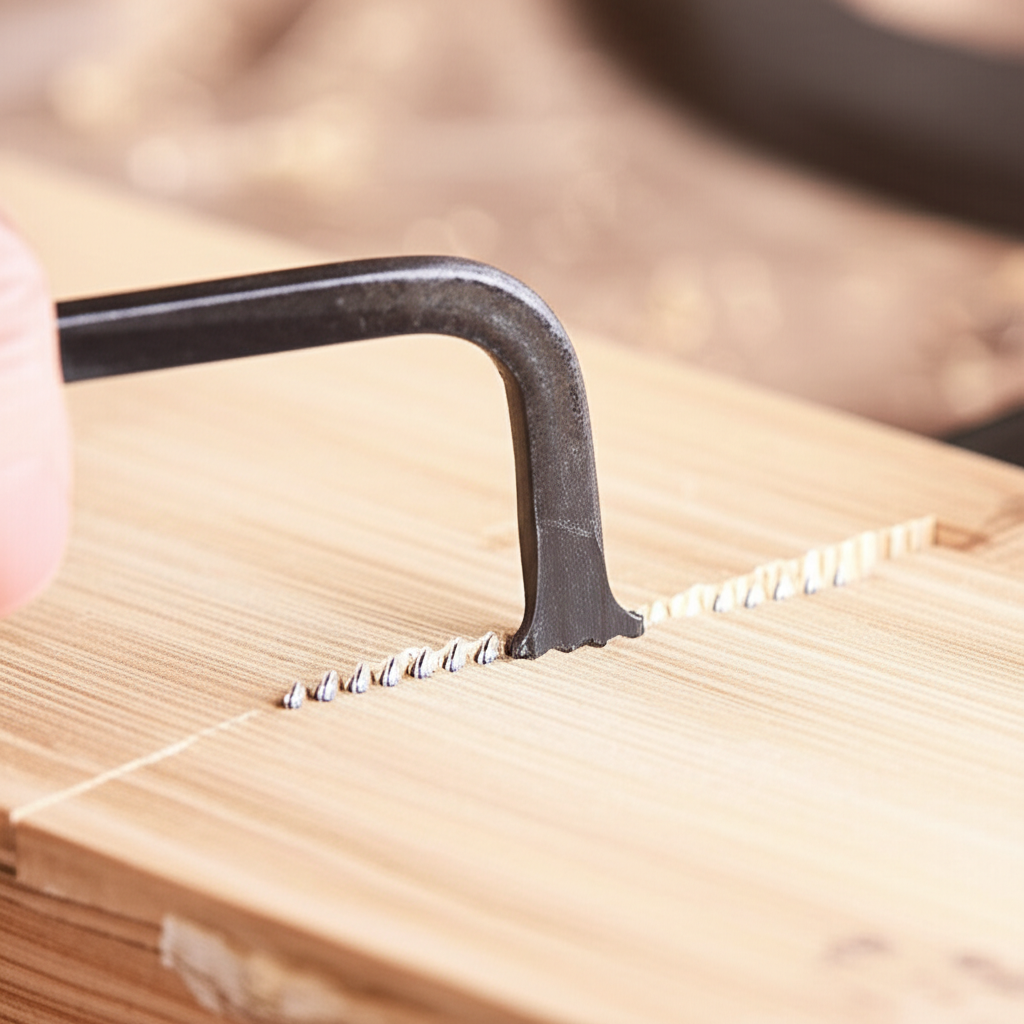
How to Use a Coping Saw: A Step-by-Step Guide
Using a coping saw is straightforward once you get the hang of it. Here’s how to get started:
Step 1: Prepare Your Workpiece
Mark your cutting line clearly on the material. For intricate cuts, a sharp pencil or a fine-tip marker works best. If you’re cutting inside a piece (like a decorative cutout), you’ll need to drill a small hole first to insert the blade.
Step 2: Install the Blade
- Loosen the Tension: Turn the tensioning screw or lever on the frame to release tension on the blade.
- Orient the Teeth: The teeth on a coping saw blade should always point away from the handle (towards the frame’s end). This means the saw cuts on the push stroke.
- Insert the Pins: Place the pin at the bottom of the blade into the slot at the bottom of the frame. Then, flex the frame slightly and insert the pin at the top of the blade into the slot at the top of the frame.
- Tension the Blade: Tighten the tensioning screw until the blade is taut. It should make a “ping” sound when plucked, similar to a guitar string. A loose blade will bend and break easily.
Step 3: Position the Saw
If you are cutting from the edge of the material, position the saw so the blade is on your waste side of the line. If you are cutting an internal shape, thread the blade through the pilot hole you drilled. For internal cuts, you might need to temporarily loosen the blade, thread it through the hole, and then re-tension it.
Step 4: Make the Cut
- Start Slowly: Begin with a gentle push stroke to establish the cut.
- Use Smooth Strokes: Move the saw back and forth using smooth, controlled strokes. Let the blade do the work; don’t force it.
- Guide with Your Hand: Use your free hand to guide the workpiece, keeping your fingers well away from the blade. You can also use your thumb or fingers on the back of the frame to help steer the saw.
- Follow the Line: Keep your eye on the line and gently turn the saw to follow the curve. The narrow blade allows for significant turning.
- Manage Blade Twisting: If the blade starts to twist, you might be pushing too hard or turning too sharply. Ease up and adjust your angle.
Step 5: Completing the Cut
As you near the end of a cut, especially on curves, support the waste piece to prevent it from breaking off prematurely and damaging your workpiece. Once the cut is complete, carefully remove the saw and the workpiece.
Tips for Precision and Control
Mastering the coping saw takes a little practice, but these tips will help you achieve cleaner, more accurate cuts:
- Pilot Holes for Internal Cuts: Always drill a pilot hole slightly larger than the blade’s width for any cut that starts in the middle of a piece. This prevents the wood from binding or tearing.
- Blade Direction Matters: Remember, teeth point away from the handle, cutting on the push. This is different from many other saws.
- Tension is Key: A properly tensioned blade is crucial. Too loose, and it wobbles and breaks. Too tight, and it can snap or make cutting difficult.
- Blade Angle: Keep the blade as perpendicular to the workpiece as possible for most cuts. For very tight curves, a slight angle might be necessary, but be mindful of blade stress.
- Support Your Work: Clamp your workpiece securely to a workbench or sawhorse. Ensure the cutting area is well-supported.
- Practice on Scrap: Before tackling your main project, practice on scrap pieces of the same material. This helps you get a feel for the saw and the material’s resistance.
- Blade Rotation: You can rotate the blade within the frame to cut in different directions without moving the entire saw. This is especially useful for intricate internal cuts.
- Don’t Force It: Let the sharp teeth do the work. Forcing the saw will lead to a rough cut, a broken blade, or a damaged workpiece.
Maintaining Your Coping Saw
A little care goes a long way in keeping your coping saw in good working order:
- Clean the Blade: After use, wipe down the blade to remove sawdust and resin. A brush can help dislodge debris.
- Check for Rust: If you notice any rust, lightly sand it off with fine-grit sandpaper or steel wool. A light coat of oil can help prevent future rust.
- Inspect the Frame: Ensure the frame is straight and the tensioning mechanism works smoothly.
- Store Blades Safely: Keep spare blades in their original packaging or a blade holder to prevent damage and injury.
- Replace Worn Blades: When a blade becomes dull or damaged, replace it. A dull blade requires more force, leading to poor results and potential injury. You can find replacement blades at most hardware stores and online retailers. For more information on tool maintenance, resources like Popular Mechanics offer great tips.
What Materials Can a Coping Saw Cut?
The versatility of the coping saw shines through in the range of materials it can handle, provided you use the correct blade:
- Softwoods: Pine, cedar, poplar – these are very easy to cut with a medium TPI blade.
- Hardwoods: Oak, maple, cherry – these will require a sharper blade (higher TPI) and a bit more effort, but the coping saw handles them well for detailed work.
- Plywood and MDF: Excellent for cutting decorative shapes or scrollwork in these sheet goods. A medium to high TPI blade is recommended.
- Plastics: Acrylic, PVC, ABS – use a high TPI blade designed for plastics to prevent melting or chipping.
- Thin Metal: With a bi-metal or specialized metal-cutting blade, you can cut thin sheet metal, aluminum, or copper.
- Foam Board and Cardboard: Very easy to cut, ideal for crafting and model making.
It’s important to match the blade’s TPI to the material’s thickness and hardness. A general rule of thumb is that at least two to three teeth should be in contact with the material at all times for a clean cut.
Frequently Asked Questions (FAQ)
What is the primary advantage of using a coping saw?
The primary advantage is its ability to make intricate curved cuts and detailed shapes with precision and control, something many other saws struggle with.
How do I know if my coping saw blade is tensioned correctly?
A properly tensioned blade will feel stiff and make a clear, high-pitched “ping” sound when plucked, similar to a guitar string. If it feels loose or makes a dull thud, it needs more tension.
Can I use a coping saw to cut metal?
Yes, but you must use a blade specifically designed for cutting metal. These blades are typically made of bi-metal or have a harder coating and have finer teeth than wood-cutting blades.
What does TPI mean on a coping saw blade?
TPI stands for “Teeth Per Inch.” A higher TPI means more teeth packed into each inch of the blade, resulting in a smoother cut but slower progress. A lower TPI means fewer, larger teeth for faster, rougher cuts.
How do I start a cut in the middle of a piece of wood with a coping saw?
You need to drill a small pilot hole (slightly larger than the blade) through the workpiece. Then, loosen the blade tension, thread the blade through the hole, and re-tension it before making your cut.
My coping saw blade keeps breaking. What am I doing wrong?
Blade breakage is usually due to insufficient tension, forcing the saw, or twisting the blade too much. Ensure the blade is taut, use smooth strokes, and don’t bend the blade beyond its intended curve.
Conclusion
The coping saw is a deceptively simple yet incredibly effective tool. From crafting delicate scrollwork to fitting precise molding joints, its ability to navigate curves and tight spaces makes it an invaluable asset for any woodworker or DIY enthusiast. By understanding its parts, choosing the right blade for your material, and practicing proper technique, you’ll soon be making clean, accurate cuts with confidence. Don’t be intimidated by its unique design; embrace the control and precision it offers, and you’ll find yourself reaching for your coping saw time and time again for those special detail-oriented tasks.