
Quick Summary: Installing a hacksaw blade correctly is simple: teeth face away from the handle, blade tension is firm but not excessive, and the blade is seated securely in the frame slots. This ensures efficient, safe cutting and prevents blade breakage.
Hey there, DIY enthusiasts and curious makers! Samuel H. Murphy here, your friendly guide to all things cutting. Ever grabbed a hacksaw, ready to tackle a project, only to find yourself staring at a floppy, incorrectly installed blade? It’s a common hiccup, and honestly, it can be a bit frustrating when you just want to get that pipe cut or that bolt trimmed. But don’t sweat it! Getting your hacksaw ready to go is actually super straightforward. We’re going to walk through it step-by-step, just like we’re in my garage, so you can feel confident and get those clean cuts you’re after. Ready to make your hacksaw work like a charm?
Why Getting Your Hacksaw Blade Installation Right Matters
A hacksaw might seem like a simple tool, but the way you install the blade makes a world of difference. Think of it like this: a correctly installed blade is your partner in cutting. It cuts smoothly, efficiently, and safely. An incorrectly installed blade? Well, that can lead to all sorts of problems. You might get jagged, uneven cuts, the blade could snap mid-cut, or worse, you could even hurt yourself. For beginners, understanding this simple step is key to building confidence and avoiding common frustrations. We want your projects to go smoothly, and that starts with a well-prepared tool.
Choosing the Right Hacksaw Blade: A Quick Primer
Before we even get to installing, it’s worth a quick word on choosing the right blade. Hacksaw blades aren’t one-size-fits-all. They come in different lengths, thicknesses, and most importantly, with different numbers of teeth per inch (TPI). The TPI is crucial for the material you’re cutting.
Here’s a quick guide:
| Material to Cut | Recommended TPI | Why |
|---|---|---|
| Thin Metal (e.g., sheet metal, conduit) | 24-32 TPI | Many small teeth engage the thin material for a clean cut without snagging. |
| Medium Metal (e.g., pipe, rod, bolts) | 18-24 TPI | A good all-around TPI for most common metal cutting tasks. |
| Thick Metal (e.g., angle iron, heavy bar stock) | 14-18 TPI | Fewer, larger teeth cut through thicker materials more effectively, preventing the blade from clogging. |
| Plastic | 14-24 TPI | The TPI can vary depending on the plastic’s density. Softer plastics might do well with fewer teeth, while harder plastics benefit from more. |
| Wood (for softer woods) | 10-18 TPI | While a dedicated wood saw is better, a hacksaw with fewer teeth can manage softer woods in a pinch. |
You’ll also notice blades made from different materials. High-speed steel (HSS) blades are great for tougher metals, while bimetal blades offer a good balance of durability and flexibility, making them a popular choice for general use. For most DIYers, a bimetal blade with 18 or 24 TPI is a fantastic starting point.
What You’ll Need: Simple Tools for a Simple Job
The beauty of installing a hacksaw blade is that you don’t need a toolbox full of specialized gadgets. In fact, you probably already have everything you need:
- Your Hacksaw: Of course! Make sure it’s a standard hacksaw frame.
- A New Hacksaw Blade: The correct TPI for your material, as we just discussed.
- Your Hands: That’s it! No screwdrivers or wrenches required for the basic installation.
The Proper Way to Install a Hacksaw Blade: Step-by-Step
Alright, let’s get down to business. This is where we turn that loose blade into a cutting machine. It’s really just a few simple actions. I’ll break it down so you can follow along easily.
Step 1: Identify the Blade’s Teeth Direction
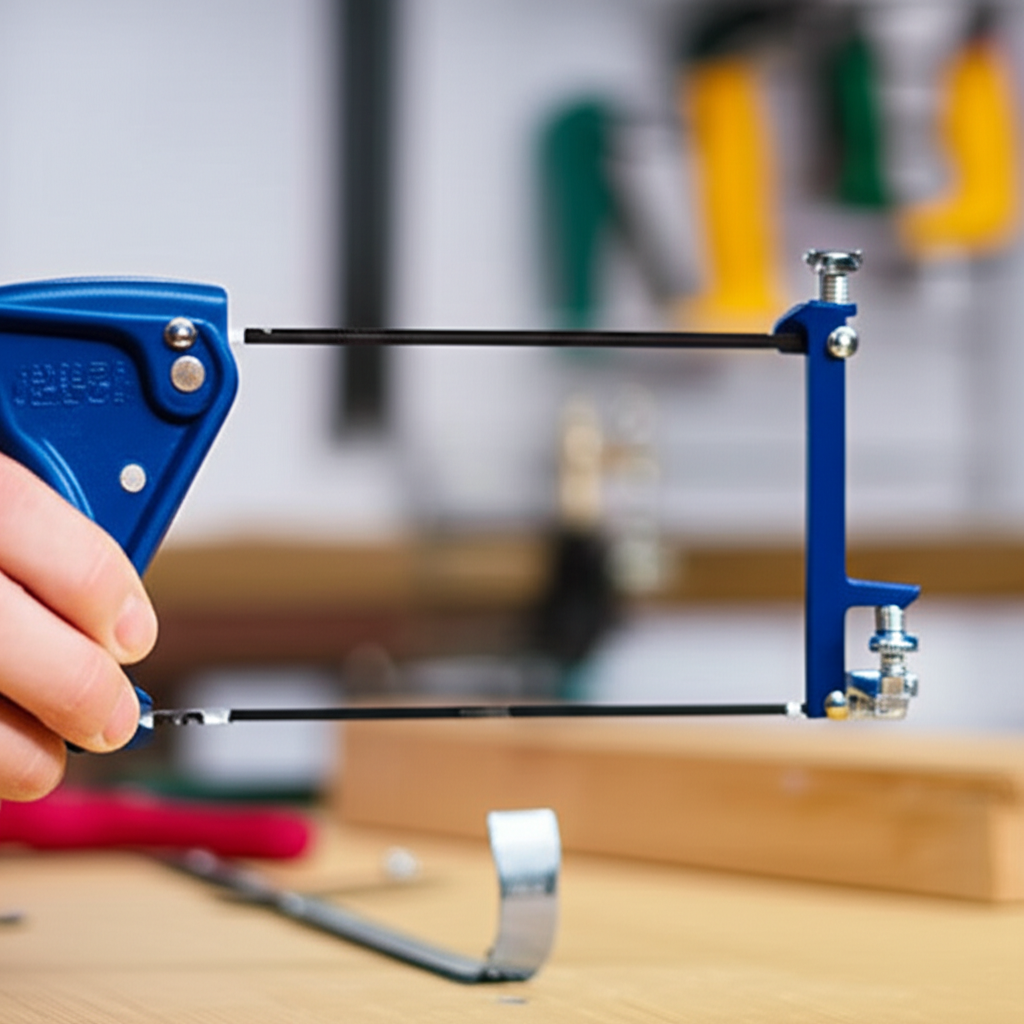
This is the most critical part! Look closely at your new hacksaw blade. You’ll see that the teeth are angled. On a hacksaw blade, the teeth should always face away from the handle of the hacksaw frame. When you’re cutting, you’ll be pushing the saw forward, and that’s when the teeth need to bite into the material. If they face the handle, the blade won’t cut effectively and will likely just skip and chatter.
Think of it like this: You push the saw away from you to cut, so the teeth need to be pointing in the direction of that push.
Step 2: Loosen the Tensioning Mechanism
Most hacksaws have a tensioning mechanism, usually a wingnut or a lever, located at the end of the handle or near the front of the frame. You need to loosen this to create slack in the blade. Turn the wingnut counter-clockwise or move the lever to release the tension. This will make it easier to insert the blade ends into the frame’s slots.
Pro Tip: If your hacksaw has a screw-type tensioner, just loosen it until there’s plenty of give. Don’t try to remove the screw entirely; it’s usually meant to stay in place.
Step 3: Insert the Blade into the Frame Slots
Now, take your blade and align one end with the slot or hook at the front of the hacksaw frame. Slide the end of the blade into the designated slot. It might require a slight wiggle to get it to seat properly. Make sure the blade is sitting flat within the slot.
Visual Aid: Imagine the frame is a little cradle. The blade needs to sit snugly in the grooves at both ends.
Step 4: Insert the Other End of the Blade
With one end of the blade in place, bring the other end towards the handle end of the hacksaw frame. You’ll notice that the frame is slightly flexible. You’ll need to gently bend the frame outwards just enough to slip the other end of the blade into its corresponding slot or hook near the handle. This is where loosening the tensioner in Step 2 really helps!
Important Note: Don’t force it. If it feels like you’re bending the frame too much or the blade isn’t going in, double-check that you’ve loosened the tensioner sufficiently and that the blade is oriented correctly.
Step 5: Tension the Blade
Once both ends of the blade are seated in their respective slots, it’s time to tension it. Slowly tighten the wingnut or move the tensioning lever. As you tighten, you’ll feel the frame become more rigid, and the blade will straighten out and become taut. You’re aiming for a tight, straight blade. A loose blade will bend and break easily, and a blade that’s too tight can also snap. A good rule of thumb is to tension it until it makes a clear “ping” sound when you flick it with your finger, like a guitar string.
How to Test Tension: Gently try to push the blade sideways with your thumb. It should have very little give. If it bends easily, it’s not tight enough.
Step 6: Check Your Work
Before you start cutting, give everything a final check. Is the blade straight? Are the teeth facing away from the handle? Is the blade securely seated in both ends of the frame? Is it properly tensioned? A quick visual inspection and a gentle push will confirm everything is good to go.
Safety First: Always ensure your hands are clear of the blade and the cutting path when you’re checking the installation and when you begin cutting.
Hacksaw Blade Installation: Troubleshooting Common Issues
Even with clear instructions, sometimes things don’t go perfectly the first time. Here are a few common snags and how to fix them:
- Blade Won’t Go In:
- Reason: Not enough tension released, or the frame is bent.
- Fix: Loosen the tensioner further. Ensure the frame isn’t warped.
- Blade is Loose:
- Reason: Tensioner not tightened enough.
- Fix: Tighten the tensioner until the blade is taut.
- Blade Snaps During Installation:
- Reason: Blade was too tight, or the frame was bent excessively, or the blade was inserted incorrectly.
- Fix: Ensure the blade is correctly oriented (teeth away from handle). Loosen the tensioner more before inserting. Tension gradually and listen for the “ping” sound. Avoid over-bending the frame.
- Blade Cuts Crooked:
- Reason: Blade is not properly tensioned, or the teeth are not engaging correctly.
- Fix: Re-tension the blade. Ensure the correct TPI for the material is used. Make sure you are applying even pressure.
Blade Maintenance and Care
To get the most out of your hacksaw blades and ensure they last as long as possible, a little care goes a long way:
- Store Properly: Keep blades in their protective sleeves or a dedicated blade holder when not in use to prevent damage and protect yourself from accidental cuts.
- Clean After Use: Brush off any metal filings or debris from the blade after each use. This prevents rust and keeps the teeth sharp.
- Use Lubricant (for Metal): For cutting metal, a bit of cutting fluid or even a light oil can help reduce friction, keep the blade cool, and improve the cut quality. You can learn more about metal cutting techniques from resources like TWI Global.
- Don’t Force It: If a blade isn’t cutting well, it’s likely dull or the wrong TPI. Don’t try to force it, as this can damage the blade, the material, or the saw. Replace the blade.
Hacksaw Blade Tension: A Deeper Dive
We’ve talked about tension, but it’s worth emphasizing why it’s so important. A hacksaw blade is designed to work under tension. This tension:
- Keeps the blade straight during the cutting stroke.
- Prevents the blade from bending or buckling.
- Ensures the teeth make consistent contact with the material.
- Helps dissipate heat generated during cutting.
The ideal tension is a balance. Too loose, and the blade will wander, skip teeth, and break easily. Too tight, and you risk snapping the blade, especially if it’s a more brittle type or if you apply too much force. The “ping” test is a good indicator, but over time, you’ll develop a feel for what “tight enough” feels like. Many modern hacksaws have a built-in tension gauge, which can be helpful for beginners.
When to Replace Your Hacksaw Blade
No blade lasts forever. Knowing when to swap out a dull blade is key to efficient and safe cutting. Here are some signs your hacksaw blade needs replacing:
- Slow Cutting: If you find yourself applying significantly more pressure than usual, and the saw is barely cutting, the blade is likely dull.
- Stripped Teeth: If you notice that some teeth are missing or appear rounded off, the blade is worn out.
- Excessive Heat: A dull blade will generate more friction and heat. The blade might feel unusually hot to the touch after a few strokes (be careful!).
- Poor Cut Quality: Jagged edges, rough surfaces, or the material “catching” on the blade are all indicators of a dull or damaged blade.
- Blade Snapping Frequently: While a loose blade can snap, if you’re consistently getting good tension and the blade still snaps, it might be a sign of fatigue or a manufacturing defect, but often it’s just a dull blade being pushed too hard.
Replacing a blade is simple, and doing it proactively will save you a lot of frustration and improve your results. You can find reliable information on tool usage and maintenance from organizations like the Occupational Safety and Health Administration (OSHA), which provides guidelines for safe tool handling.
Frequently Asked Questions (FAQ)
Q1: How do I know which way the hacksaw blade teeth should face?
A1: The teeth should always face away from the hacksaw handle. This is because you push the saw forward to cut, and the teeth need to bite into the material during the forward stroke.
Q2: My hacksaw blade feels loose even after tightening. What’s wrong?
A2: Make sure you’ve loosened the tensioning mechanism sufficiently before inserting the blade. If it’s still loose, try tightening the tensioner more. If it won’t get tight, the tensioning mechanism itself might be worn or damaged, or the blade might be too short for the frame.
Q3: Can I use a hacksaw blade to cut wood?
A3: While a hacksaw is primarily for metal and plastic, you can cut softer woods with a hacksaw blade that has fewer teeth per inch (TPI), typically between 10-18 TPI. For best results with wood, use a saw specifically designed for woodworking.
Q4: How tight should a hacksaw blade be?
A4: The blade should be taut and straight, like a guitar string. It shouldn’t have much give when you press it sideways. A good test is to flick it with your finger; it should make a clear “ping” sound. Avoid overtightening, which can snap the blade.
Q5: What does TPI mean on a hacksaw blade?
A5: TPI stands for “Teeth Per Inch.” It tells you how many teeth are on one inch of the blade. A higher TPI means more teeth, which are smaller and better for cutting thin materials cleanly. A lower TPI means fewer, larger teeth, which are better for cutting thicker materials faster.
Q6: Why does my blade keep breaking?
A6: Common reasons include the blade being too loose, too tight, the wrong TPI for the material, or trying to force the cut. Ensure proper tension, correct TPI, and a smooth, consistent cutting motion.
Conclusion: You’ve Got This!
See? Installing a hacksaw blade is a fundamental skill that’s surprisingly easy to master. By paying attention to the direction of the teeth, ensuring proper tension, and choosing the right blade for your material, you’re setting yourself up for success on any cutting project. Remember, a well-installed blade isn’t just about making a clean cut; it’s about working safely and efficiently, building your confidence with every stroke. So next time you need to make a cut, you’ll know exactly what to do. Happy cutting, and enjoy those satisfyingly clean results!