
The water separator on your air compressor should be placed as close to the compressor’s outlet as possible, before any air tools or other accessories, to effectively capture moisture.
Ever notice little droplets of water where you don’t want them? It’s a common frustration for anyone using an air compressor. Water in your air lines can cause rust, damage your tools, and ruin paint jobs. It’s a sneaky problem that can sneak up on you. But don’t worry, it’s easily preventable with the right setup. Knowing where to put your water separator is key to keeping your air clean and your tools happy. We’ll walk through the best placement, step-by-step, so you can get back to your projects with confidence.
Why Water in Your Air Lines is a Big Deal
Think of your air compressor like a lung for your tools. It breathes in air, compresses it, and then delivers that power. But the air we breathe isn’t perfectly dry. When air is compressed, it heats up, and then cools down. This cooling process causes the moisture in the air to condense, just like dew on grass. This condensed water can wreak havoc on your valuable air tools.
Rust and Corrosion: Metal tools exposed to water will inevitably rust. This weakens the tool and can lead to costly repairs or replacements.
Tool Malfunction: Water can gum up the delicate internal mechanisms of air tools, causing them to seize or perform poorly.
Poor Finish Quality: If you’re using an air compressor for painting or spraying, water droplets can cause blemishes, runs, and an uneven finish.
Reduced Efficiency: Water can restrict airflow, meaning your tools won’t perform at their peak.
That’s why a water separator is an essential accessory for any air compressor user. It acts as a first line of defense against these moisture-related problems.
Understanding the Air Compressor System: A Quick Look
Before we dive into placement, let’s quickly visualize how air flows through your system. It’s pretty straightforward:
1. Compressor: This is where the air gets squeezed.
2. Tank: The compressed air is stored here.
3. Hose: Carries the air from the tank to your tools.
4. Tools/Accessories: The final destination for the air.
The goal of the water separator is to catch that pesky moisture before it travels too far down the line.
Where Do You Put The Water Separator: Genius Placement Explained
The golden rule for water separator placement is simple: As close to the compressor’s main air outlet as possible, and before any other accessories or hoses.
Let’s break down why this is the “genius” placement:
Catching Moisture Early: The air coming directly from the compressor, especially after it has been stored in the tank, is the most saturated with moisture. Placing the separator here means you’re intercepting the water at its source, preventing it from traveling through your hoses and into your tools.
Protecting the Entire System: By installing it right after the compressor’s output, you protect not only your tools but also your hoses, fittings, and any other components in the line.
Efficiency: The less distance the moist air has to travel before being filtered, the more effective the separator will be.
The Ideal Setup: Visualizing the Flow
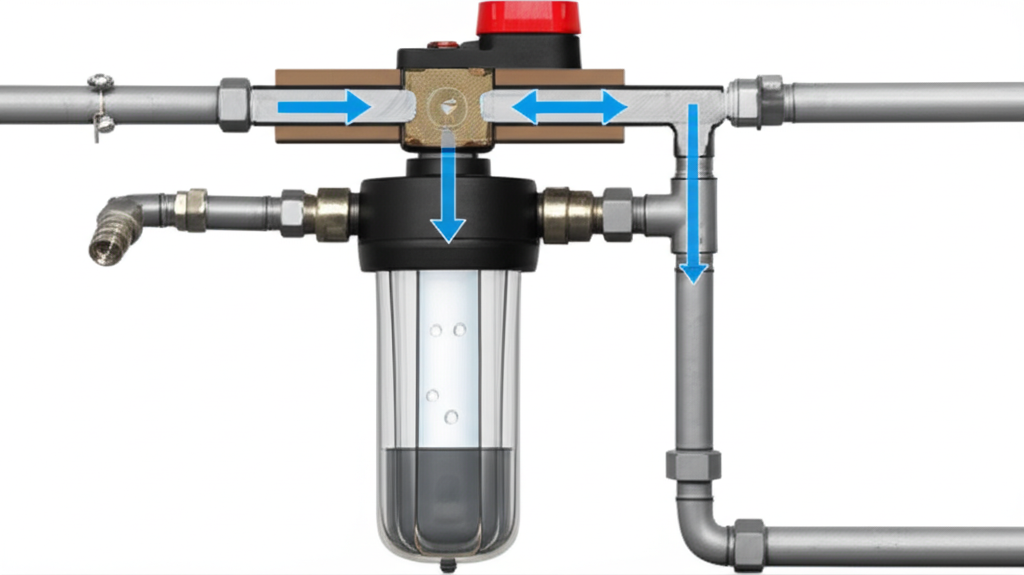
Imagine your air compressor has an outlet port. You’ll typically attach a fitting to this port, and then connect your water separator directly to that fitting. From the water separator, you’ll then connect your main air hose.
Here’s a typical connection sequence:
`Compressor Outlet` -> `Fitting` -> `Water Separator` -> `Air Hose` -> `Tool`
Why NOT to Place it Elsewhere
You might be tempted to put the water separator at the end of the hose, right before your tool. While this will protect your tool, it won’t protect your hose or any other fittings in between. Water will still accumulate in your hose, leading to rust and potential blockages over time.
Similarly, placing it after an air dryer or filter might seem logical, but the primary goal is to catch the bulk of the condensation as early as possible. Advanced filtration systems are great for finer particles and oil, but the initial, heavy moisture removal is best done right at the source.
Types of Water Separators and How They Connect
Water separators come in a few main varieties, and their connection methods are generally straightforward:
1. Inline Moisture Separators
These are the most common and versatile type. They typically have threaded inlet and outlet ports.
How they connect: You’ll need a fitting (often a male-to-male adapter or a swivel fitting) to connect the compressor’s outlet to the inlet of the water separator. Then, another fitting or your main air hose connects to the outlet of the separator.
| Component | Connection Type |
| :——————— | :——————————- |
| Compressor Outlet | Threaded (e.g., 1/4″ NPT Male) |
| Water Separator Inlet | Threaded (e.g., 1/4″ NPT Female) |
| Water Separator Outlet | Threaded (e.g., 1/4″ NPT Female) |
| Air Hose | Threaded (e.g., 1/4″ NPT Male) |
Key Feature: Many have a small valve or button at the bottom to drain the collected water.
2. Desiccant Air Dryers/Filters (often include moisture separation)
While more advanced, these units also serve the purpose of moisture removal and are typically placed in a similar “early” position.
How they connect: Similar to inline separators, they have threaded ports that connect directly to the compressor’s output.
3. In-tank Moisture Separators
Some larger compressors have built-in separators or drain valves at the bottom of the tank. While these help, they don’t replace the need for an external separator for the air leaving the tank.
Step-by-Step Installation Guide
Let’s get your water separator installed! It’s a simple process, but taking your time ensures a good seal and effective operation.
Tools You’ll Likely Need:
Water Separator: Choose one appropriate for your compressor’s CFM (cubic feet per minute) rating and your common air pressure.
Pipe Thread Sealant (PTFE tape or pipe dope): Essential for creating airtight seals on threaded connections.
Adjustable Wrenches or Pliers: To tighten fittings securely.
Optional: Swivel Fitting: Can make connecting easier and reduce stress on the compressor outlet.
Optional: Teflon Tape Dispenser: Makes applying PTFE tape neat and easy.
Installation Steps:
1. Safety First! Ensure your air compressor is turned OFF and the tank is fully depressurized. Disconnect the power source (unplug it or turn off the breaker).
2. Identify the Compressor Outlet: Locate the main port where compressed air exits the compressor tank and is ready to connect to your hose.
3. Choose Your Fittings: You’ll likely need a fitting to connect from the compressor outlet to the water separator’s inlet. A common scenario is if your compressor has a male NPT thread, and your separator has a female NPT thread. You might need a male-to-male adapter or a male-to-female adapter depending on the specific threads. A swivel fitting can be very handy here.
4. Prepare the Threads: Apply PTFE tape (Teflon tape) or pipe dope to the threads of the fitting that will connect to the compressor outlet. Wrap the tape clockwise around the threads 2-3 times, ensuring it’s snug but not overly bulky.
5. Connect to the Compressor: Carefully thread the fitting into the compressor’s outlet port. Hand-tighten first, then use a wrench to snug it up another half to full turn. Avoid overtightening, which can damage the threads.
6. Prepare the Separator Inlet: Apply PTFE tape or pipe dope to the threads of the fitting that will connect to the water separator’s inlet.
7. Attach the Water Separator: Connect the water separator to the fitting you just attached to the compressor. Again, hand-tighten, then use a wrench to snug it up. Ensure the separator is oriented correctly – the inlet should be on the side that receives air from the compressor, and the outlet will be where the air exits.
8. Connect Your Air Hose: Apply PTFE tape or pipe dope to the threads of your main air hose (or the fitting on the end of your hose). Connect this to the outlet port of the water separator. Tighten securely with a wrench.
9. Check for Leaks:
Turn the power back on to your compressor.
Slowly allow the compressor to build pressure.
Listen for any hissing sounds, which indicate air leaks.
You can also use a spray bottle with soapy water. Spray around all the connections. If you see bubbles forming, you have a leak.
If you find a leak, turn off the compressor, depressurize the tank, and slightly tighten the leaking connection. Re-test.
Ongoing Maintenance: Draining the Separator
This is crucial! Your water separator won’t do its job if it’s full of water.
Regular Draining: Most separators have a small drain valve or petcock at the bottom.
How to Drain: With the compressor turned off and the system depressurized, open the drain valve. Water will flow out. Close the valve once the water stops.
Frequency: Drain it regularly, especially after long periods of use or in humid conditions. Some separators have automatic drains, but manual draining is often more reliable for DIYers. Check your separator’s manual for specific recommendations.
Factors to Consider When Choosing a Water Separator
Not all water separators are created equal. Here are a few things to keep in mind:
CFM Rating: This is the volume of air the separator can handle. Make sure it matches or exceeds your compressor’s maximum CFM output. An undersized separator will restrict airflow.
Pressure Rating: Ensure the separator can handle the maximum pressure your compressor can produce.
Port Size: Most common sizes are 1/4″ or 3/8″ NPT. Match this to your compressor’s outlet and your hose fittings.
Filter Type: Some separators have a simple bowl, while others include a coalescing filter to remove finer oil and water particles. For painting or very sensitive tools, a coalescing filter is highly recommended.
Drain Type: Manual drain valves are common, but automatic float drains can be more convenient if you use your compressor frequently.
Advanced Air Filtration: Beyond the Basic Water Separator
For more demanding applications, like automotive painting or delicate instrument use, you might need a more robust filtration system. These often combine water separation with oil removal and particle filtration.
Common Filtration Stages:
1. Water Separator (Coalescing Filter): Catches larger water droplets and oil aerosols.
2. Particulate Filter: Removes dust, rust, and other solid contaminants.
3. Activated Carbon Filter: Removes oil vapors and odors.
These multi-stage filters are typically installed in the same “close to the compressor” position as a basic water separator, often as a single unit.
According to OSHA guidelines on compressed air systems, proper filtration and moisture control are essential for worker safety and equipment longevity. While OSHA’s focus is often on industrial settings, the principles of clean, dry air apply to all users. You can learn more about compressed air safety standards on the Occupational Safety and Health Administration (OSHA) website.
Frequently Asked Questions (FAQ)
Q1: Do I really need a water separator if my compressor has a tank?
A1: Yes! While the tank helps cool air and allow some moisture to condense and drain from the tank itself, air leaving the tank will still carry moisture. A separator placed after the tank outlet is essential for capturing this remaining moisture before it reaches your tools.
Q2: Can I put the water separator at the end of my air hose?
A2: You can, but it’s not ideal. This placement only protects your tool, not your hose or any other fittings in between. Water will still collect in your hose, potentially causing rust and damage over time. Placing it near the compressor outlet protects the entire system.
Q3: How often should I drain the water separator?
A3: This depends on your usage and the humidity in your environment. It’s a good habit to drain it after each significant use, or at least daily if you’re using it frequently. Check the water level in the bowl visually if possible; if it’s getting full, it’s time to drain.
Q4: What happens if I don’t use a water separator?
A4: You risk damaging your air tools with rust and corrosion, which can lead to costly repairs or premature replacement. For painting, water can ruin your finish. It also reduces the overall efficiency and lifespan of your compressed air system.
Q5: My water separator has a small bowl. Is that normal?
A5: Yes, that bowl is designed to collect the condensed water. It’s important to regularly drain this bowl to keep the separator working effectively.
Q6: What is PTFE tape and why is it important?
A6: PTFE tape, also known as Teflon tape, is a thread sealant. It fills in the small gaps between threaded fittings, creating an airtight seal. This prevents compressed air from leaking out at the connections, ensuring your system is efficient and safe.
Conclusion: Clean Air for Better Results
Installing a water separator correctly is one of the simplest yet most impactful upgrades you can make to your air compressor setup. By placing it right at the compressor’s outlet, you create an efficient barrier against moisture, protecting your valuable tools, ensuring better performance, and saving you money on repairs and replacements in the long run.
Remember to always prioritize safety by depressurizing your system before making any connections, use thread sealant for a proper seal, and make draining the separator a regular part of your maintenance routine. With a little attention to placement and upkeep, you’ll enjoy clean, dry air for all your projects, from inflating tires to running sophisticated pneumatic tools. Happy compressing!