
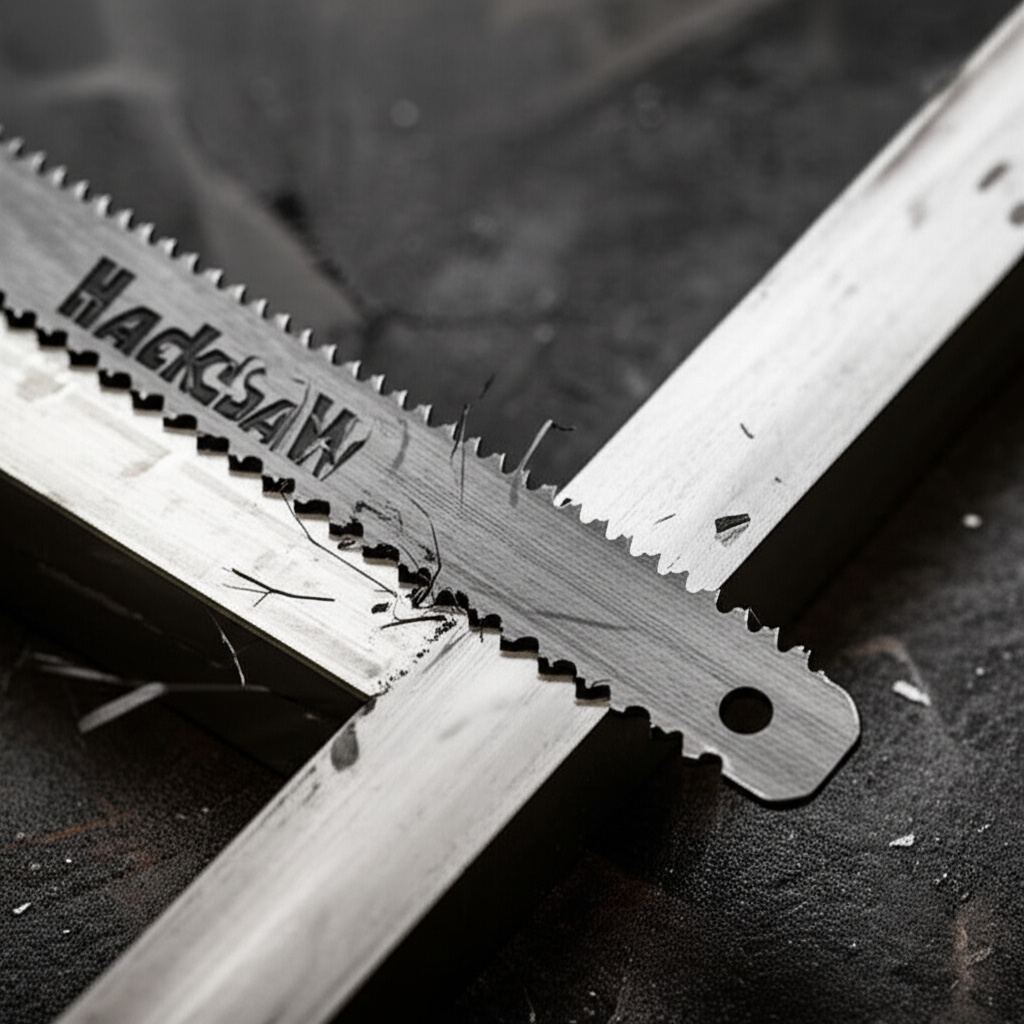
Hacksaw High Speed Steel blades offer superior durability and cutting power for metal, plastic, and even some wood. Choosing the right HSS blade ensures faster, cleaner cuts and a longer blade life, making your DIY projects smoother and more successful.
Ever grabbed a hacksaw for a quick fix, only to end up with jagged edges and a blade that’s seen better days? It’s a common frustration for anyone tackling DIY projects, from assembling furniture to repairing plumbing. The good news is, the right hacksaw blade can make a world of difference. We’re going to dive into the world of High Speed Steel (HSS) blades. They’re like the workhorses of the hacksaw blade family, built to handle tough materials. Stick with me, and by the end, you’ll know exactly why HSS blades are a game-changer and how to pick the perfect one for your next job.
What Exactly is a High Speed Steel (HSS) Hacksaw Blade?
Let’s break down what “High Speed Steel” means for your hacksaw. It’s a type of tool steel that’s specially designed to withstand the high temperatures created when cutting materials at speed. Think about it: when you saw through metal, there’s a lot of friction. This friction generates heat. If the blade isn’t made of the right stuff, it can quickly become dull, warp, or even break. HSS blades are engineered to stay sharp and strong even under these demanding conditions.
This makes them ideal for cutting materials that are harder or tougher than wood, like various types of metal (steel, aluminum, copper) and hard plastics. While you might use a simpler blade for soft woods, when you need to get through something more robust, HSS is your go-to.
Why Choose HSS Blades? Proven Performance Explained
So, why are HSS blades so popular and often recommended for serious cutting tasks? It all comes down to their “proven performance.” This isn’t just marketing speak; it’s backed by the material science and the real-world experience of countless DIYers and professionals.
- Durability and Longevity: HSS blades are significantly more durable than standard carbon steel blades. They resist wear and tear much better, meaning they stay sharp for longer. This translates to fewer blade changes and a more consistent cutting experience.
- Heat Resistance: As mentioned, HSS can handle higher temperatures without losing its hardness. This is crucial for maintaining a sharp cutting edge when cutting metals.
- Cutting Speed: Because they stay sharp and don’t overheat as easily, you can often cut through materials faster with an HSS blade. This saves you time and effort on your projects.
- Versatility: While they excel at metal, many HSS blades are also effective on plastics and even some hardwoods. This makes them a versatile addition to your toolbox.
- Cleaner Cuts: A sharp, robust blade will produce cleaner, smoother cuts. This means less finishing work for you and a more professional-looking result.
To give you a better idea of how HSS stacks up, let’s look at a comparison:
| Blade Material | Heat Resistance | Durability | Best For | Cost |
|---|---|---|---|---|
| Carbon Steel | Low | Low | Soft metals, wood, plastic | Low |
| High Speed Steel (HSS) | High | High | All metals, hard plastics, wood | Medium |
| Bi-Metal | High | Very High | Demanding metal cutting, tough materials | High |
As you can see, HSS offers a great balance of performance and cost for most general-purpose metal cutting needs. For extremely demanding tasks or very hard materials, Bi-Metal blades might be considered, but for the everyday DIYer, HSS is often the sweet spot.
Understanding Tooth Count (TPI) for HSS Blades
One of the most important factors when choosing any hacksaw blade, including HSS, is the Tooth Per Inch (TPI) count. This refers to how many teeth are packed into every inch of the blade. The TPI significantly impacts how the blade cuts and what materials it’s best suited for.
Think of TPI like this: more teeth mean finer cuts, while fewer teeth mean faster, more aggressive cuts.
Here’s a general guide:
- Low TPI (14-18 TPI): These blades have fewer, larger teeth. They are designed for cutting thicker, softer materials like thick-gauge metal pipes, rebar, or thicker plastics. The larger gullets (the space between teeth) help clear away material quickly without clogging.
- Medium TPI (24 TPI): This is often considered the all-purpose TPI. It’s a good balance for cutting medium-thickness metals (like angle iron, conduit, sheet metal) and harder plastics. It provides a reasonable cutting speed with a relatively clean finish.
- High TPI (32 TPI): These blades have many small teeth. They are ideal for cutting thin materials like sheet metal, thin-walled tubing, or very hard plastics. The fine teeth engage the material more smoothly, preventing snagging and producing a cleaner cut.
The Rule of Thumb: Always ensure you have at least two to three teeth in contact with the material you are cutting at all times. If you’re cutting a thin piece of metal, using a low TPI blade will result in teeth skipping over the thin material, leading to poor cuts and rapid tooth wear. Conversely, using a high TPI blade on thick material will clog up and cut very slowly.
For HSS blades, you’ll commonly find them in 18, 24, and 32 TPI. A 24 TPI HSS blade is a fantastic starting point for most general metal cutting tasks. If you know you’ll be working with thinner metals regularly, a 32 TPI HSS blade is a great addition. If you’re tackling thicker stock, an 18 TPI HSS blade will be more efficient.
How to Properly Use Your HSS Hacksaw Blade
Even the best HSS blade won’t perform optimally if you don’t use it correctly. Proper technique is key to getting those clean, fast cuts and ensuring your blade lasts as long as possible. Let’s walk through it step-by-step.
Step 1: Select the Right Blade and Mount It
As we’ve discussed, choose your HSS blade based on the material and its thickness (TPI). Once you have your blade, it’s time to put it in the hacksaw frame. Most hacksaws have adjustable frames, allowing you to tension the blade properly.
How to Mount the Blade:
- Loosen the wing nuts or tensioning knob on the hacksaw frame.
- Insert one end of the blade into the hook at the front of the frame.
- Insert the other end of the blade into the slot at the back of the frame.
- Crucially, ensure the teeth are pointing AWAY from you (forward). This is how the blade cuts efficiently when you push.
- Tighten the wing nuts or tensioning knob until the blade is taut. It should make a “ping” sound when plucked, similar to a guitar string. A loose blade will bend, break, or cut poorly. A blade that’s too tight can snap.
For more on blade tensioning, you can check out resources from organizations like the Occupational Safety and Health Administration (OSHA), which often provides guidelines on safe tool usage, though they might not detail hacksaw blade tensioning specifically. However, the principle of proper tool setup for safety and efficiency is universal.
Step 2: Secure Your Workpiece
This is a critical safety step. Your material needs to be held firmly so it doesn’t move while you’re cutting. A vise is the best tool for this. If you don’t have a vise, use clamps to secure the workpiece to a sturdy workbench or table.
Tips for Securing:
- Position the workpiece so that the cut line is as close to the vise jaws or clamp as possible. This minimizes vibration and makes cutting easier.
- For round materials like pipes, use a pipe vise or ensure the regular vise jaws are gripping it tightly to prevent it from rolling.
- If cutting a thin piece of metal, you might want to place a scrap piece of wood or metal underneath it to support it and prevent it from bending excessively.
Step 3: Start the Cut
Starting a cut can be tricky. You don’t want the blade to jump.
How to Start:
- Place the blade on your marked cut line.
- Hold the hacksaw with both hands, using a firm grip.
- Start with a few gentle, short strokes, guiding the blade with your index finger lightly against the blade guard (if your saw has one) or the frame. This helps to create a small notch or kerf for the blade to sit in.
- Once the blade is seated in the material, you can begin your full strokes.
Step 4: The Cutting Stroke
This is where the HSS blade shines, but technique matters.
Proper Cutting Technique:
- Use Long, Smooth Strokes: Extend the stroke as much as the blade length allows. This engages more teeth and makes the cutting more efficient.
- Apply Steady Pressure: Lean into the cut on the forward stroke (when the teeth are cutting). Use moderate pressure. Too much pressure can break the blade or strip the teeth. Too little pressure means you’re not cutting effectively and will generate more heat.
- Ease Off on the Return Stroke: Lift slightly or apply very light pressure on the backward stroke. The teeth are designed to cut on the push, not the pull. This also helps prevent clogging and tooth wear.
- Keep the Blade Straight: Try to keep the hacksaw frame perpendicular to the material. Avoid twisting or bending the blade.
- Let the Blade Do the Work: HSS blades are sharp and strong. You don’t need to force them. Let the teeth do the cutting.
Step 5: Finishing the Cut
As you get close to the end of the cut, reduce the pressure and slow down your strokes. This prevents the workpiece from breaking off abruptly, which can leave a rough edge or even injure you if a sharp piece snaps off unexpectedly.
Tips for Finishing:
- Lighten your pressure considerably.
- Take slower, more controlled strokes.
- Support the piece you are cutting off, especially if it’s long, to prevent it from bending or breaking unevenly.
Step 6: Clean Up and Blade Care
After you’re done cutting, it’s important to clean your blade and the workpiece. Brush away any metal shavings (swarf) with a brush. Inspect the blade for any damage or excessive wear. If you plan on storing the saw for a while, a light coat of oil on the blade can help prevent rust.
When to Replace Your HSS Hacksaw Blade
Even HSS blades don’t last forever. Knowing when to replace yours will save you frustration and ensure you continue to get good results. Here are the signs:
- Dulling: The most obvious sign is when the blade starts taking much longer to cut through material, or you have to apply significantly more force.
- Stripped Teeth: If you notice teeth are missing or look rounded off, the blade is no longer effective.
- Excessive Heat: If the blade feels excessively hot to the touch even with proper technique, it might be dulling and creating more friction.
- Poor Cut Quality: If your cuts are becoming rough, jagged, or you’re experiencing more “catching” or snagging, the blade is likely worn out.
- Blade Breakage: While less common with proper tensioning, a blade that repeatedly bends or breaks is either being misused or is worn out and brittle.
Replacing a hacksaw blade is simple. Just loosen the tension, remove the old blade, and insert a new one following the steps above. It’s a small investment that makes a big difference in your cutting performance.
Common Materials You Can Cut with HSS Blades
HSS blades are incredibly versatile, making them a staple for anyone working with various materials. Here’s a look at what they’re great for:
| Material Type | Examples | Recommended TPI (General) | Notes |
|---|---|---|---|
| Ferrous Metals | Steel, Iron, Cast Iron | 18-24 TPI | Lubrication (like cutting oil) can help with heat and wear. |
| Non-Ferrous Metals | Aluminum, Copper, Brass, Bronze | 24-32 TPI | Softer than steel, so finer teeth can work well. |
| Thin Sheet Metal | Steel or Aluminum Sheet (up to ~1/8″ thick) | 32 TPI | Essential to have enough teeth engaged. |
| Metal Tubing & Conduit | EMT conduit, steel pipe, aluminum tubing | 18-24 TPI (depending on wall thickness) | Use a vise to prevent crushing thin-walled tubing. |
| Hard Plastics | PVC (thicker), ABS, Acrylic, Polycarbonate | 24-32 TPI | Avoid melting by using moderate speed and pressure. |
| Wood (Hardwoods) | Oak, Maple, Walnut (for rough cuts) | 18-24 TPI | While specialized wood saws are better, HSS can handle hardwoods in a pinch, especially for smaller projects where a fine finish isn’t critical. Clean teeth regularly. |
It’s worth noting that while HSS can cut wood, it’s not ideal. Wood cutting blades have larger, more aggressive teeth designed to clear sawdust. Using an HSS blade on wood will work, but it might be slower and produce a rougher cut than a wood saw blade. However, for mixed-material projects or when you only have one saw, an HSS blade is a capable option for many common DIY materials.
Tips for Extending the Life of Your HSS Blades
You’ve invested in good HSS blades, so let’s make them last! Proper care and usage are key.
- Use the Correct TPI: We’ve covered this, but it’s worth repeating. Using the wrong TPI is one of the fastest ways to ruin a blade.
- Proper Tension: A blade that’s too loose will bend and break. A blade that’s too tight can snap. Aim for that “ping” sound.
- Lubrication: For metal cutting, especially steel, using a cutting fluid or oil can significantly reduce friction and heat. This keeps the teeth sharper for longer and makes cutting smoother.
- Clean Strokes: Let the blade do the work. Avoid excessive force or jerky movements.
- Keep it Clean: After use, brush off metal shavings. If storing for a long time, a light wipe with an oily rag can prevent rust.
- Don’t Force It: If you’re struggling to cut, check your technique, blade tension, or TPI. Forcing a dull or inappropriate blade will only damage it further.
- Avoid Hitting Other Materials: Be mindful of what you’re cutting. Hitting nails in wood, concrete, or other hard objects will instantly dull or break your HSS teeth.
For more detailed information on cutting fluids and their applications in metalworking, you can refer to resources from reputable metalworking supply companies or educational sites focusing on machining. For instance, many metal fabrication guides will discuss the importance of coolants and lubricants.
Frequently Asked Questions (FAQs)
Q1: Can I use HSS blades on wood?
A1: Yes, you can use HSS blades on wood, especially harder woods. However, they are not optimized for wood cutting. Wood saw blades have larger, more aggressive teeth designed to clear
Samuel H. Murphy is DIY expert and Interior Designer. He is also a part time content writer of Capische. He lives in Warren city, Michigan. He test tools like drill, saw, sander, air compressor etc and helps readers to find out the best tools.