
Changing the direction of a drill machine is simple. It involves just a few steps.
Whether you’re a DIY enthusiast or a professional, knowing how to change the direction of a drill can save you time and effort. This function is crucial for both drilling and removing screws. Understanding this feature enhances your tool’s versatility, making your work smoother.
In this guide, we’ll explore the easy steps to switch your drill’s direction. You’ll learn how to identify the controls and make the switch safely. This skill is essential for anyone working with power tools. Let’s dive in and simplify the process for you.
Types Of Drill Machines
Drill machines are essential tools for both professionals and DIY enthusiasts. Knowing the types of drill machines helps you choose the right one for your project. In this section, we’ll explore two main types: corded and cordless drills.
Corded Drills
Corded drills are powerful and reliable. They plug into a power outlet. This means you get consistent power. They are ideal for heavy-duty tasks. You don’t need to worry about battery life. Corded drills are usually lighter because they don’t have a battery. They are perfect for long drilling sessions. If you need constant power, a corded drill is a great choice.
Cordless Drills
Cordless drills offer flexibility and convenience. They run on rechargeable batteries. You can use them anywhere, without worrying about power outlets. They are great for tight spaces. Cordless drills come in various battery sizes. Choose a higher voltage for more power. Modern batteries last longer and charge faster. For small to medium tasks, cordless drills are ideal. They are easy to carry and store. If you need mobility, go for a cordless drill.
Tools And Materials Needed
Changing the direction of a drill machine is a simple task. It requires the right tools and materials. This section provides a detailed list of essential tools and recommended accessories to make the process easier.
Essential Tools
- Drill Machine: Ensure it is in good working condition.
- Manual: The user manual for your specific drill model.
- Screwdriver: Useful for removing any screws or fasteners.
- Safety Glasses: Protect your eyes from debris.
- Work Gloves: Protect your hands while handling tools.
Recommended Accessories
- Lubricant: Helps keep the drill’s moving parts smooth.
- Spare Batteries: Ensure you have extra power ready.
- Cleaning Cloth: Wipe down the drill and keep it clean.
- Storage Case: Keep all tools and accessories organized.
By having these tools and accessories ready, you can change the direction of your drill machine quickly and safely.
Pre-change Preparations
Before changing the direction of your drill machine, it’s essential to make some key preparations. These steps ensure safety and efficiency. They also prevent potential damage to your tool. Let’s start with the basic checks.
Inspecting The Drill
First, inspect the drill carefully. Look for any visible damage. Check for cracks, frayed wires, or loose parts. A damaged drill can be dangerous. Ensure all parts are in good condition. This step helps avoid accidents during use.
Next, examine the drill bit. Make sure it is suitable for the task. The bit should be sharp and free from rust. A dull or rusted bit can break easily. It also affects the quality of your work.
| Inspection Checklist | Status |
|---|---|
| Check for visible damage | ✔️ |
| Inspect the drill bit | ✔️ |
| Ensure all parts are tight | ✔️ |
Ensuring Power Off
Before making any changes, ensure the power is off. Unplug the drill from the power source. For battery-powered drills, remove the battery. This step is crucial for your safety.
Verify the power switch is in the off position. This prevents accidental activation. It also protects you from unexpected movements.
Follow these simple steps to ensure the drill is safe to handle:
- Unplug the drill or remove the battery
- Check the power switch
- Ensure the drill is completely off
By following these pre-change preparations, you can ensure a safer and more efficient process. Always prioritize safety first.
Changing Direction On Corded Drill
Changing the direction of a corded drill can be useful for various tasks. Sometimes, you need to reverse the drill bit to remove screws or back out of a hole. This guide will help you understand how to change the direction on a corded drill easily.
Locating The Direction Switch
The direction switch is usually found above the trigger. It’s a small lever or button. Look for a switch with forward and backward arrows.
Make sure your drill is unplugged before you locate the switch. This ensures safety while handling the tool.
Switching To Reverse
Once you locate the direction switch, push it to the reverse position. This is usually marked with an arrow pointing backward.
After switching to reverse, plug in the drill. Squeeze the trigger to test if the drill bit turns counterclockwise. If it does, your drill is now in reverse mode.
To switch back to forward, just push the switch to the forward position. The arrow should point forward. Test the drill again to ensure it turns clockwise.
Remember these simple steps to change the direction of your corded drill:
- Locate the direction switch above the trigger.
- Ensure the drill is unplugged.
- Push the switch to the reverse position.
- Plug in the drill and test the reverse direction.
- Switch back to forward if needed.
Changing the direction on a corded drill is easy. Just follow these steps for safe and efficient use.
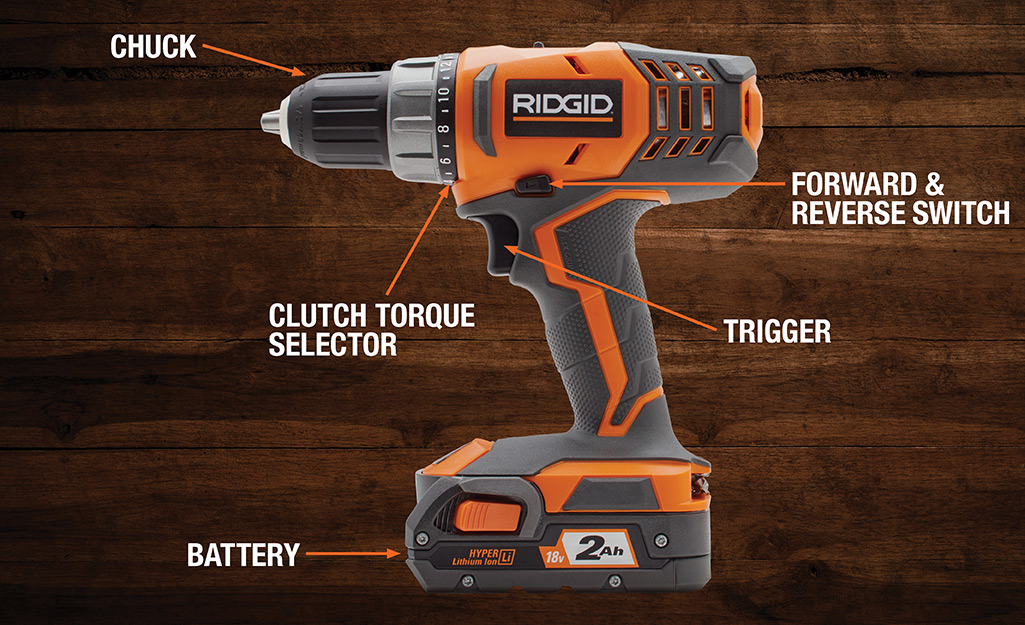
Changing Direction On Cordless Drill
Changing the direction of your cordless drill can be essential for various tasks. Whether you need to remove screws or switch between drilling and driving, understanding this feature is crucial. This guide will help you navigate this function with ease. Let’s dive into the steps involved in changing the direction on a cordless drill.
Identifying The Reverse Button
First, locate the reverse button on your cordless drill. This button is usually near the trigger. It is often marked with an arrow or a small icon. The icon shows the direction the drill will spin. Look for this symbol to ensure you are pressing the right button.
Activating Reverse Mode
Now, press the reverse button to change the direction. You should hear a click, indicating the mode has changed. Squeeze the trigger to test the new direction. The drill bit should now spin counterclockwise. If it doesn’t, press the button again and test it.
With these simple steps, you can easily change the direction of your cordless drill. This skill will make your tasks more efficient and manageable. Happy drilling!

Credit: www.elephant-cnc.com
Testing The Direction Change
Testing the direction change of your drill machine is crucial. It ensures the tool operates correctly. This step verifies that the drill bit spins in the intended direction. Follow these simple steps to ensure the direction change is successful.
Powering On The Drill
Start by plugging in the drill or inserting the battery. Ensure the power source is secure. Turn on the drill using the power switch. Listen for a steady hum. This indicates the drill is functioning properly.
Checking Rotation
Next, hold the drill firmly. Press the trigger lightly. Observe the direction of the drill bit. For forward rotation, the bit should turn clockwise. For reverse rotation, it should turn counterclockwise. Release the trigger and check again. Ensure the direction matches your selection.
Troubleshooting Common Issues
Having trouble with your drill machine can be frustrating. When you need to change the direction of your drill, it’s important to know how to troubleshoot common issues. Let’s look at some common problems and how to fix them.
Drill Not Switching
If your drill is not switching directions, check these points:
- Ensure the drill is turned off before inspecting.
- Check the direction switch for any debris. Clean it if necessary.
- Verify the battery is charged and properly connected.
- If the switch is loose, tighten it gently.
Use a multimeter to check if the switch is functioning. If the switch is faulty, consider replacing it.
Unusual Noises
Unusual noises can indicate problems with your drill. Follow these steps:
- Turn off the drill and unplug it.
- Inspect the chuck and make sure it is tightened.
- Check for any visible damage or wear on the drill bit.
- Listen for grinding sounds. This may mean internal damage.
If you hear continuous unusual noises, contact a professional. Regular maintenance can prevent many issues.
| Problem | Possible Cause | Solution |
|---|---|---|
| Drill not switching | Dirty switch | Clean the switch |
| Unusual noises | Loose chuck | Tighten the chuck |
| Drill not switching | Faulty switch | Replace the switch |
Credit: www.homedepot.com
Maintenance Tips
Maintaining your drill machine is crucial for ensuring its longevity and optimal performance. Regular maintenance not only extends the life of your tool but also ensures safety and efficiency. Below are some essential tips to keep your drill machine in top condition.
Regular Cleaning
Dust and debris can accumulate in your drill machine over time. Clean your drill regularly to prevent clogging and ensure smooth operation. Use a soft brush or a cloth to remove dirt from the vents and other parts. Avoid using water or harsh chemicals that could damage the machine.
Proper Storage
Store your drill in a dry and cool place. Avoid exposing it to moisture or extreme temperatures. Use a case or a toolbox to protect it from dust and impacts. Proper storage can significantly extend the life of your drill machine.

Credit: www.youtube.com
Frequently Asked Questions
How Do You Reverse A Drill Machine?
To reverse a drill machine, locate the forward/reverse switch. Switch it to the opposite direction. This usually reverses the drill’s rotation.
What Is The Forward/reverse Switch?
The forward/reverse switch is a control on the drill. It changes the rotation direction of the drill bit.
Why Change The Direction Of A Drill?
Changing the drill direction is useful for removing screws. It also helps when the drill bit gets stuck.
Can All Drills Change Direction?
Most modern drills have a forward/reverse switch. Check your drill’s manual to confirm if it has this feature.
Conclusion
Changing the drill machine’s direction is simple with these steps. Ensure your drill is off and unplugged. Locate the directional switch, usually near the trigger. Switch it to the desired direction. Practice a few times to get comfortable. Remember, safety first.
Always wear protective gear. A well-maintained drill lasts longer and works better. Keep practicing, and soon, you’ll find it easy. Happy drilling!